Creating a Calendar
A Calendar in QuantixOne defines a bookable schedule — it sets the meeting type, team members, availability rules, and who can book it. You can create multiple calendars for different purposes, such as a discovery call calendar, a group training session, or a round-robin team calendar.
Opening Calendar Settings
From the Calendar section, click the Settings dropdown in the top navigation and select Calendars Settings.
 The Calendars Settings page lists all your existing calendars. Click Create Calendar to add a new one.
Creating a New Calendar
Click the Create Calendar button in the top-right corner of the Calendars Settings page.
 Click Create Calendar to begin the calendar creation flow.
A Choose Calendar Type dialog will appear first. Select the type that matches your use case, then proceed to the setup form.
Step 1 — Choose a Calendar Type
QuantixOne offers the following calendar types:
| Type | Description |
|---|---|
| Personal Booking | One-on-one meetings. One host, one client per slot. |
| Round Robin | Distributes appointments across multiple team members based on priority and availability. |
| Class Booking | One host with multiple attendees in the same slot (e.g., group training, webinars). |
| Collective Booking | Multiple hosts must all be available for a slot to appear (e.g., panel interviews). |
Note: Collective Booking and other advanced types may appear as coming soon depending on your account.
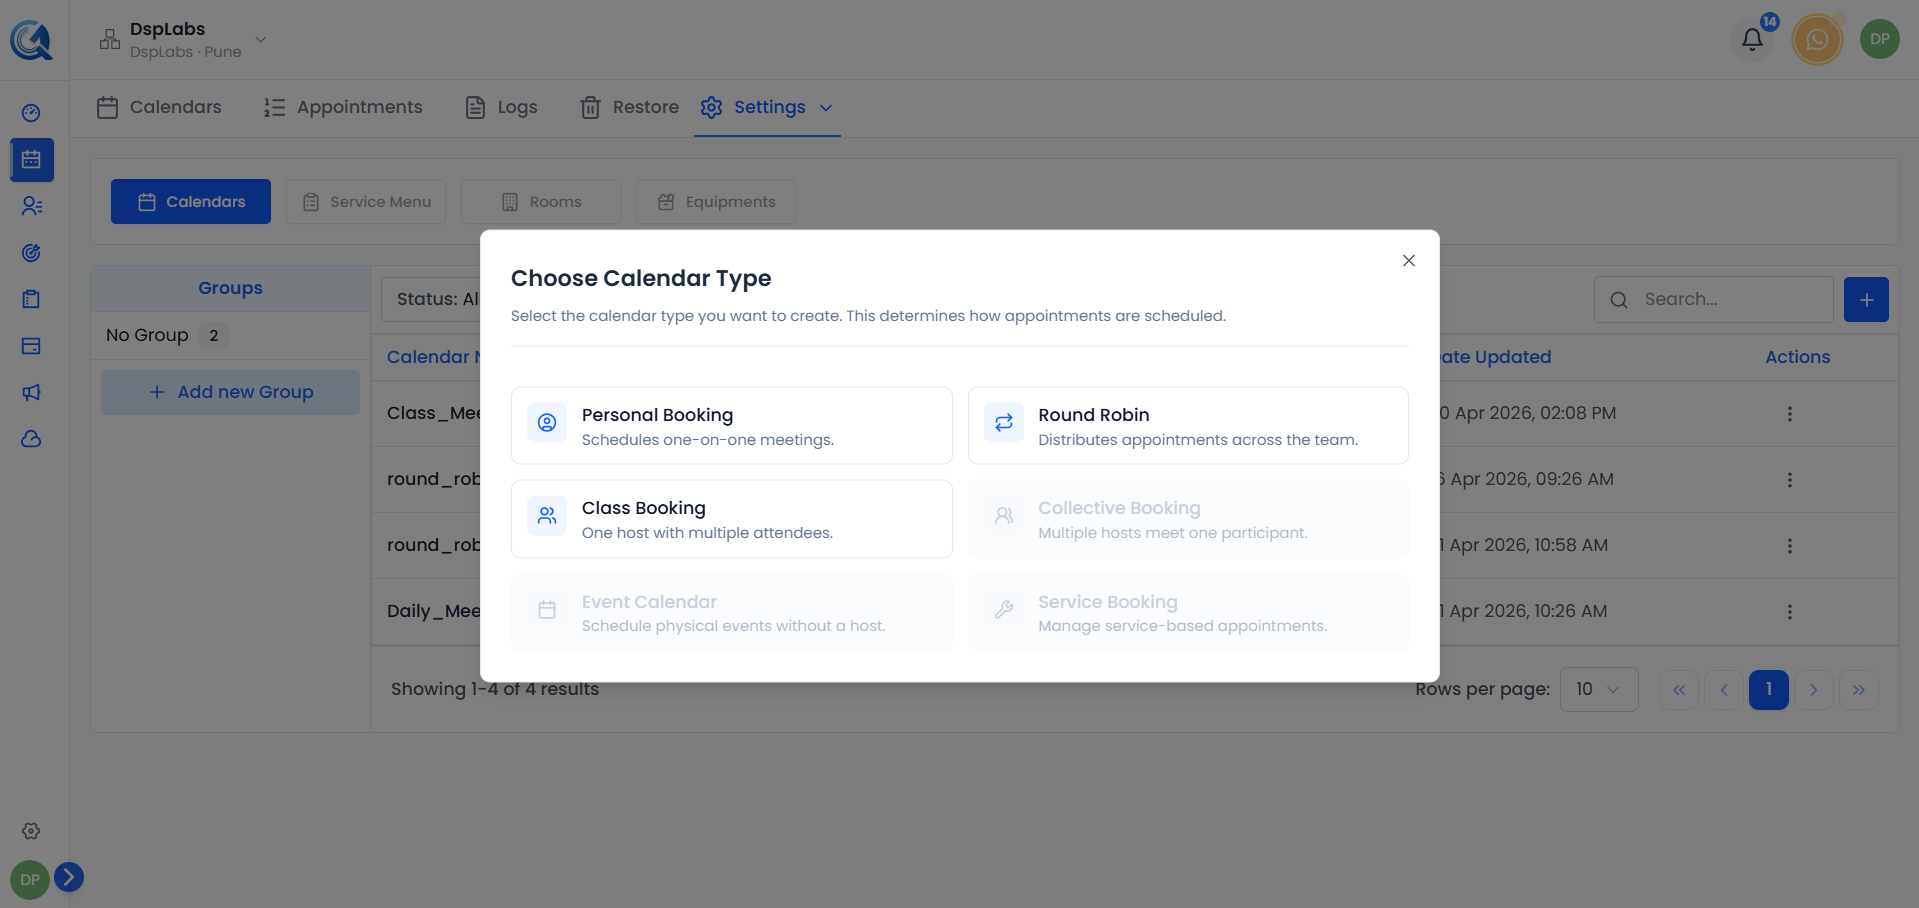 Select the calendar type that fits your scheduling workflow, then click to proceed.
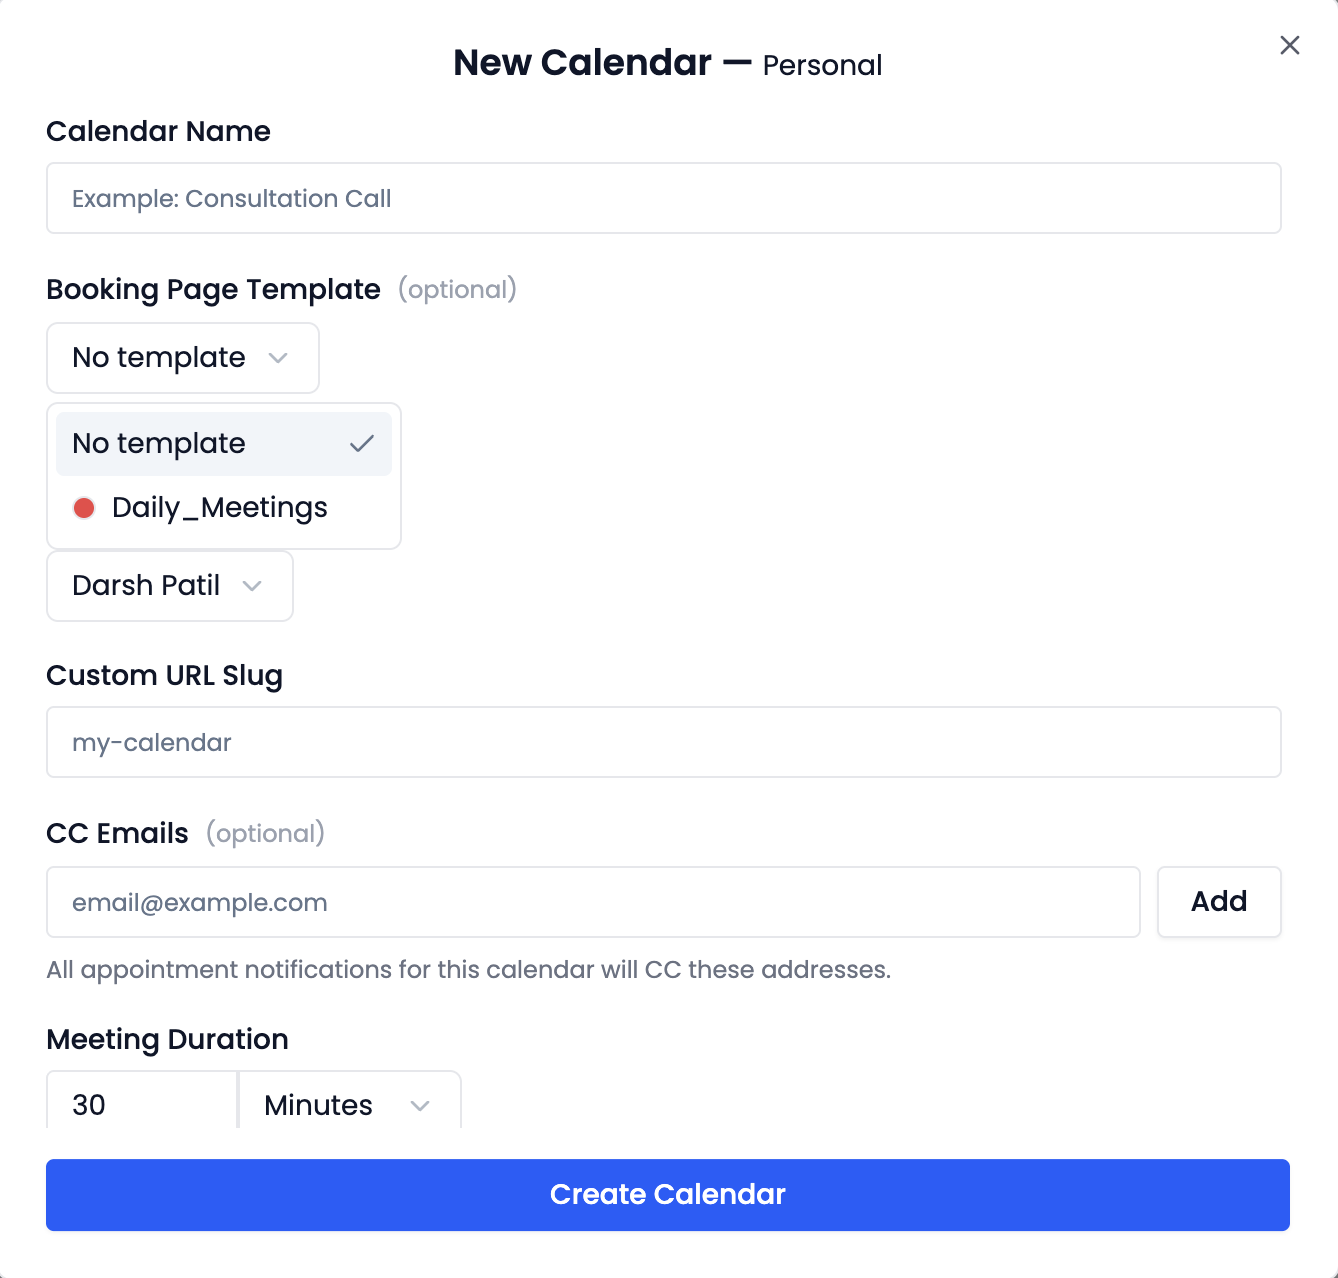
Step 2 — Fill In Calendar Details
After selecting a type, a setup form appears. Fill in the following:
Select a Template
At the top of the form you can pick a Template to apply to this calendar's booking page. A template pre-fills the calendar's primary color, background color, and button text so every calendar that uses the same template looks consistent on the public booking page.
 Pick a template to apply your brand styling. Leave this empty if you want to set colors manually.
Tip: Templates are managed under Calendar Settings → Templates. See Calendar Templates for how to create and edit them.
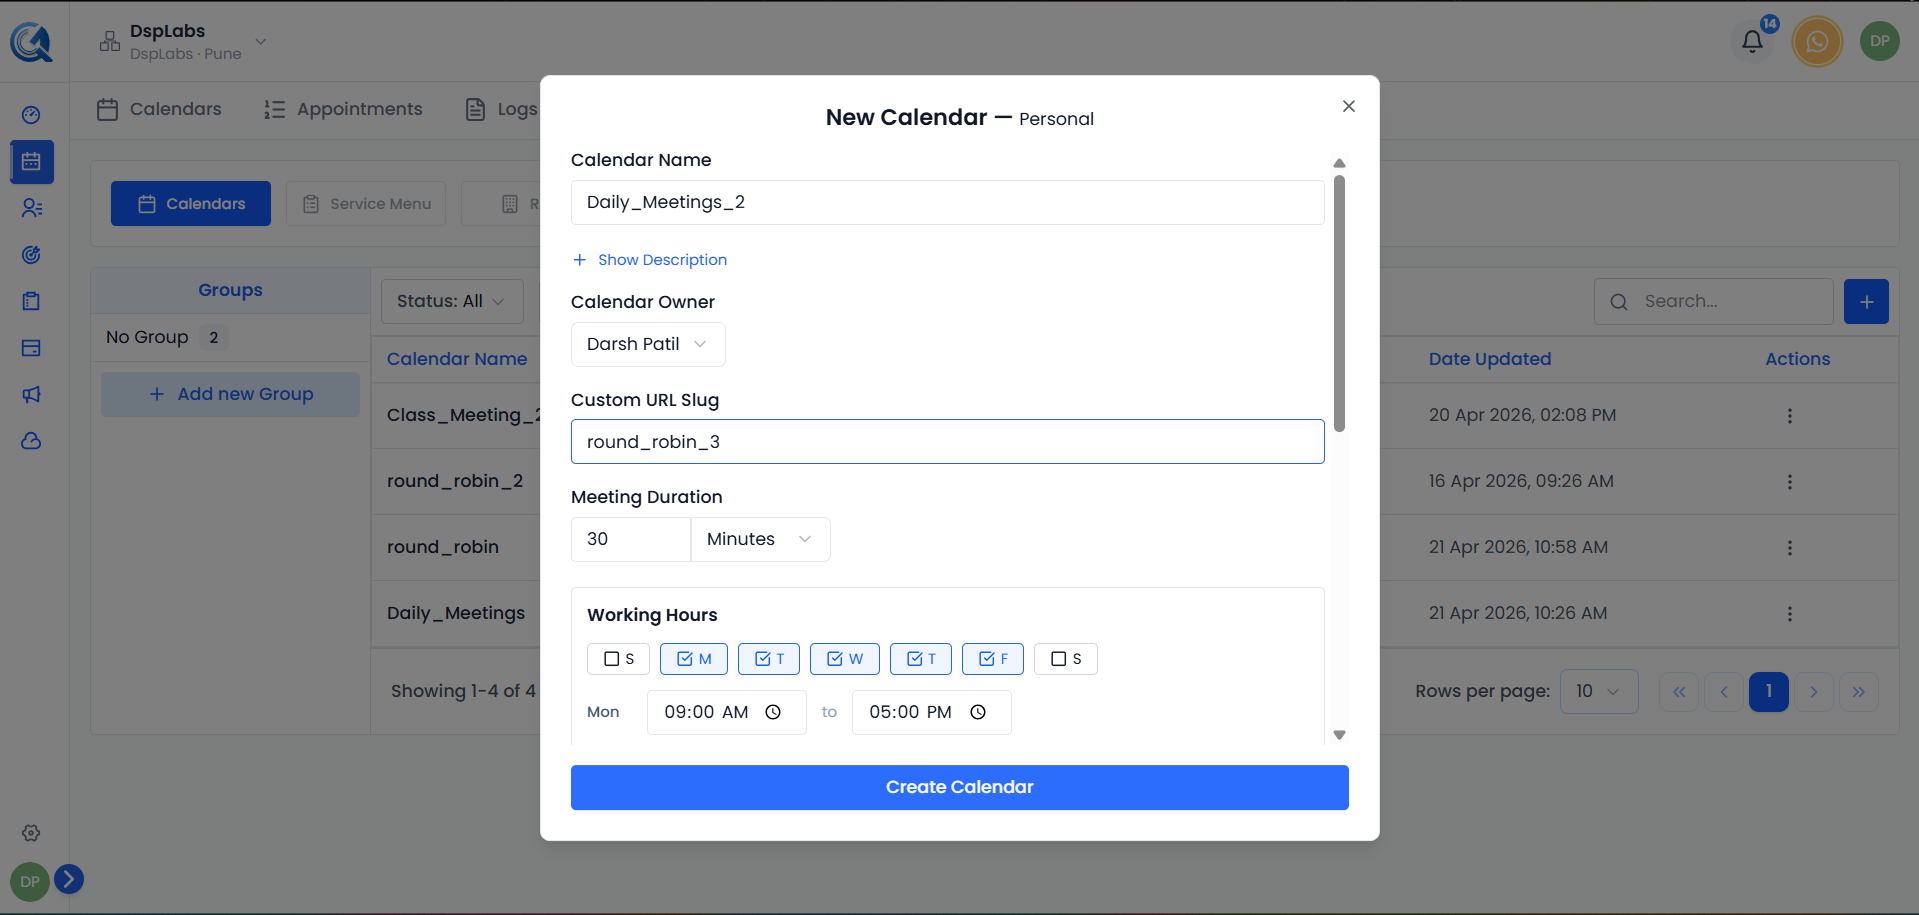
Calendar Name
Enter a descriptive name for this calendar. This name is visible to clients on the booking page (e.g., "Discovery Call", "30-Minute Consultation").
Widget Slug (Booking URL)
Every calendar gets a unique Widget Slug — the last part of the public booking URL that clients use to self-book. It is auto-generated from the calendar name, but you can edit it.
 Edit the slug to create a cleaner URL (e.g.,
 discovery-call). If the slug is already taken, the field will show an invalid indicator in red.
Slot Duration
Set the default length of each appointment (e.g., 30 mins, 1 hour). This is how long each booked meeting lasts.
Slot Interval
How frequently available time slots appear on the booking page. For example, a 15-minute interval shows slots at 9:00, 9:15, 9:30, and so on.
Slot Pre-Buffer and Post-Buffer
Add padding before and after each appointment to prevent back-to-back bookings.
Minimum Booking Notice
The minimum time a client must give before booking. For example, 2 hours means no same-day last-minute bookings within 2 hours.
Maximum Advance Booking
How far in the future a client can book. For example, 30 days limits bookings to the next 30 days.
Max Bookings Per Slot
For Class Booking calendars, this sets the maximum number of attendees who can join the same time slot.
Max Bookings Per Day
The maximum total appointments that can be booked on this calendar in a single day.
Team Members
Add the team members who will be on this calendar. For Round Robin calendars, you can also set each member's priority (High or Low).
CC Emails
Add email addresses that should be CC'd on every notification sent from this calendar — booking confirmations, reschedules, cancellations, and reminders. Useful when an assistant, ops team, or shared inbox needs to track every appointment on the calendar without being a team member.
To add an address, type it in the CC Emails field and press Enter or comma. Each address appears as a chip below the input. Click the × on a chip to remove an address.
 CC'd addresses receive a copy of every notification email this calendar sends.
Note: CC Emails are applied at the calendar level — they apply to all bookings on this calendar. If you need to CC someone on a specific appointment only, add them as a guest on that appointment instead.
Custom Booking Form Fields
By default, the public booking page asks the client for name, email, and phone number. You can add custom fields to capture anything else you need — a company name, a topic dropdown, a "How did you hear about us?" question, a consent checkbox, and so on.
Click Add Field in the Booking Form section to open the field editor.
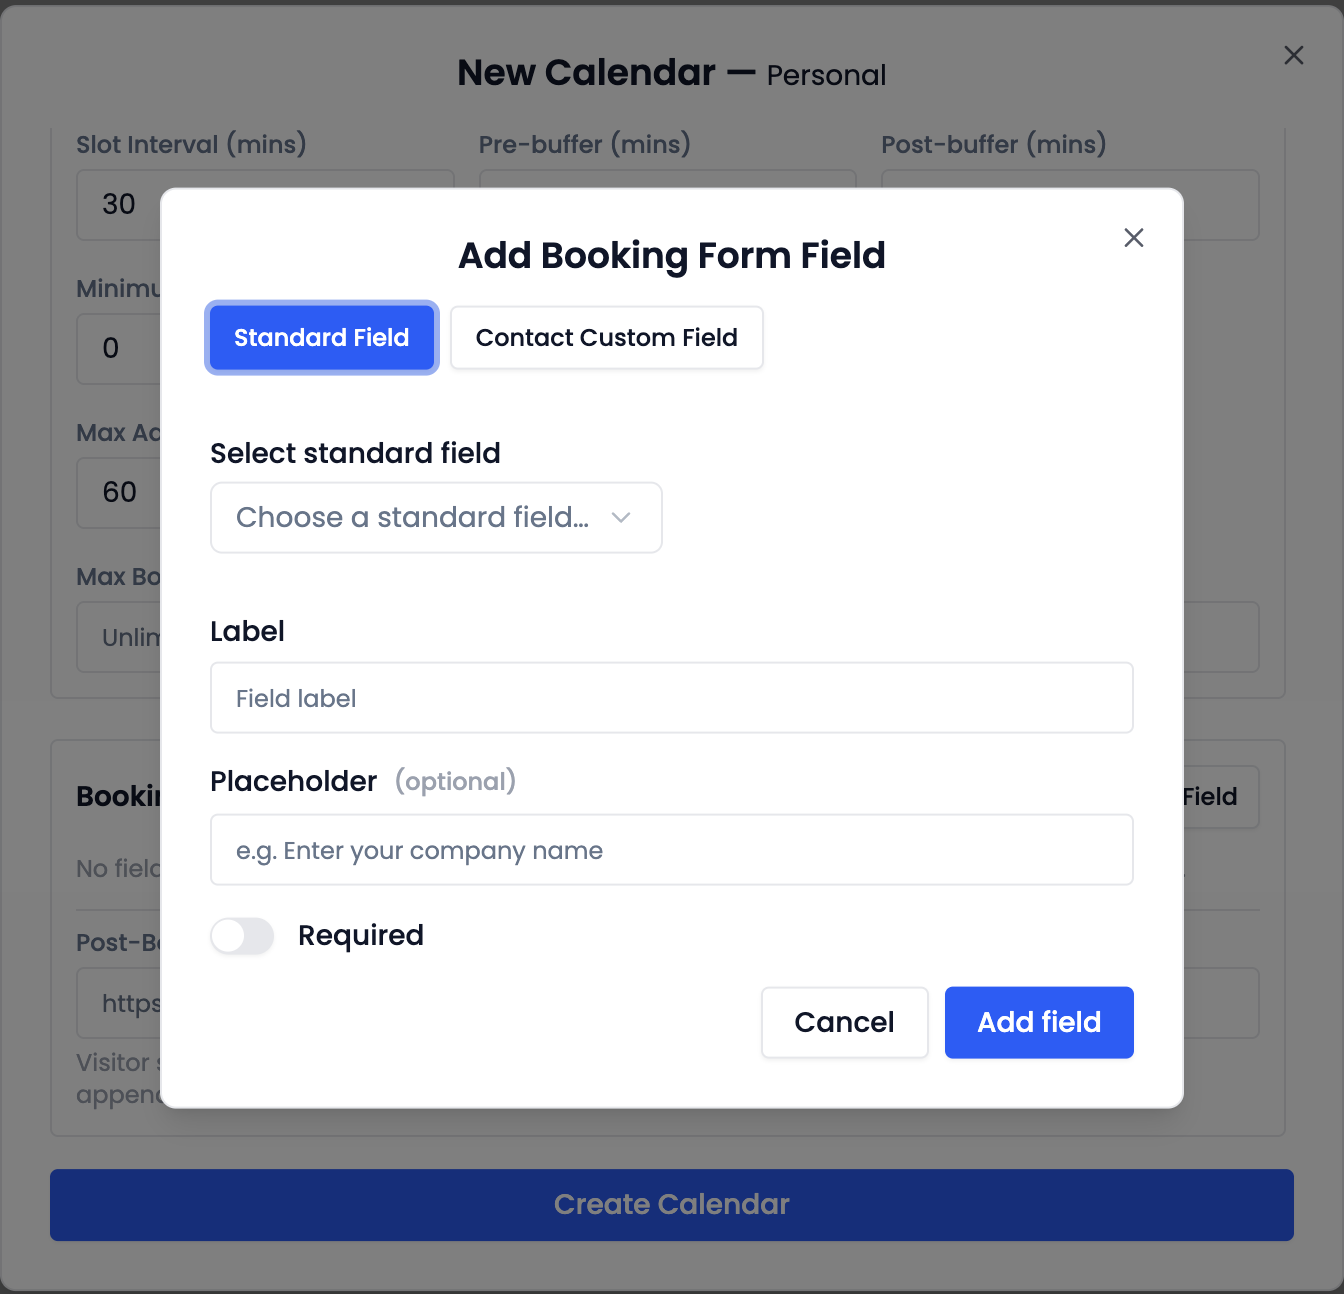 Add a custom field, choose its type, and optionally map it to a contact field.
For each field you can configure:
| Setting | Description |
|---|---|
| Field Type | text, textarea, email, phone, number, date, dropdown (single or multi-select), or checkbox. |
| Label | The question the client sees on the booking page (e.g., "Company name"). |
| Field Key | A short identifier used in the API and exports. Auto-generated from the label; can be edited. |
| Placeholder | Optional helper text shown inside the input before the client types. |
| Required | If on, the client cannot submit the booking until this field is filled. |
| Options | For dropdown fields, the list of choices the client can pick from. |
| Contact Mapping | Optionally map this field to a standard contact field (Name, Email, Phone, Notes) or to a custom contact field. The booker's input then flows directly into the contact record. |
Fields appear on the public booking page in the order they are listed. Drag a field's handle to reorder it.
Where the data shows up: Values captured at booking are visible on the appointment's Form tab in the Appointments view. See Appointments → Viewing Appointment Details.
Open Hours
Set the days of the week and time ranges when this calendar is open for bookings.
Reschedule & Cancellation Policies
Control whether clients can reschedule or cancel their own bookings, and how close to the start time they're allowed to do so. Each policy has the same shape:
- Enabled — turn the policy on for clients to self-serve.
- Window — a value plus a unit (e.g., 2 hours, 1 day) before the meeting starts. Outside the window, the action is allowed; inside it, the action is blocked.
- Message — the text the client sees if they try to reschedule or cancel after the window has closed (e.g., "Reschedules are not allowed within 2 hours of the meeting.").
 Set the window and the message clients see if they try to reschedule or cancel too close to the meeting.
Tip: The reschedule and cancel buttons that clients see on confirmation emails and the booking-success page automatically respect these policies.
Saving the Calendar
Once all details are filled in, click Save to create the calendar.
 Click Save to create the calendar. You can further configure it at any time from the Calendar Settings edit form.
After saving, the calendar appears in your Calendars list. You can now share its booking link with clients, configure notifications, or set up Google or Outlook sync.
Who can see this calendar? Only you (the creator), the team members you added, and org admins can see, edit, or delete it. Other users in your organization will not see this calendar in their list. See Calendar Overview → Calendar Access & Permissions for the full rules.
Video Walkthrough
Watch the step-by-step video below to see how to create a new calendar in QuantixOne.