Zoom Integration
QuantixOne uses a dedicated pool of Zoom accounts to power video meetings for paid users. Instead of using your personal Zoom account, QuantixOne provides you with pre-licensed Zoom accounts that you connect to your location. Once connected, these accounts are used automatically to generate a Zoom meeting link for every appointment — no manual setup needed per booking.
How It Works (Overview)
When you book an appointment through QuantixOne, no Zoom link is created immediately. Instead, the system waits until 10 minutes before the meeting starts, then automatically:
- Picks an available Zoom account from your connected pool.
- Creates a Zoom meeting under that account.
- Sends the Zoom join link to your client via email.
- Displays the meeting link on the appointment detail in your QuantixOne dashboard.
This approach keeps Zoom resources free until they are actually needed, and ensures every meeting gets a fresh, dedicated link right before it starts.
Step 1 — Get Your Pool Zoom Account Credentials
QuantixOne provides you with one or more dedicated Zoom account credentials (email and password) as part of your paid plan. These are separate from your personal Zoom account — they are accounts managed by QuantixOne specifically for running your meetings.
Note: If you have not received your Zoom pool account credentials yet, contact your QuantixOne account manager or support team.
Step 2 — Connect the Pool Account
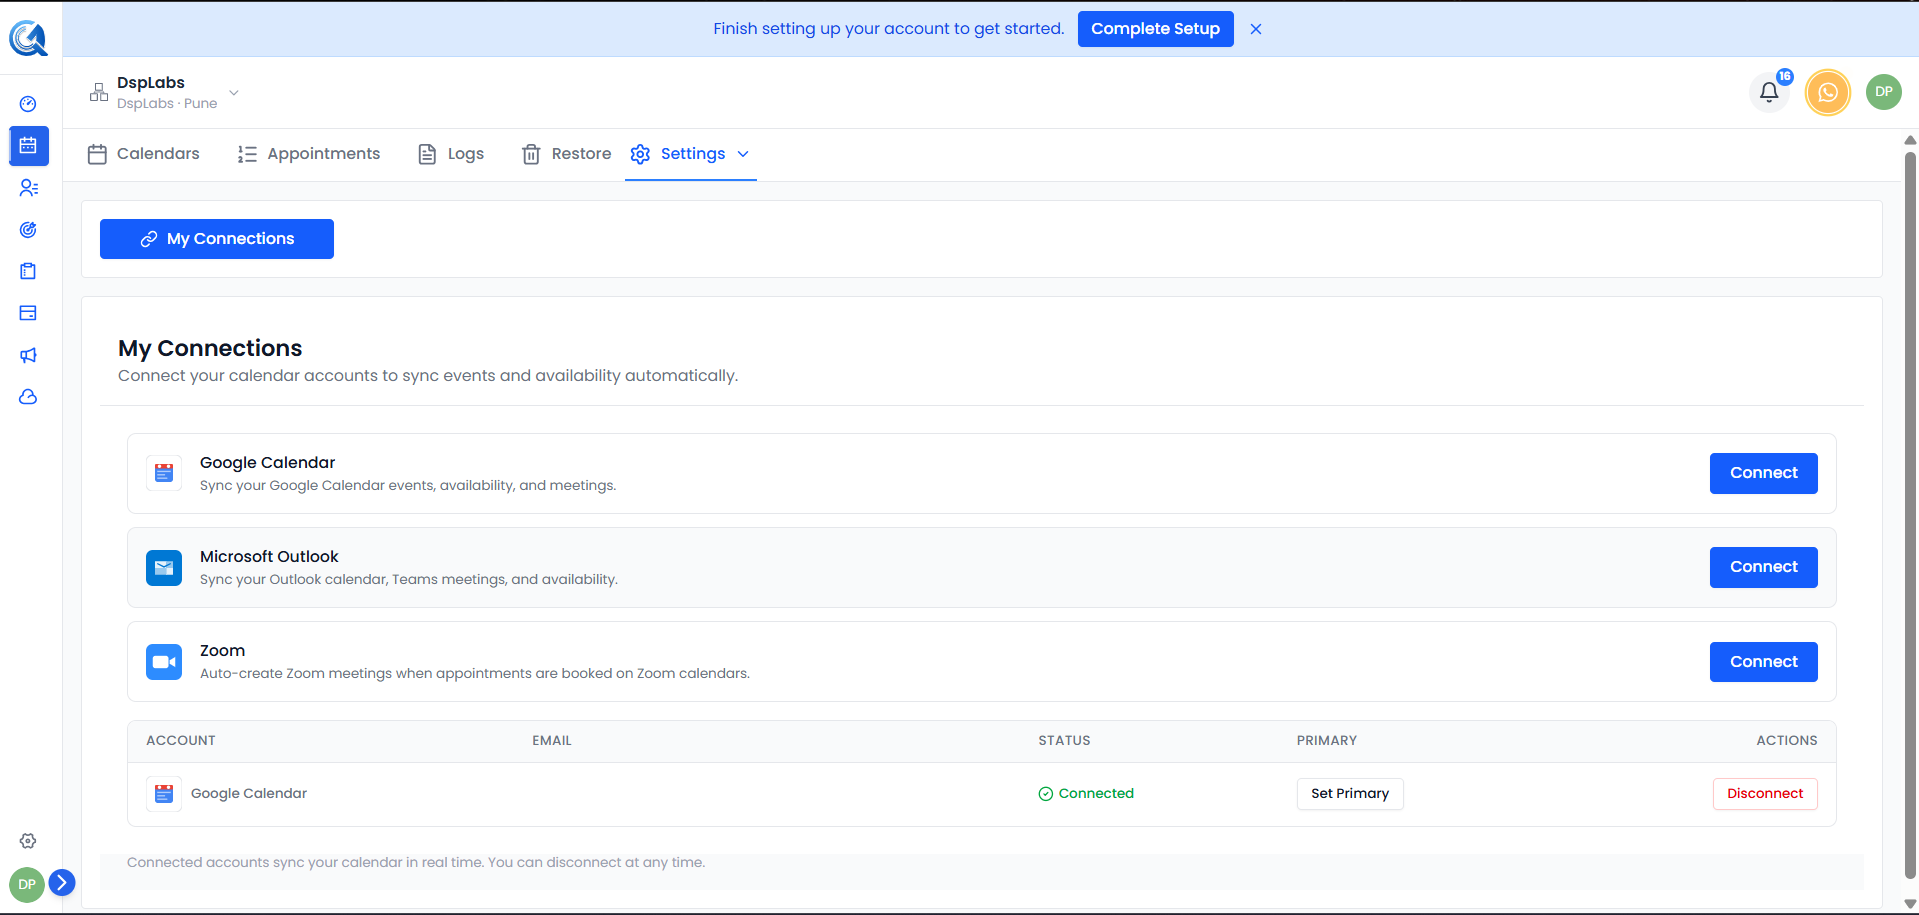
From the Calendar section, click the Settings dropdown in the top navigation and select Connections.
On the My Connections page, click Connect on the Zoom card.
 Click Connect on the Zoom card to begin the OAuth authorisation flow.
A Zoom sign-in window will open. Log in using the pool account credentials provided by QuantixOne (not your personal Zoom account), then click Allow to grant QuantixOne permission to create and manage meetings.
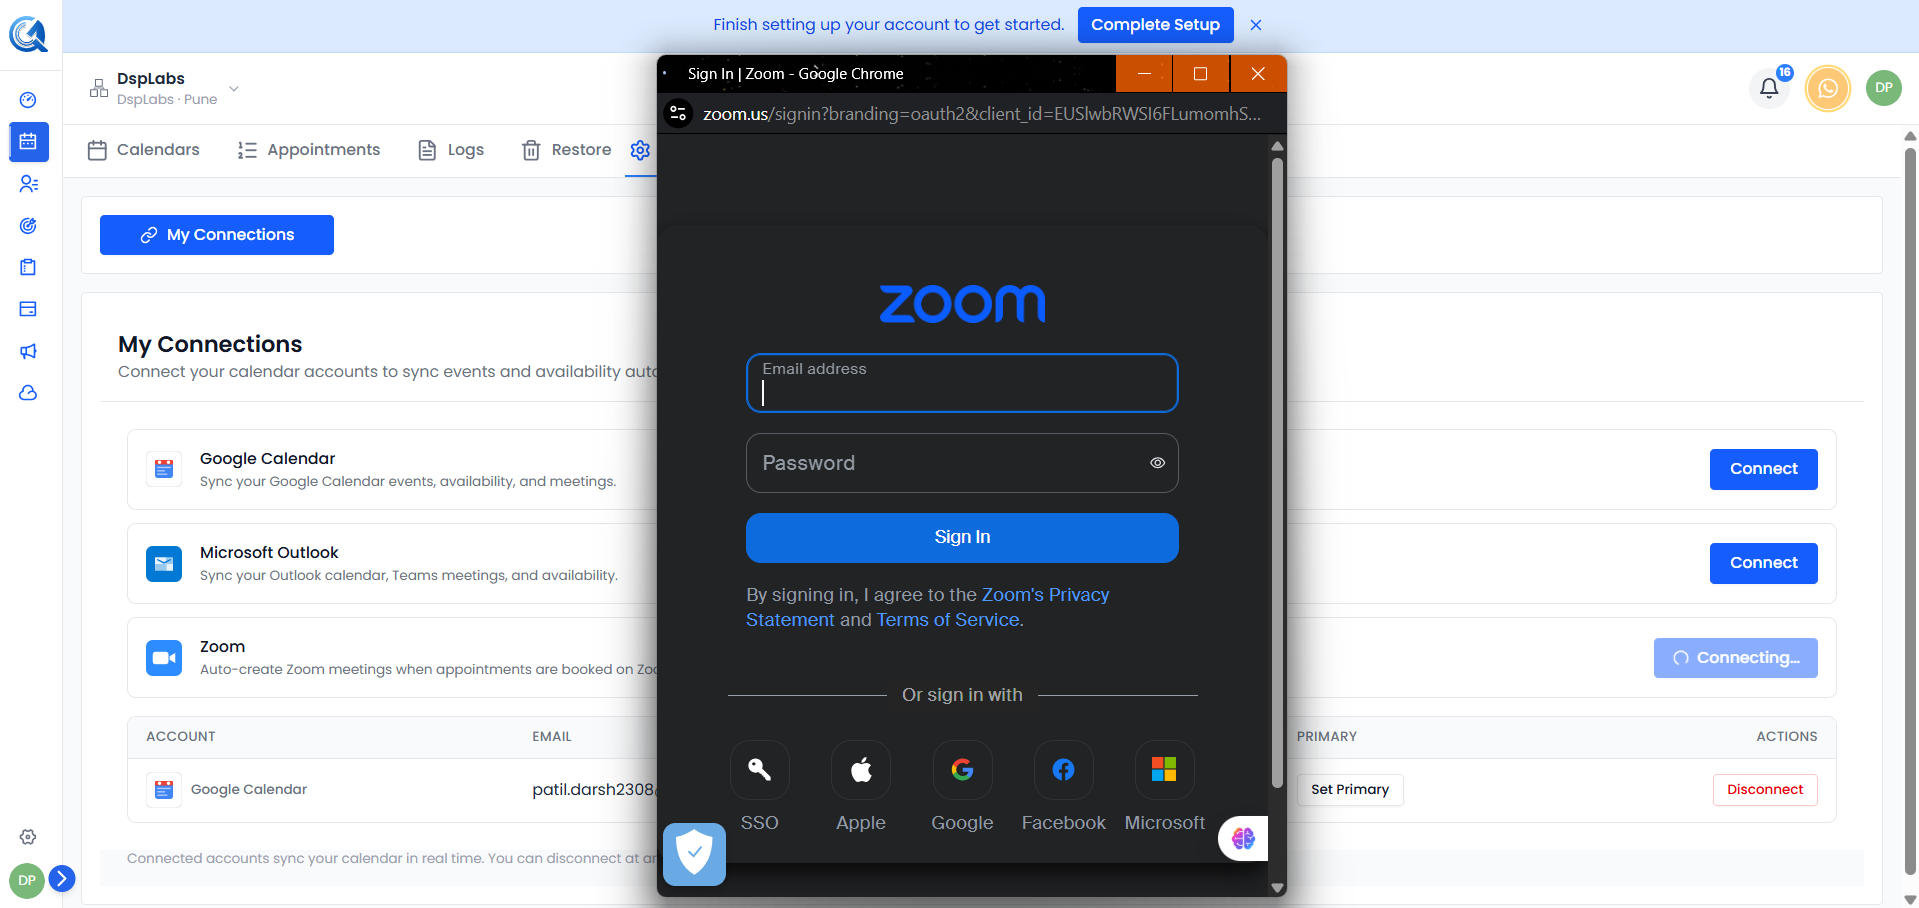 Log in with the Zoom pool account credentials and click Allow.
Once authorised, the pool account appears in the connected accounts table with a Connected status.
 The Zoom pool account is active. It will now be used to generate meeting links for your appointments.
Tip: If QuantixOne has provided you with more than one pool account, connect each one by repeating this step. Having multiple pool accounts connected means the system can run several meetings simultaneously without any conflict.
Step 3 — Enable Zoom on a Calendar
For Zoom links to be generated, Zoom must be set as the meeting location on the specific calendar.
- Open Calendar Settings and click on the calendar you want to configure.
- In the calendar edit form, go to the Meeting Details section.
- In the Meeting Location field, select Zoom.
- Click Save.
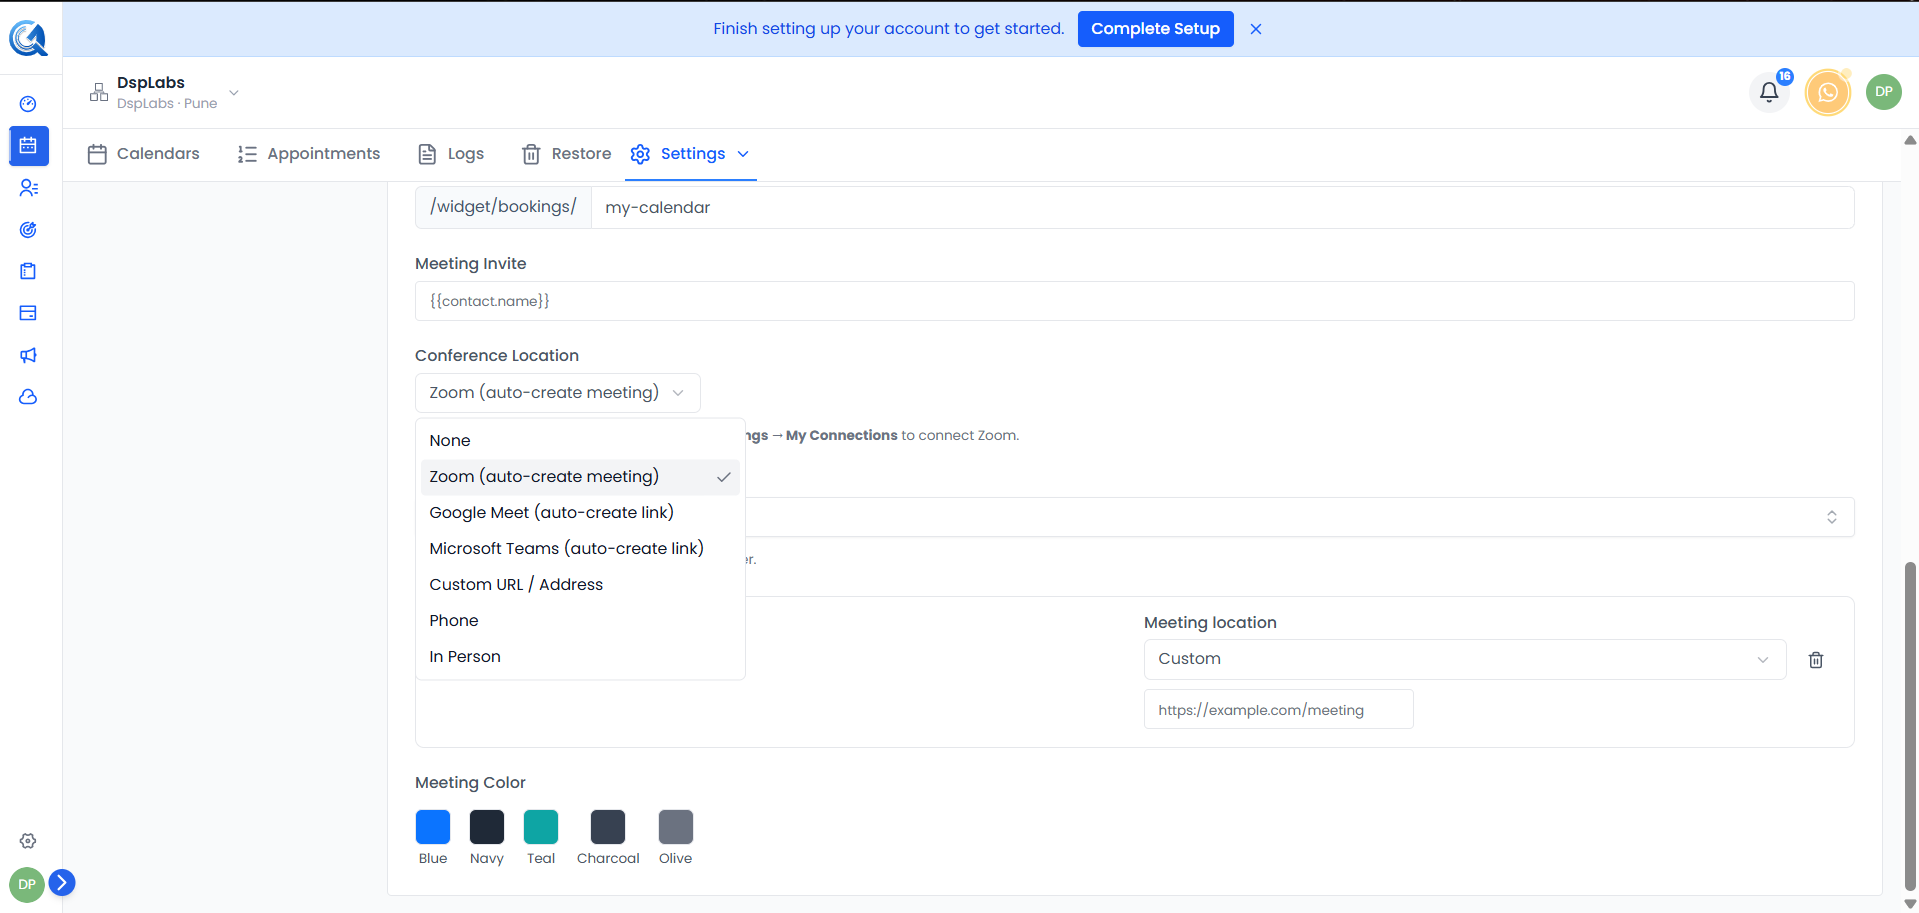 Select Zoom as the Meeting Location. A Zoom link will be automatically generated for each booking on this calendar.
Note: If you select a different meeting location (e.g., Phone, Google Meet, or a custom link), the pool accounts will not be used and no Zoom link will be generated.
What Happens When a Meeting Is Booked
At Booking Time
When a client books an appointment, the booking is confirmed immediately. No Zoom link exists yet at this stage. The booking confirmation sent to the client does not include a meeting link — it will be delivered separately before the meeting starts.
10 Minutes Before the Meeting
The QuantixOne system automatically:
- Selects an available pool account (the one that has been idle the longest, to spread usage evenly).
- Creates a Zoom meeting under that account with cloud recording enabled.
- Updates the appointment with the Zoom join link.
- Sends the join link to your client via email — the email arrives approximately 10 minutes before the scheduled start time.
During the Meeting
- Your client joins using the link they received in the email.
- You (the host) can see and copy the join link from the appointment detail on the QuantixOne dashboard.
- The Zoom meeting records automatically to the cloud.
After the Meeting
Once Zoom finishes processing the recording, the pool account enters a brief cooldown period (approximately 5 minutes) before it becomes available for the next appointment. The recording is attached to the appointment in QuantixOne once Zoom finishes processing it.
Where to Find the Meeting Link
As the host, the Zoom join link is visible in the appointment detail panel in your QuantixOne dashboard from the moment it is generated (T-10).
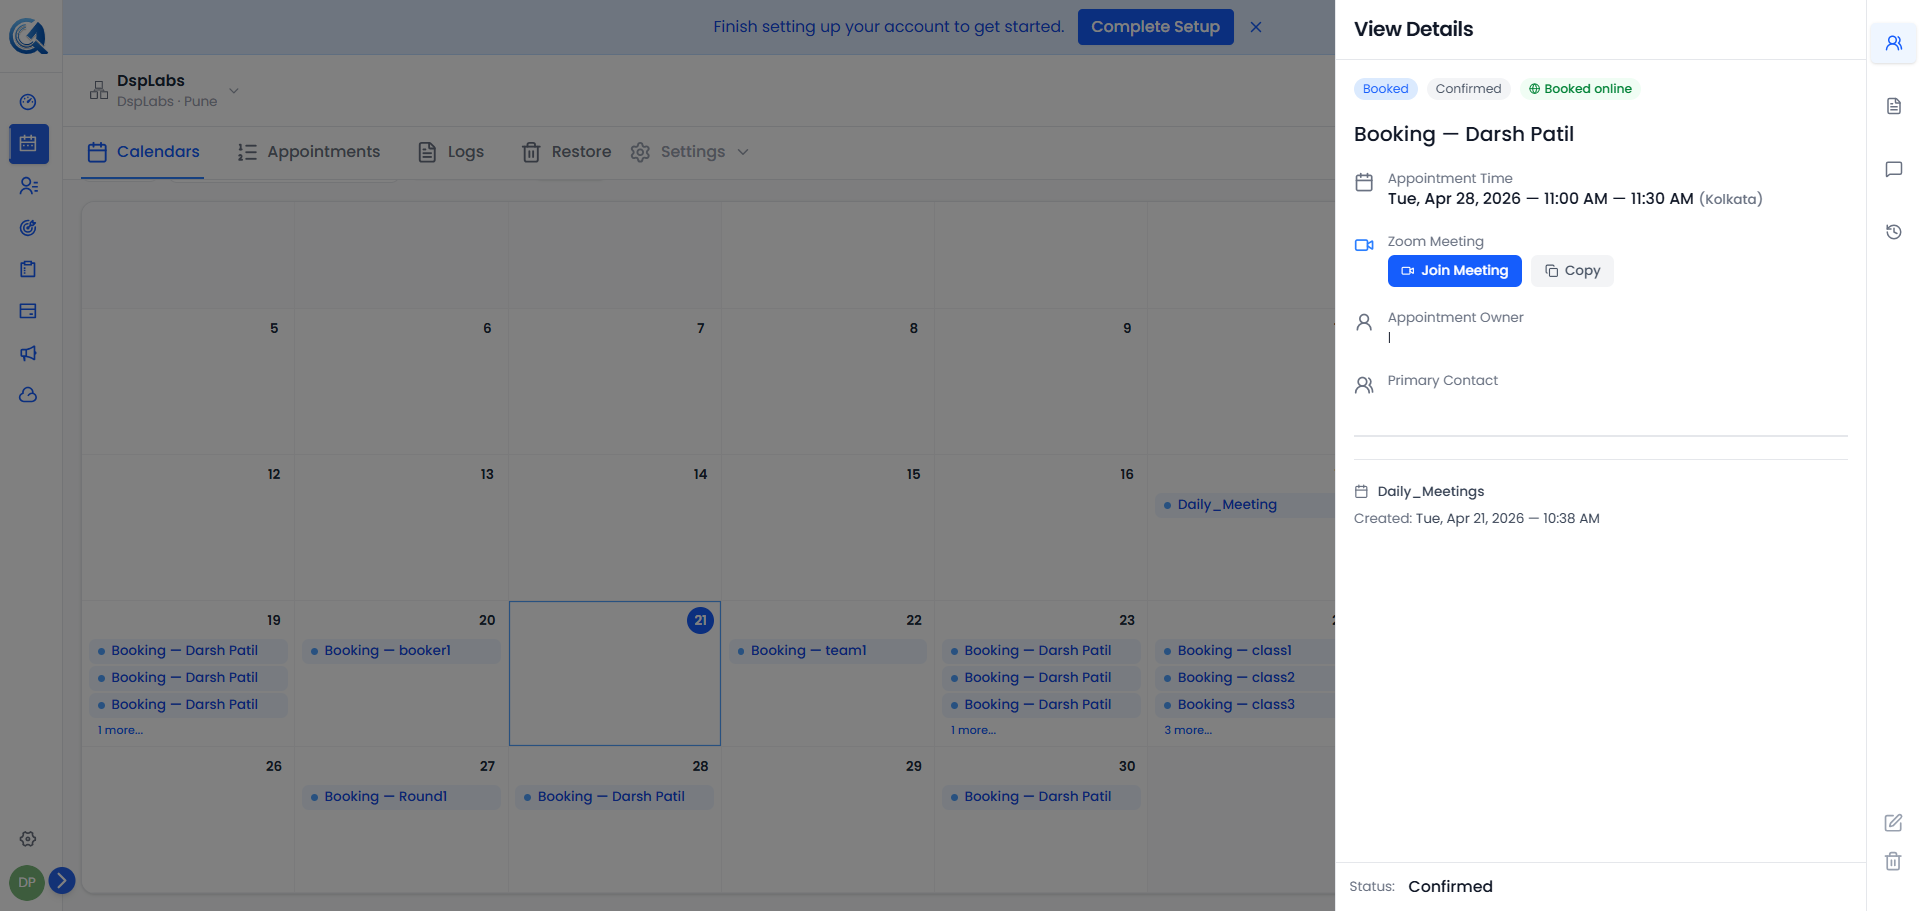 The join link appears in the appointment details 10 minutes before the meeting. Click Copy to use it directly.
Your client receives the link by email approximately 10 minutes before the meeting. They do not need a Zoom account — the link opens directly in their browser.
Cancellations and Reschedules
- Cancellation — If an appointment is cancelled after a Zoom link has already been generated, the Zoom meeting is automatically deleted and the pool account is freed immediately.
- Reschedule — If an appointment is rescheduled, the existing Zoom meeting is deleted and the pool account is freed. A new Zoom meeting will be created 10 minutes before the new start time, and a fresh link will be sent to your client.
Adding More Pool Accounts
Each connected pool account can handle one meeting at a time. If your location has multiple appointments happening simultaneously, you need one pool account per concurrent meeting.
To add capacity, connect additional pool accounts provided by QuantixOne by repeating the Connect steps above. Each new account is automatically added to the pool for your location.
Contact support if you need additional pool accounts. Each account is a licensed Zoom seat managed by QuantixOne on your behalf.
Disconnecting a Pool Account
To remove a pool account, go to Settings → Connections, find it in the connected accounts table, and click Disconnect.
 Disconnecting a pool account removes it from the available pool. Existing appointments that already have a Zoom link are unaffected.
Note: Do not disconnect a pool account while a meeting using it is in progress. Wait until the meeting ends and the recording has been processed.
Video Walkthrough
Watch the walkthrough below to see how to connect Zoom pool accounts and see auto-generated meeting links in QuantixOne.