Importing Contacts
Import hundreds of contacts in minutes. QuantixOne walks you through a 3-step wizard — Upload File, AI Mapping, and Preview — with AI-suggested column mapping and duplicate detection built in, so nothing is written to your database until you confirm.
Supported File Formats
| Format | Extension | Max Size |
|---|---|---|
| CSV | .csv | 5 MB |
| Excel | .xlsx | 5 MB |
| Excel (legacy) | .xls | 5 MB |
If your Excel file has multiple sheets, QuantixOne asks you to pick one before continuing — you'll see each sheet's name and approximate row count.
Step 1: Upload File
Go to Contacts > Import, then drag and drop your file onto the upload area, or click Upload File to browse for it.
- Download Sample generates a ready-made template with these columns:
First Name, Last Name, Email, Phone, Company Name, Job Title, Tags, Task Title, Task Due Date, Note Body - Your CSV must include a name and at least one of Email or Phone. The info panel on this step lists these as required, and Company Name, Job Title, Tags, Task Title, Task Due Date, and Note Body as optional.
- Your column headers do not need to match any fixed convention — you'll map them to the right field in Step 2, regardless of what they're called in your file.
Click Next to upload the file and let QuantixOne suggest a mapping.
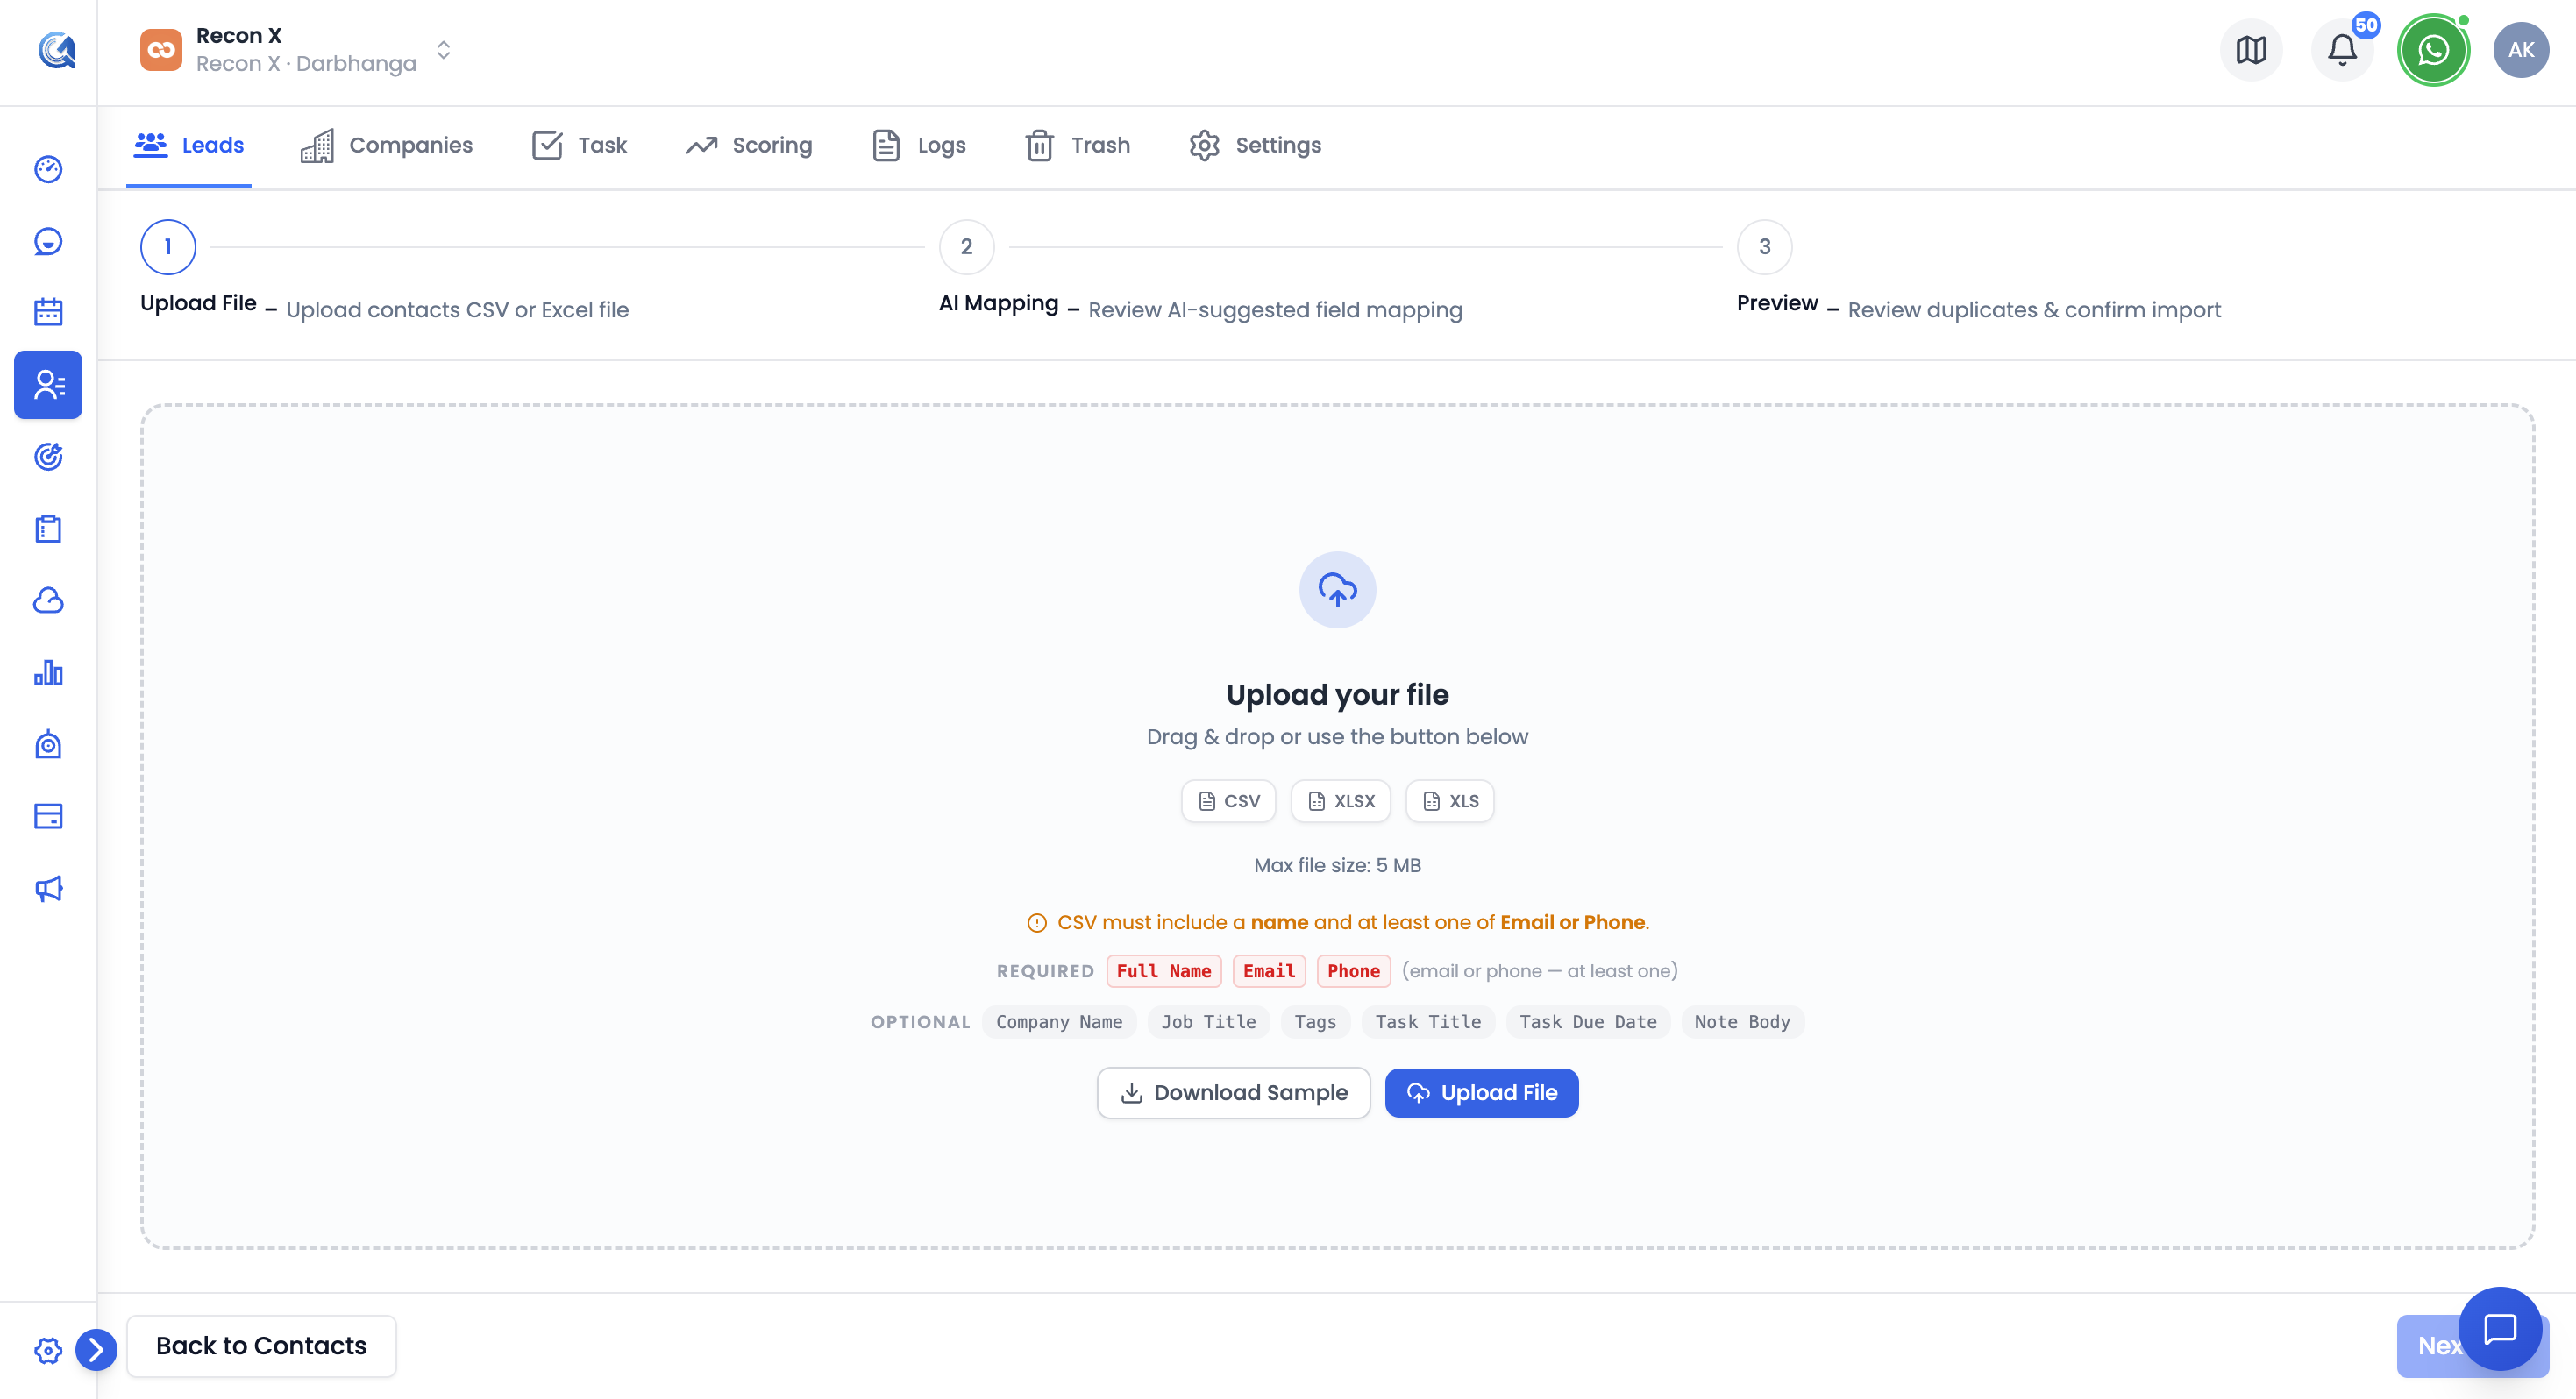 Drag and drop your CSV or Excel file, or click Upload File to browse for it.
Step 2: AI Mapping
QuantixOne automatically suggests a mapping for every column in your file to a Contact, Task, Note, or Company field — or offers to create a brand-new custom field for it.
A banner summarizes the result: "AI mapped N of M columns automatically", plus how many new custom fields were auto-created.
The mapping table shows, per column:
- CSV Column — your original header text.
- Type — System, Custom, New Field, or Skip.
- Mapped To — a field picker to override the AI's suggestion; click + next to it to create a new custom field on the fly (prefilled with the AI's suggested name and type), or the pencil icon to edit an auto-created field's configuration.
- Field Type — the data type and its configuration.
- Status / Reason — why a column was mapped the way it was, or what's needed to map it.
Uncheck a row to exclude that column from the import entirely.
If anything required is missing, a banner reads "Fix the following before continuing" with the specific issue (for example, a missing name column, or no Email/Phone mapped). Once resolved, it turns into "All required fields are mapped — you're ready to continue."
Before continuing, choose your Import Mode:
| Option | Behavior |
|---|---|
| Create & Update (default) | Creates new contacts and updates matches. |
| Create Only | Skips rows that match an existing contact. |
| Update Only | Only updates contacts that already exist. |
Click Next to validate your mapping and detect duplicates.
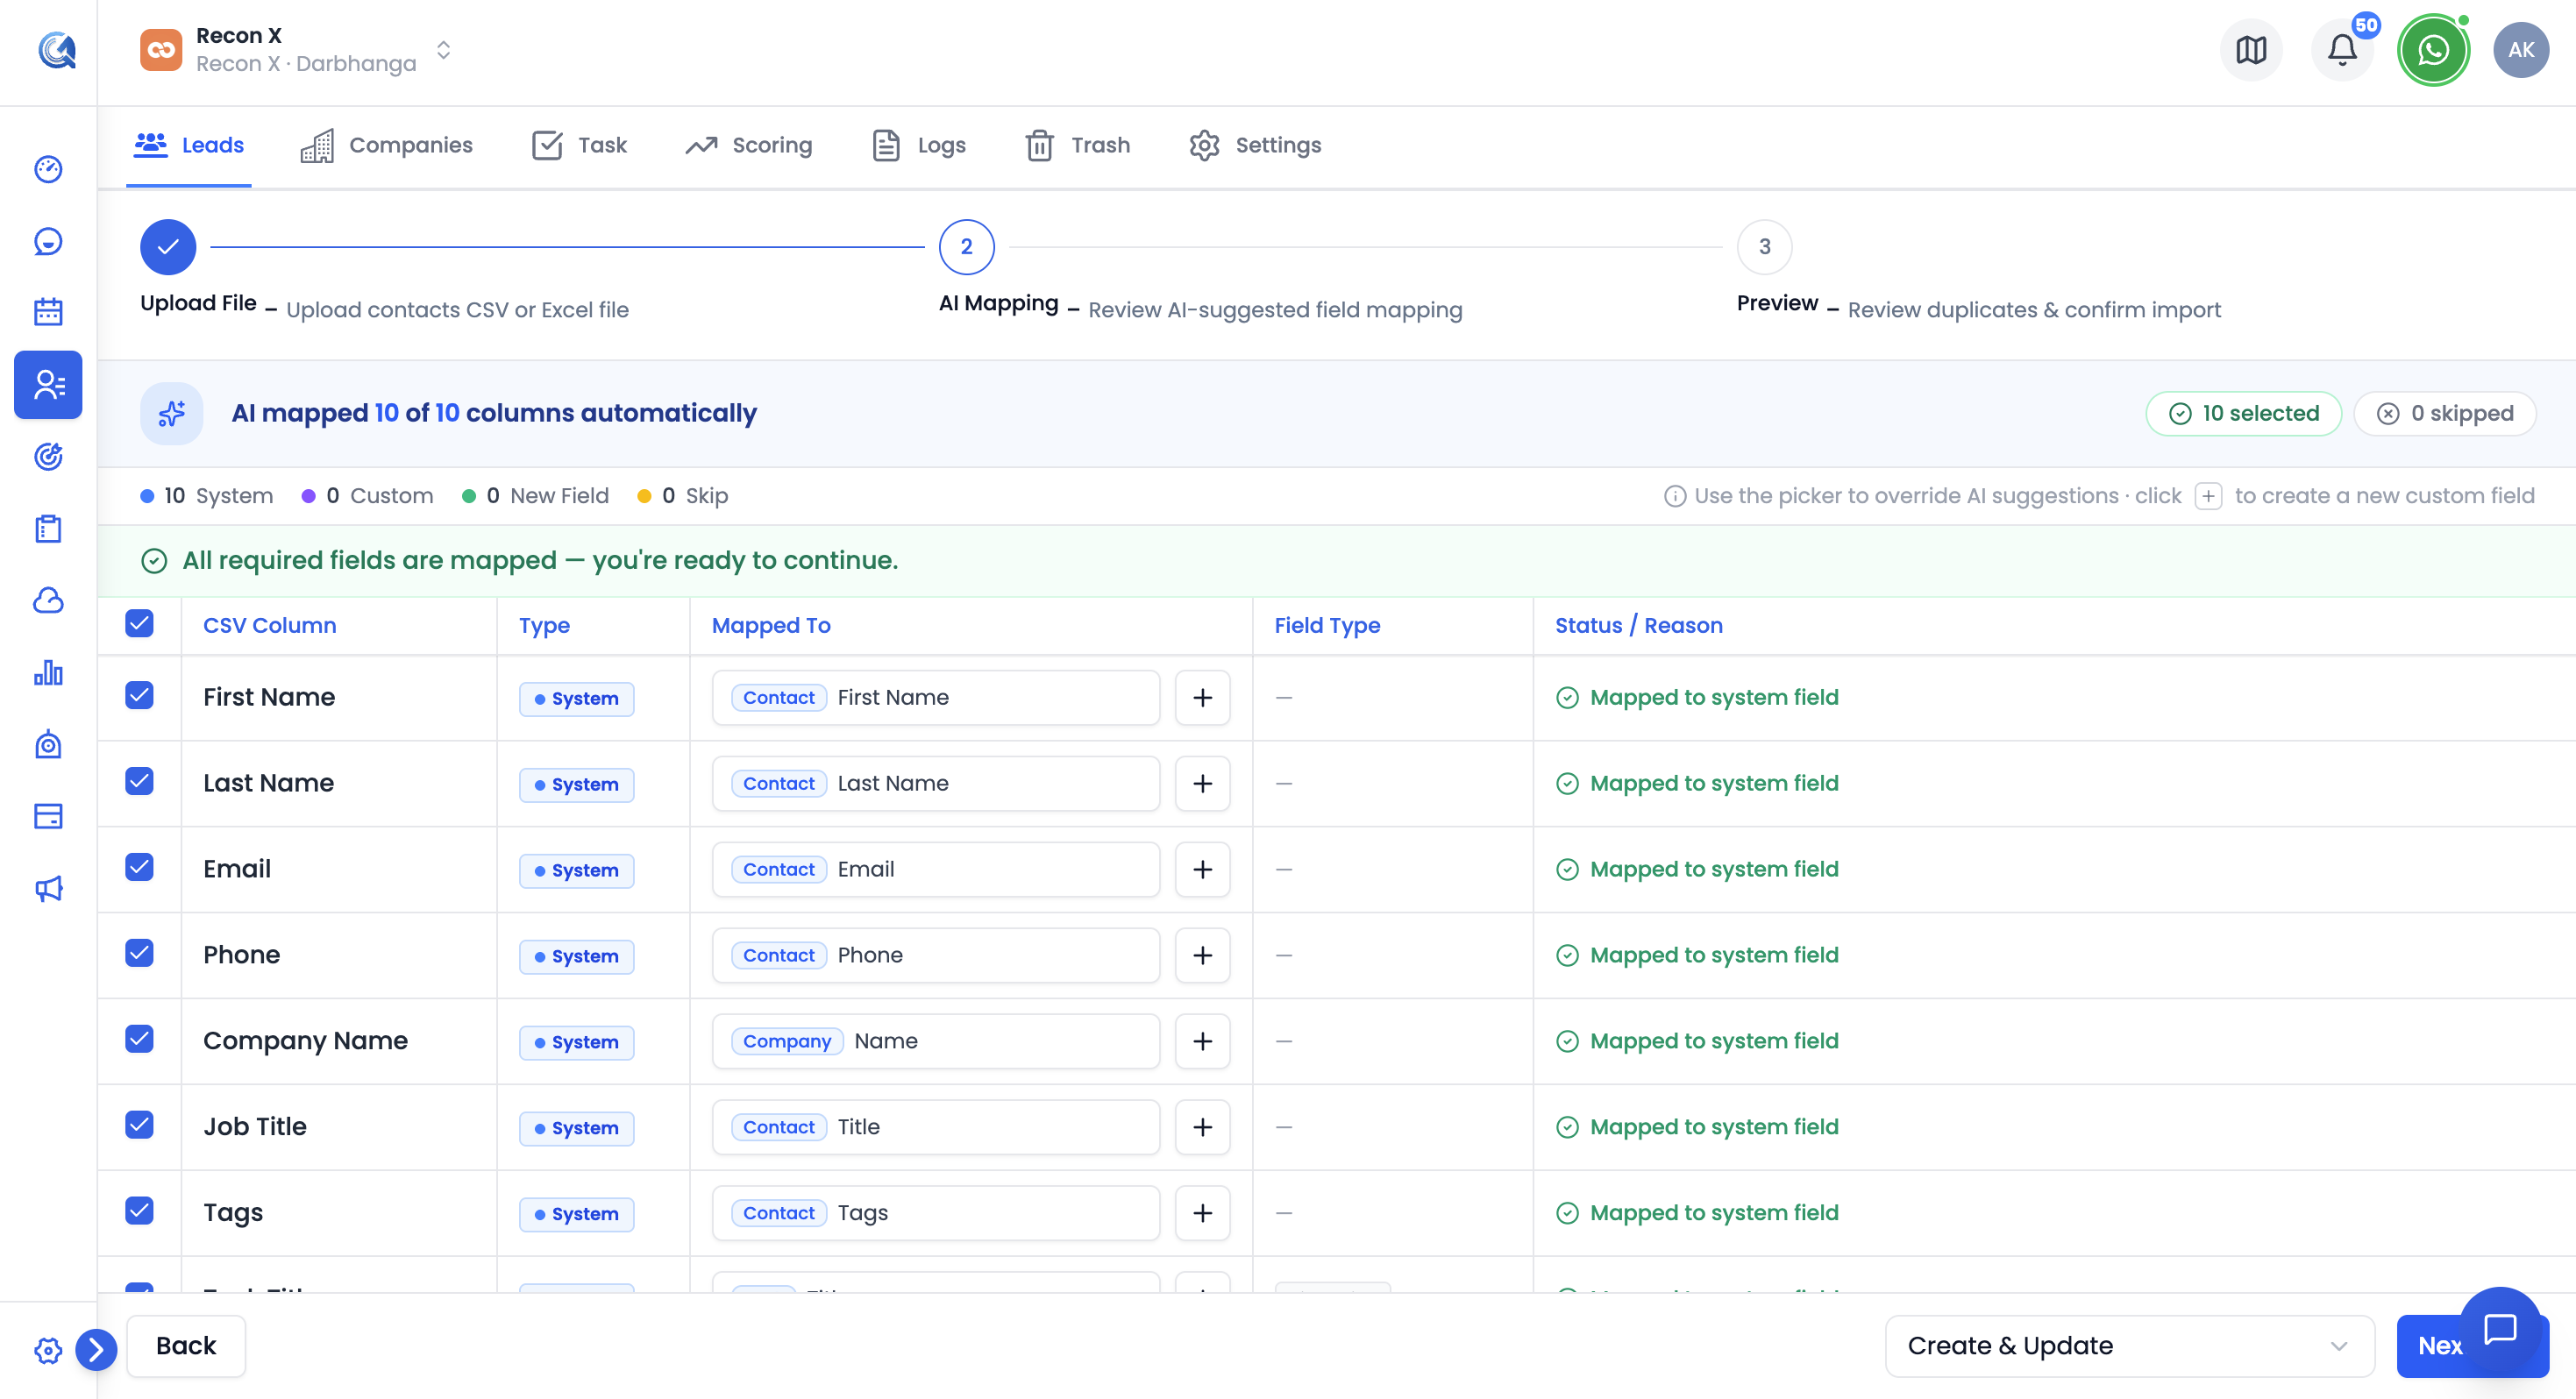 QuantixOne suggests a field mapping for every column, which you can review and override.
Step 3: Preview
This step shows validation results and lets you resolve duplicates before anything is saved.
Stats shown: Total, Create, Update, Duplicates, Invalid, Skipped.
- Invalid Rows — an expandable panel listing why each row failed.
- Warnings — any non-blocking issues found.
- Duplicates — if any rows match existing contacts, they're listed in a table with a mode badge (AUTO or MANUAL). Click Compare & choose fields to open a side-by-side comparison and decide, field by field, which record's value should win.
- If there are no duplicates, you'll instead see an Import Preview — a sample of how your rows will be imported.
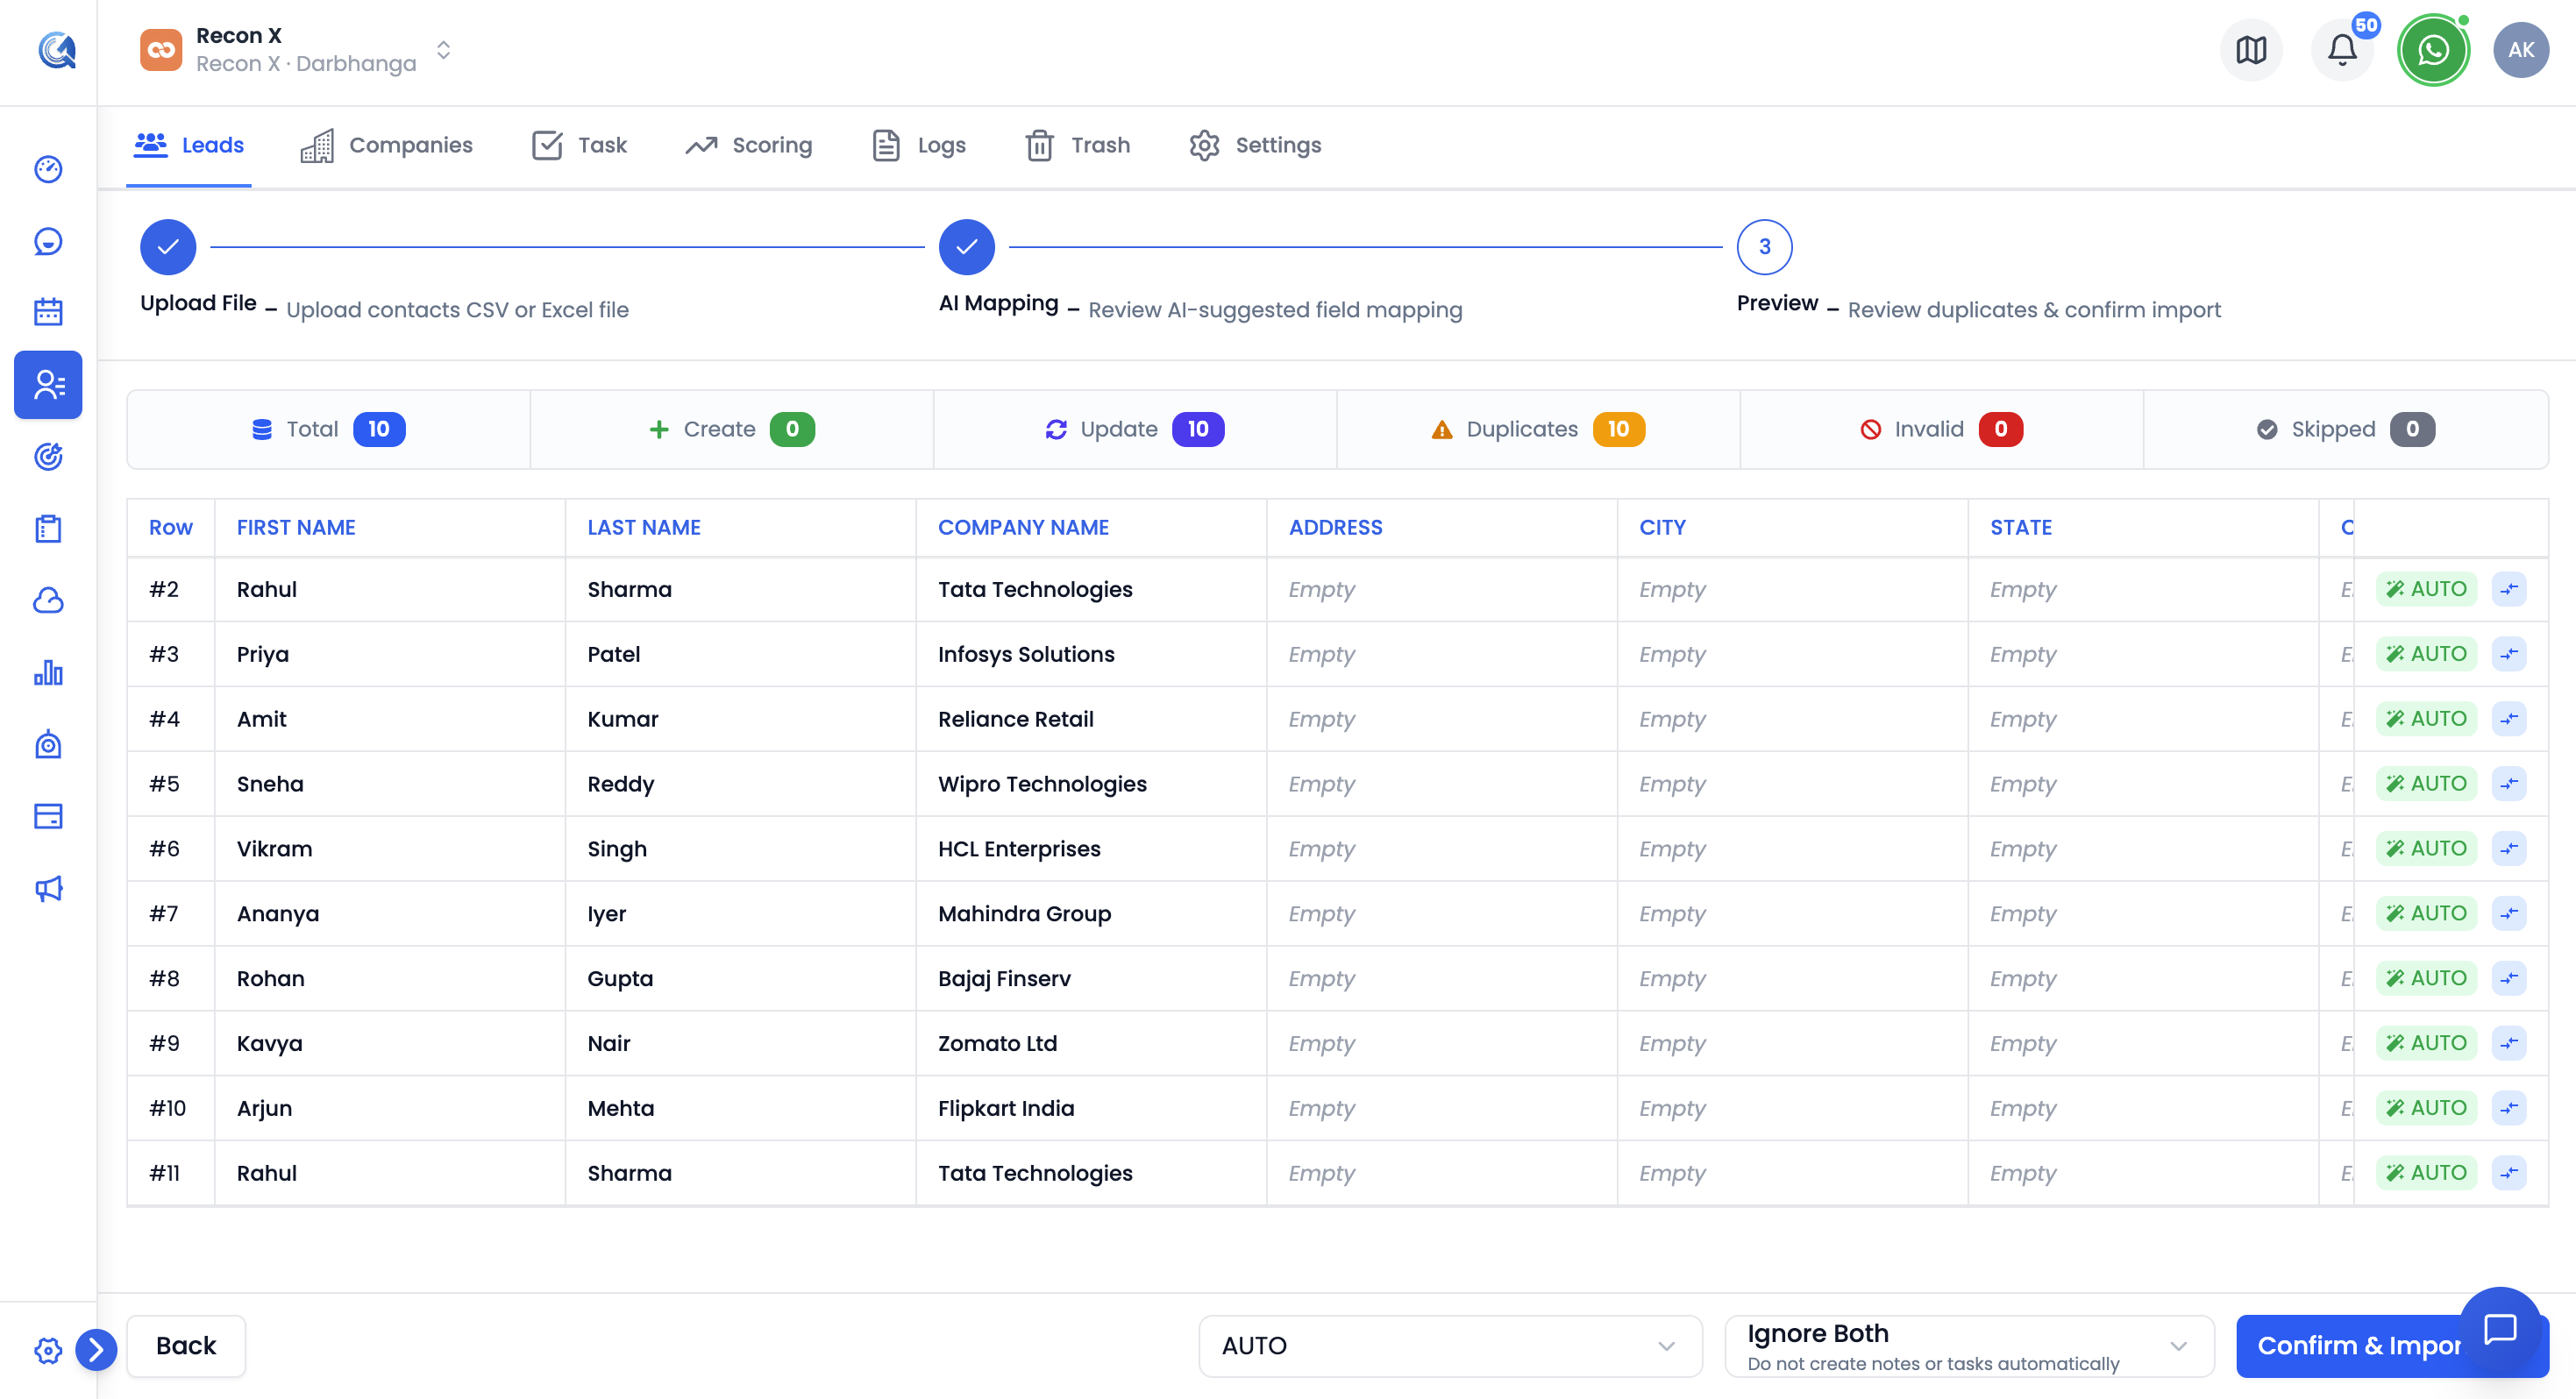 Review validation stats and resolve any duplicates before confirming the import.
Choose your Merge Strategy:
| Option | Behavior |
|---|---|
| AUTO (default) | Fill only missing fields — the safest option. |
| OVERRIDE | Overwrite existing data with your import file's values. |
| MANUAL | Choose field-by-field via Compare. Selected automatically once you make any manual choice — the other two options then become disabled. |
Choose your Auto-create option for related records:
| Option | Behavior |
|---|---|
| Ignore Both (default) | Don't create notes or tasks automatically. |
| Auto-create Notes | Add a note for each imported row. |
| Auto-create Tasks | Add a task for each imported row. |
| Auto-create Both | Add both a note and a task for each imported row. |
Click Confirm & Import. A Ready to Import? dialog summarizes your Mode, Merge Strategy, and Auto-create choice, and warns that invalid rows will be skipped automatically. Click Yes, Import to confirm.
After You Confirm
A results modal shows live progress while the import runs, then a summary of what happened, plus a Failed Rows list with plain-language reasons for anything that didn't import (e.g. a bad date format, or a missing email/phone). You can close this modal and continue working — the import keeps running in the background.
Field Format Reference
Name, Email, Phone
- Name — a Full Name column, or First Name + Last Name.
- Email — standard
user@domain.tldformat. - Phone — any format works; QuantixOne normalizes it to E.164 (e.g.
+919876543210) automatically.
Dates
- Date of Birth — ISO format
YYYY-MM-DD(e.g.1990-05-15). - Task Due Date —
YYYY-MM-DD,YYYY-MM-DDTHH:MM:SS, orYYYY-MM-DDTHH:MM:SSZ.
Tags and Other List Fields
Tags, Skills, Languages, and similar fields accept semicolon-separated values, e.g. VIP;Enterprise;Hot.
Task Fields
If you map a column to Task Title, Status, Priority, Type, or Due Date, use these exact values:
- Task Status —
pending,in_progress,completed,blocked - Task Priority —
low,medium,high - Task Type —
call,email,follow_up,meeting,other
Invalid values are silently converted to a default rather than rejected — double-check these columns before importing.
Custom Fields
Custom fields must exist before you import (create them under Contacts > Settings first, or create one on the fly during the AI Mapping step). Values must match the field's configured type:
| Field Type | Format |
|---|---|
| Number | Plain numeric, no currency symbols |
| Date | YYYY-MM-DD |
| Dropdown / Radio | Exact match to one of the field's options |
| Checkbox | true, false, 1, 0 |
| Multi-select / Text Box List | Semicolon-separated values |
What Gets Imported
- Contacts — all mapped system and custom fields.
- Companies — auto-created if a company-name column is mapped and no match exists.
- Tags — auto-created if new.
- Tasks — created per row if you mapped task columns or chose an Auto-create option.
- Notes — created per row if you mapped a note column or chose an Auto-create option.
Sending a Campaign From an Import
Starting an import from the Conversations "New Campaign" flow (rather than directly from Contacts) adds two extra steps after Preview: naming your campaign and choosing a template, then a final Preview & Send step where you pick Send Immediately or Schedule for later. The Launch/Schedule button stays disabled until the import itself finishes processing. This is a distinct entry point from a plain contacts import — see Bulk Messaging for the campaign side of this flow.
Import Best Practices
- Create custom fields first — the system can't create them mid-import unless you use the "+" option during AI Mapping.
- Test with a small file — 10–20 rows — before running a full import.
- Read every validation error in Step 3 — don't rush past duplicate review; merge decisions matter.
- Standardize phone and date formats in your source file to reduce mapping surprises.
- Review the results modal after import completes, and download the failed-rows report if anything didn't import.
Troubleshooting
"Invalid email format" — check for a missing @, missing domain extension, or a double @.
Phone not recognized — QuantixOne accepts most formats and normalizes to E.164, but a bare local number without a default country set can be ambiguous.
Task status/priority/type look wrong after import — you likely used a value outside the exact lists above; invalid values are silently replaced with a default instead of raising an error.
Custom field didn't populate — the field must already exist, and its values must match the configured type (see the table above).
Tags merged into one tag — use a semicolon (;) between tags, not a comma or pipe.
File won't upload — check it's under 5 MB and one of .csv, .xlsx, .xls.
Video Walkthrough
Watch the complete video tutorial on importing contacts into QuantixOne CRM.