Invoices
Invoices is where you create, send, and track payment requests to your contacts. When you open this section you land on a summary dashboard with four KPI cards showing your billing pipeline at a glance, followed by the full invoice list below.
Navigating to Invoices
From the main navigation, click Payments, then select the Invoices & Estimates tab, then the Invoices sub-tab.
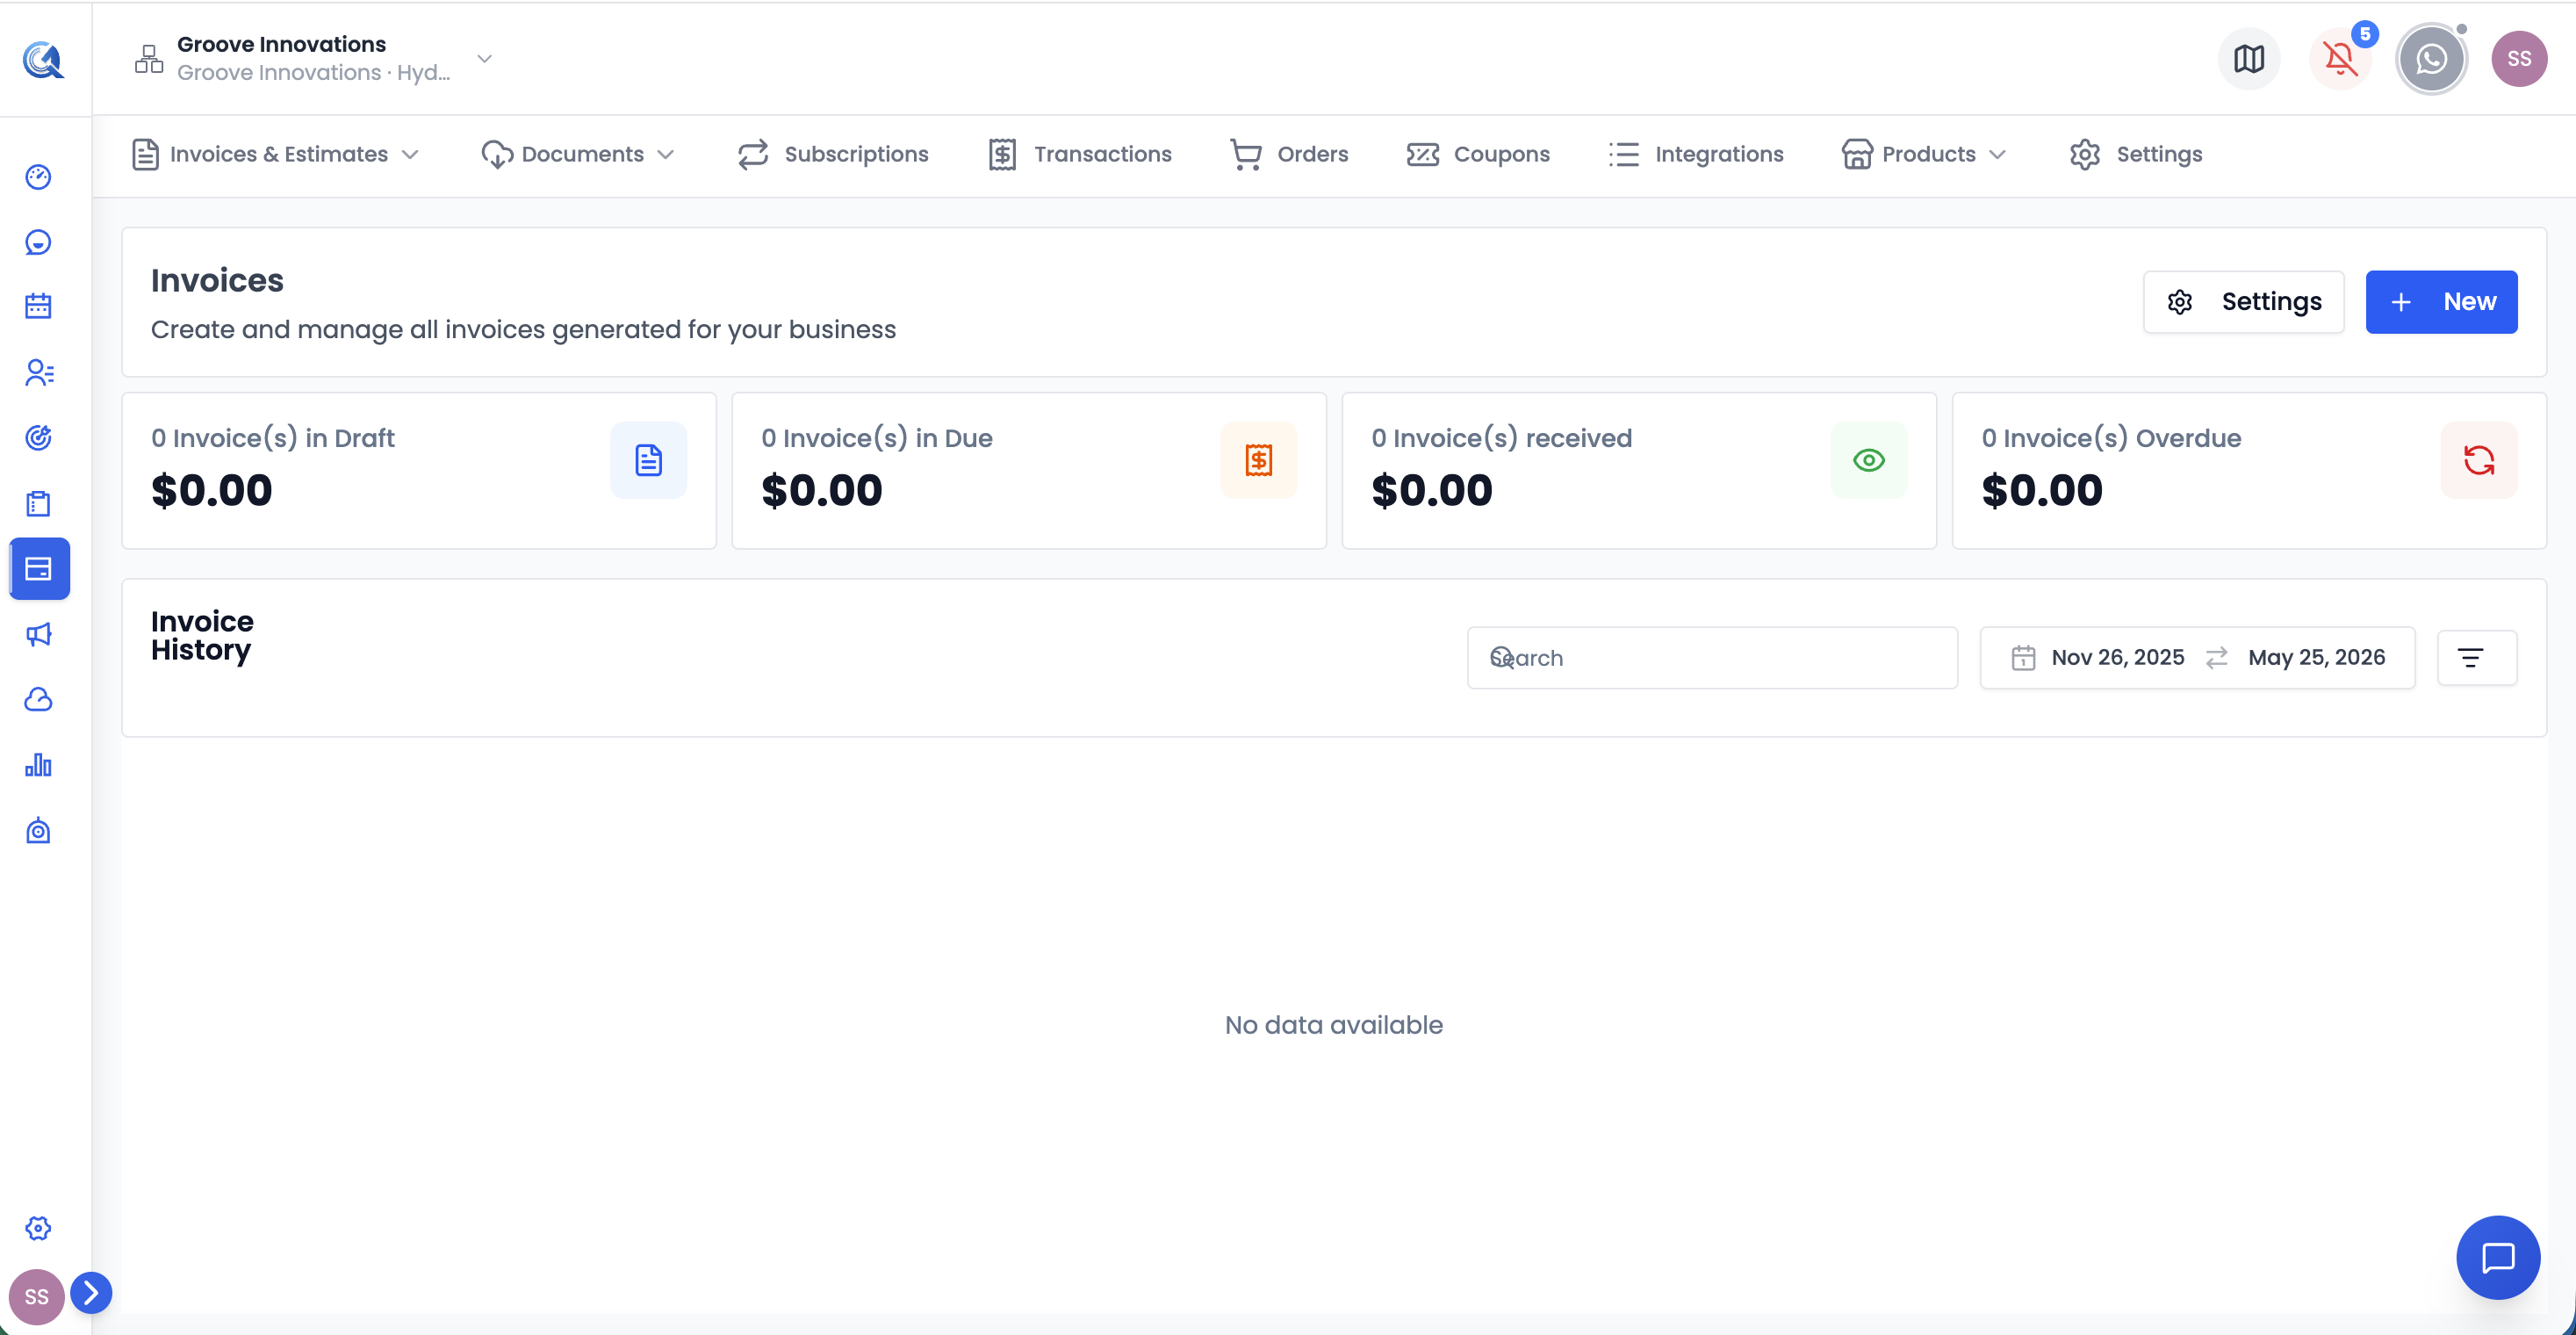 The Invoices view with summary cards at the top and a filterable table below.
Dashboard Summary Cards
The four cards at the top update in real time as invoices change status.
| Card | What it shows |
|---|---|
| Draft | Total combined value of all invoices currently in Draft status |
| Due | Total value of sent invoices that are awaiting payment but not yet overdue |
| Paid | Total value of all invoices that have been paid (manually or via payment link) |
| Overdue | Total value of invoices that have passed their due date without payment |
Clicking a card filters the invoice list to show only invoices in that status.
Invoice Statuses
Every invoice moves through a defined set of statuses.
| Status | What it means | How it gets there |
|---|---|---|
| Draft | Created but not yet sent to the contact | Default state when you save without sending |
| Sent | Delivered to the contact's email inbox | When you click Send, or the scheduled send time arrives |
| Paid | Payment has been received and recorded | When the contact pays via the payment link, or you click Mark as Paid |
| Overdue | Past the due date with no payment received | Automatically set by the system when the due date passes on an unpaid sent invoice |
| Scheduled | Set to send automatically at a future date and time | When you configure a scheduled send time instead of sending immediately |
Creating an Invoice
Click + New Invoice in the top-right corner to open the invoice creation form.
Step 1 — Contact
Search for and select the contact you are billing. The contact's name, email, and address pre-fill the billing details automatically. You can override any of these fields directly in the invoice form without affecting the original contact record.
Business details (your own business information) can also be edited per invoice — useful if you operate multiple brands.
Step 2 — Line Items
Line items are the individual charges that make up the invoice total.
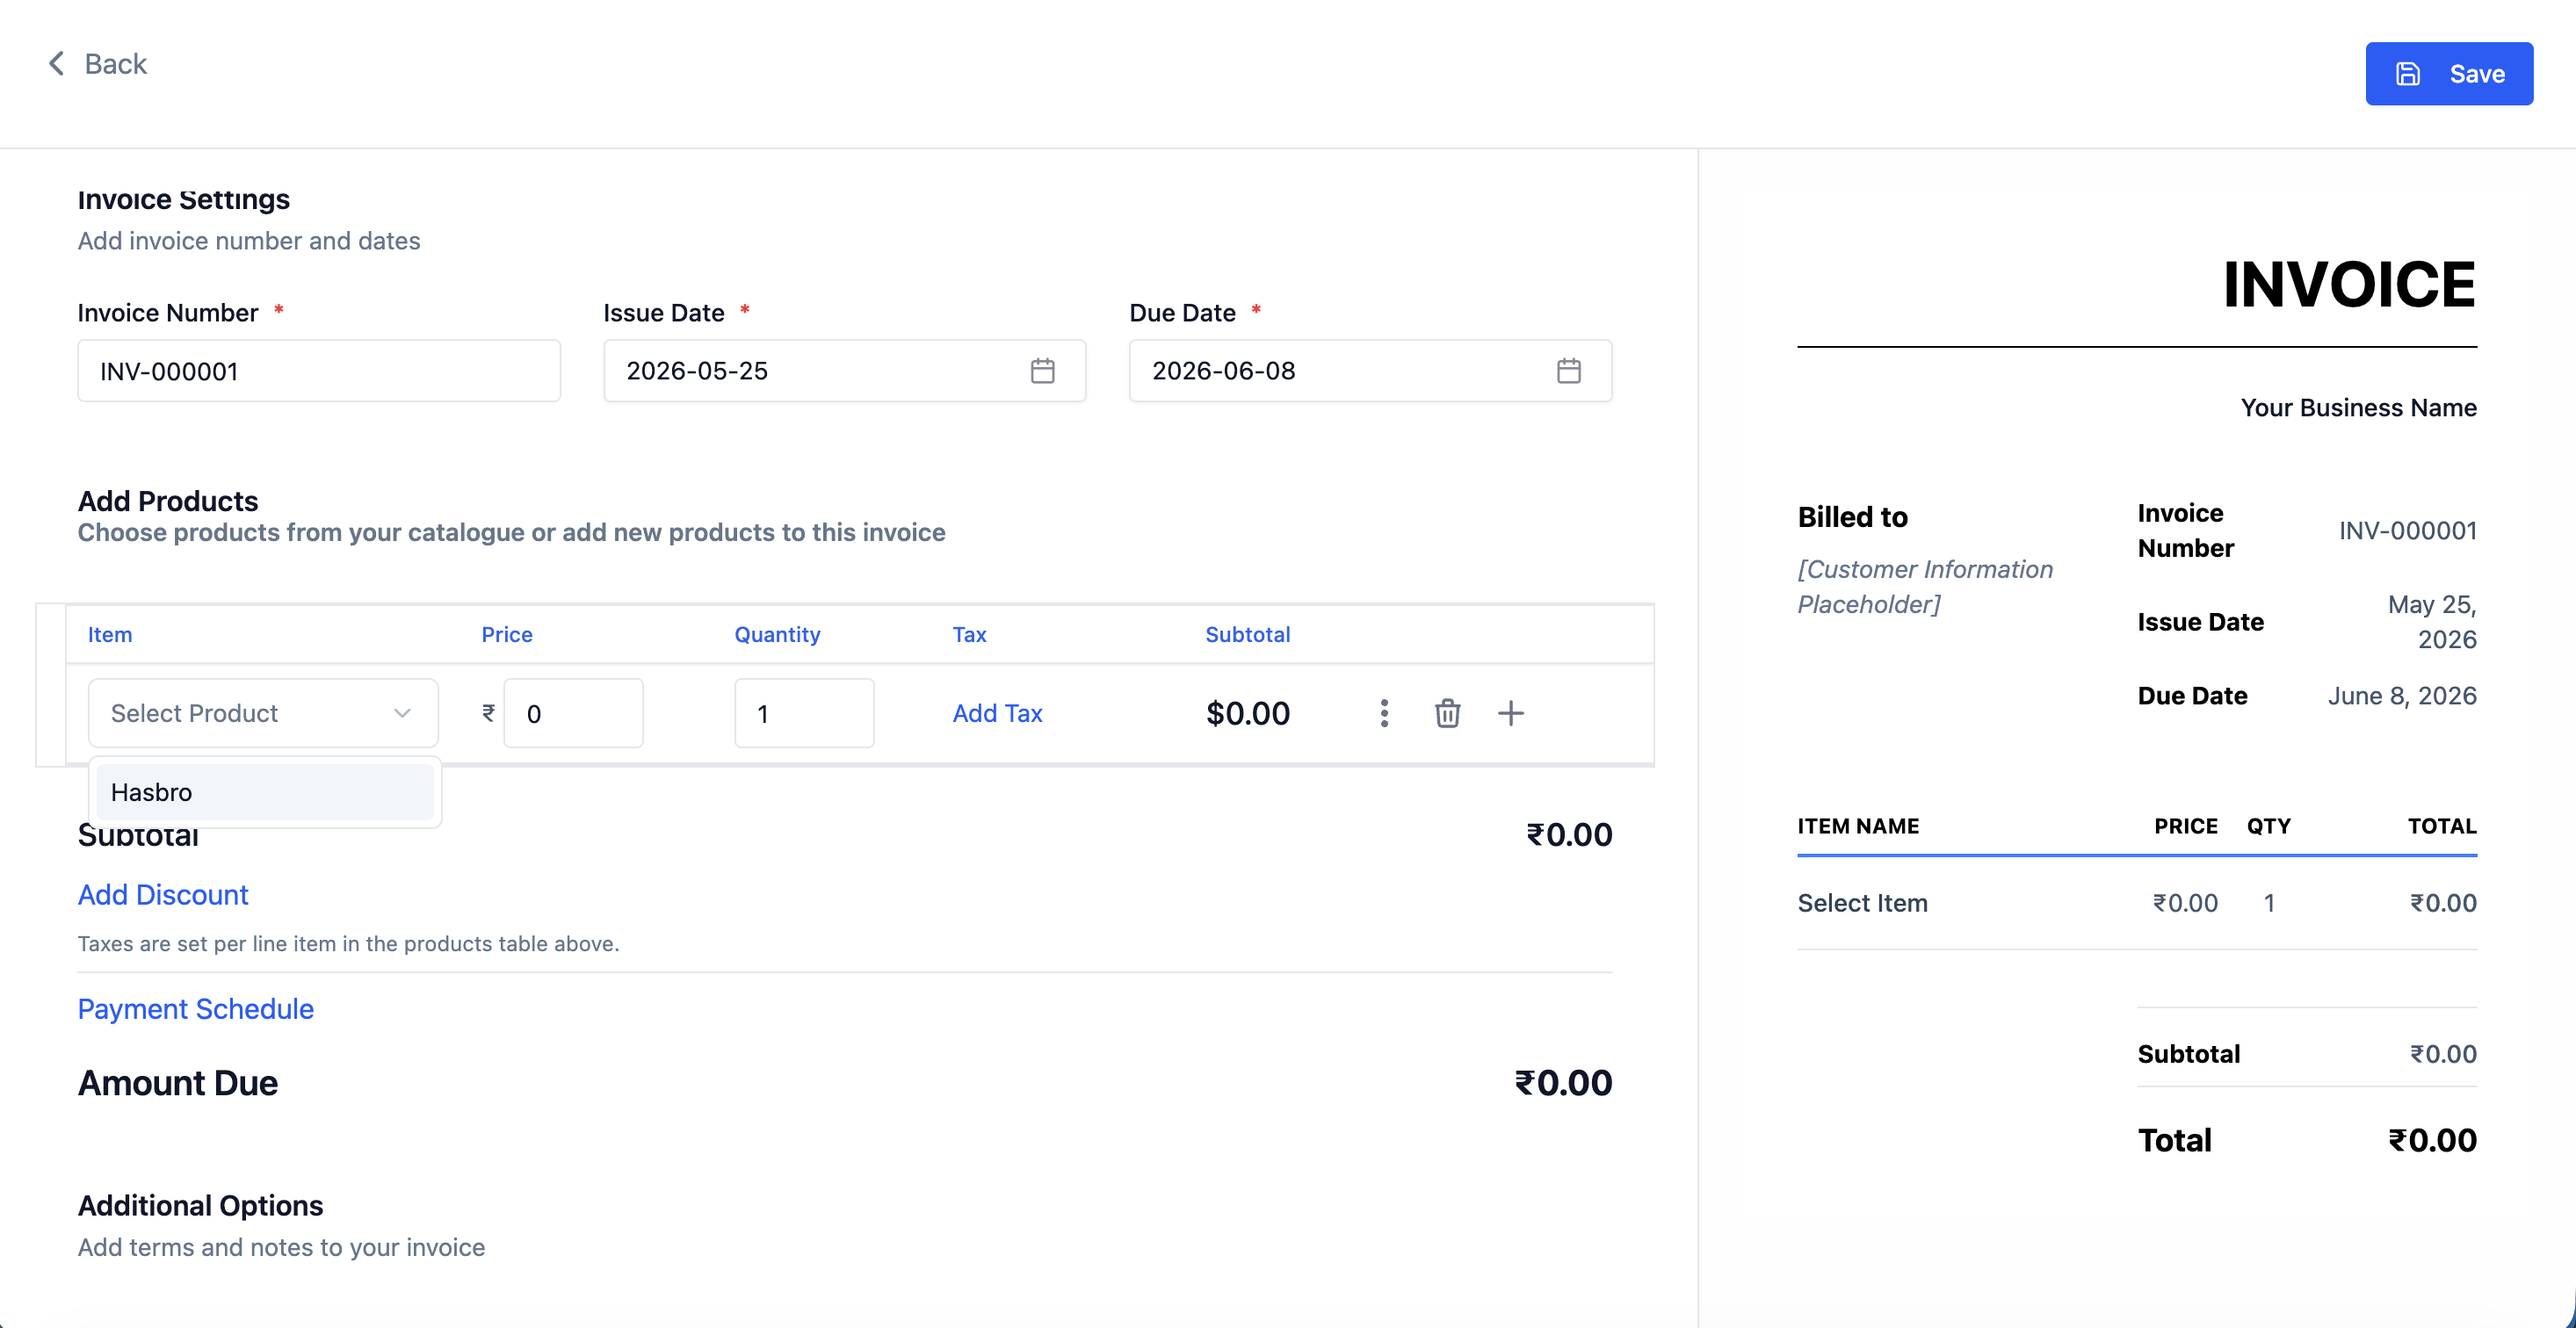 Each line item has description, quantity, unit price, tax rate, and a calculated total. Add from your catalogue or type a custom entry.
There are two ways to add line items:
- From your product catalogue — type a product name in the line item search field and select it. The price, description, and tax rate fill in automatically from the product record.
- As a custom entry — type any description directly and enter the unit price manually. Use this for one-off charges, labour hours, or anything not in your catalogue.
Each line item has the following fields:
| Field | Description |
|---|---|
| Description | Name or description of the item being charged |
| Quantity | Number of units (supports decimals for hours, partial units, etc.) |
| Unit Price | Price per single unit |
| Tax Rate | Optional tax to apply to this specific line item (select from rates configured in Settings → Taxes) |
| Total | Calculated automatically: quantity × unit price, with tax applied on top if selected |
The invoice subtotal, tax total, and grand total update live as you add or edit line items.
Step 3 — Optional Settings
Discount
Toggle the discount field on to apply a discount to the invoice subtotal (before tax).
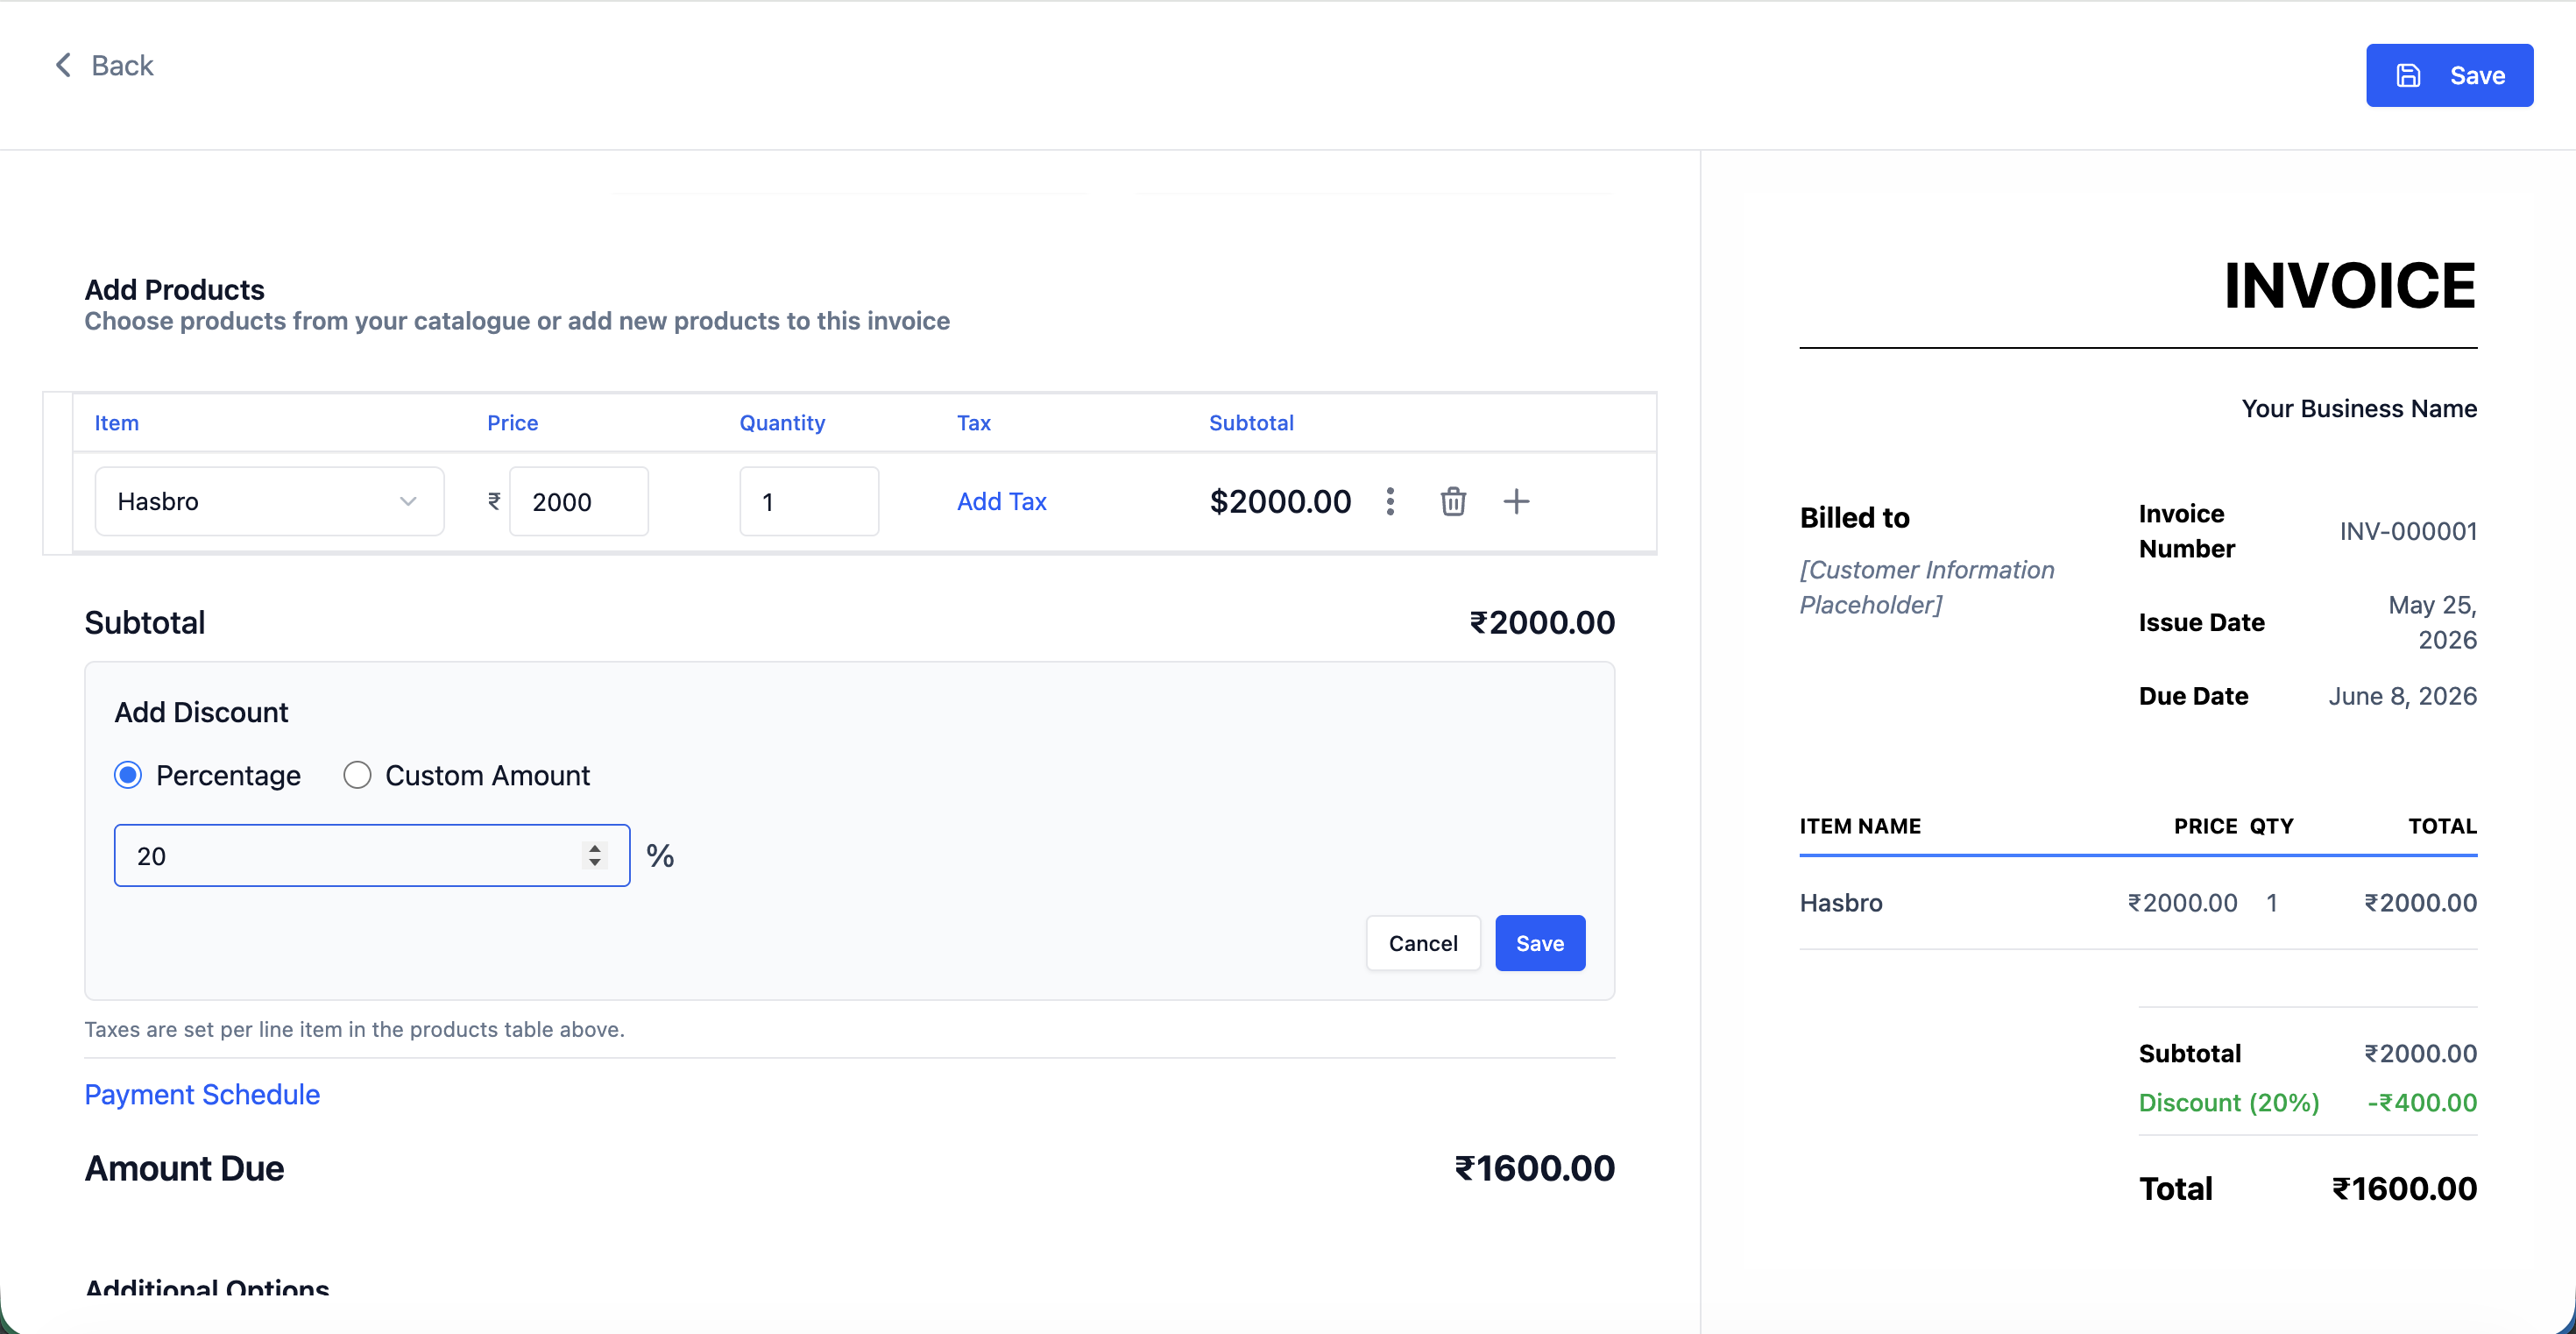 The discount toggle expanded. Choose Percentage (%) or Fixed Amount ($), then enter the value. The discount is applied before tax is calculated.
- Choose Percentage (%) to deduct a proportion of the subtotal — e.g. entering
10deducts 10%. - Choose Fixed Amount ($) to deduct a specific dollar amount — e.g. entering
50deducts $50. - The discount is applied to the subtotal. Tax is then calculated on the discounted subtotal.
Payment Schedule
By default, the full invoice amount is due on a single due date. The payment schedule lets you split the total into multiple instalments, each with its own due date.
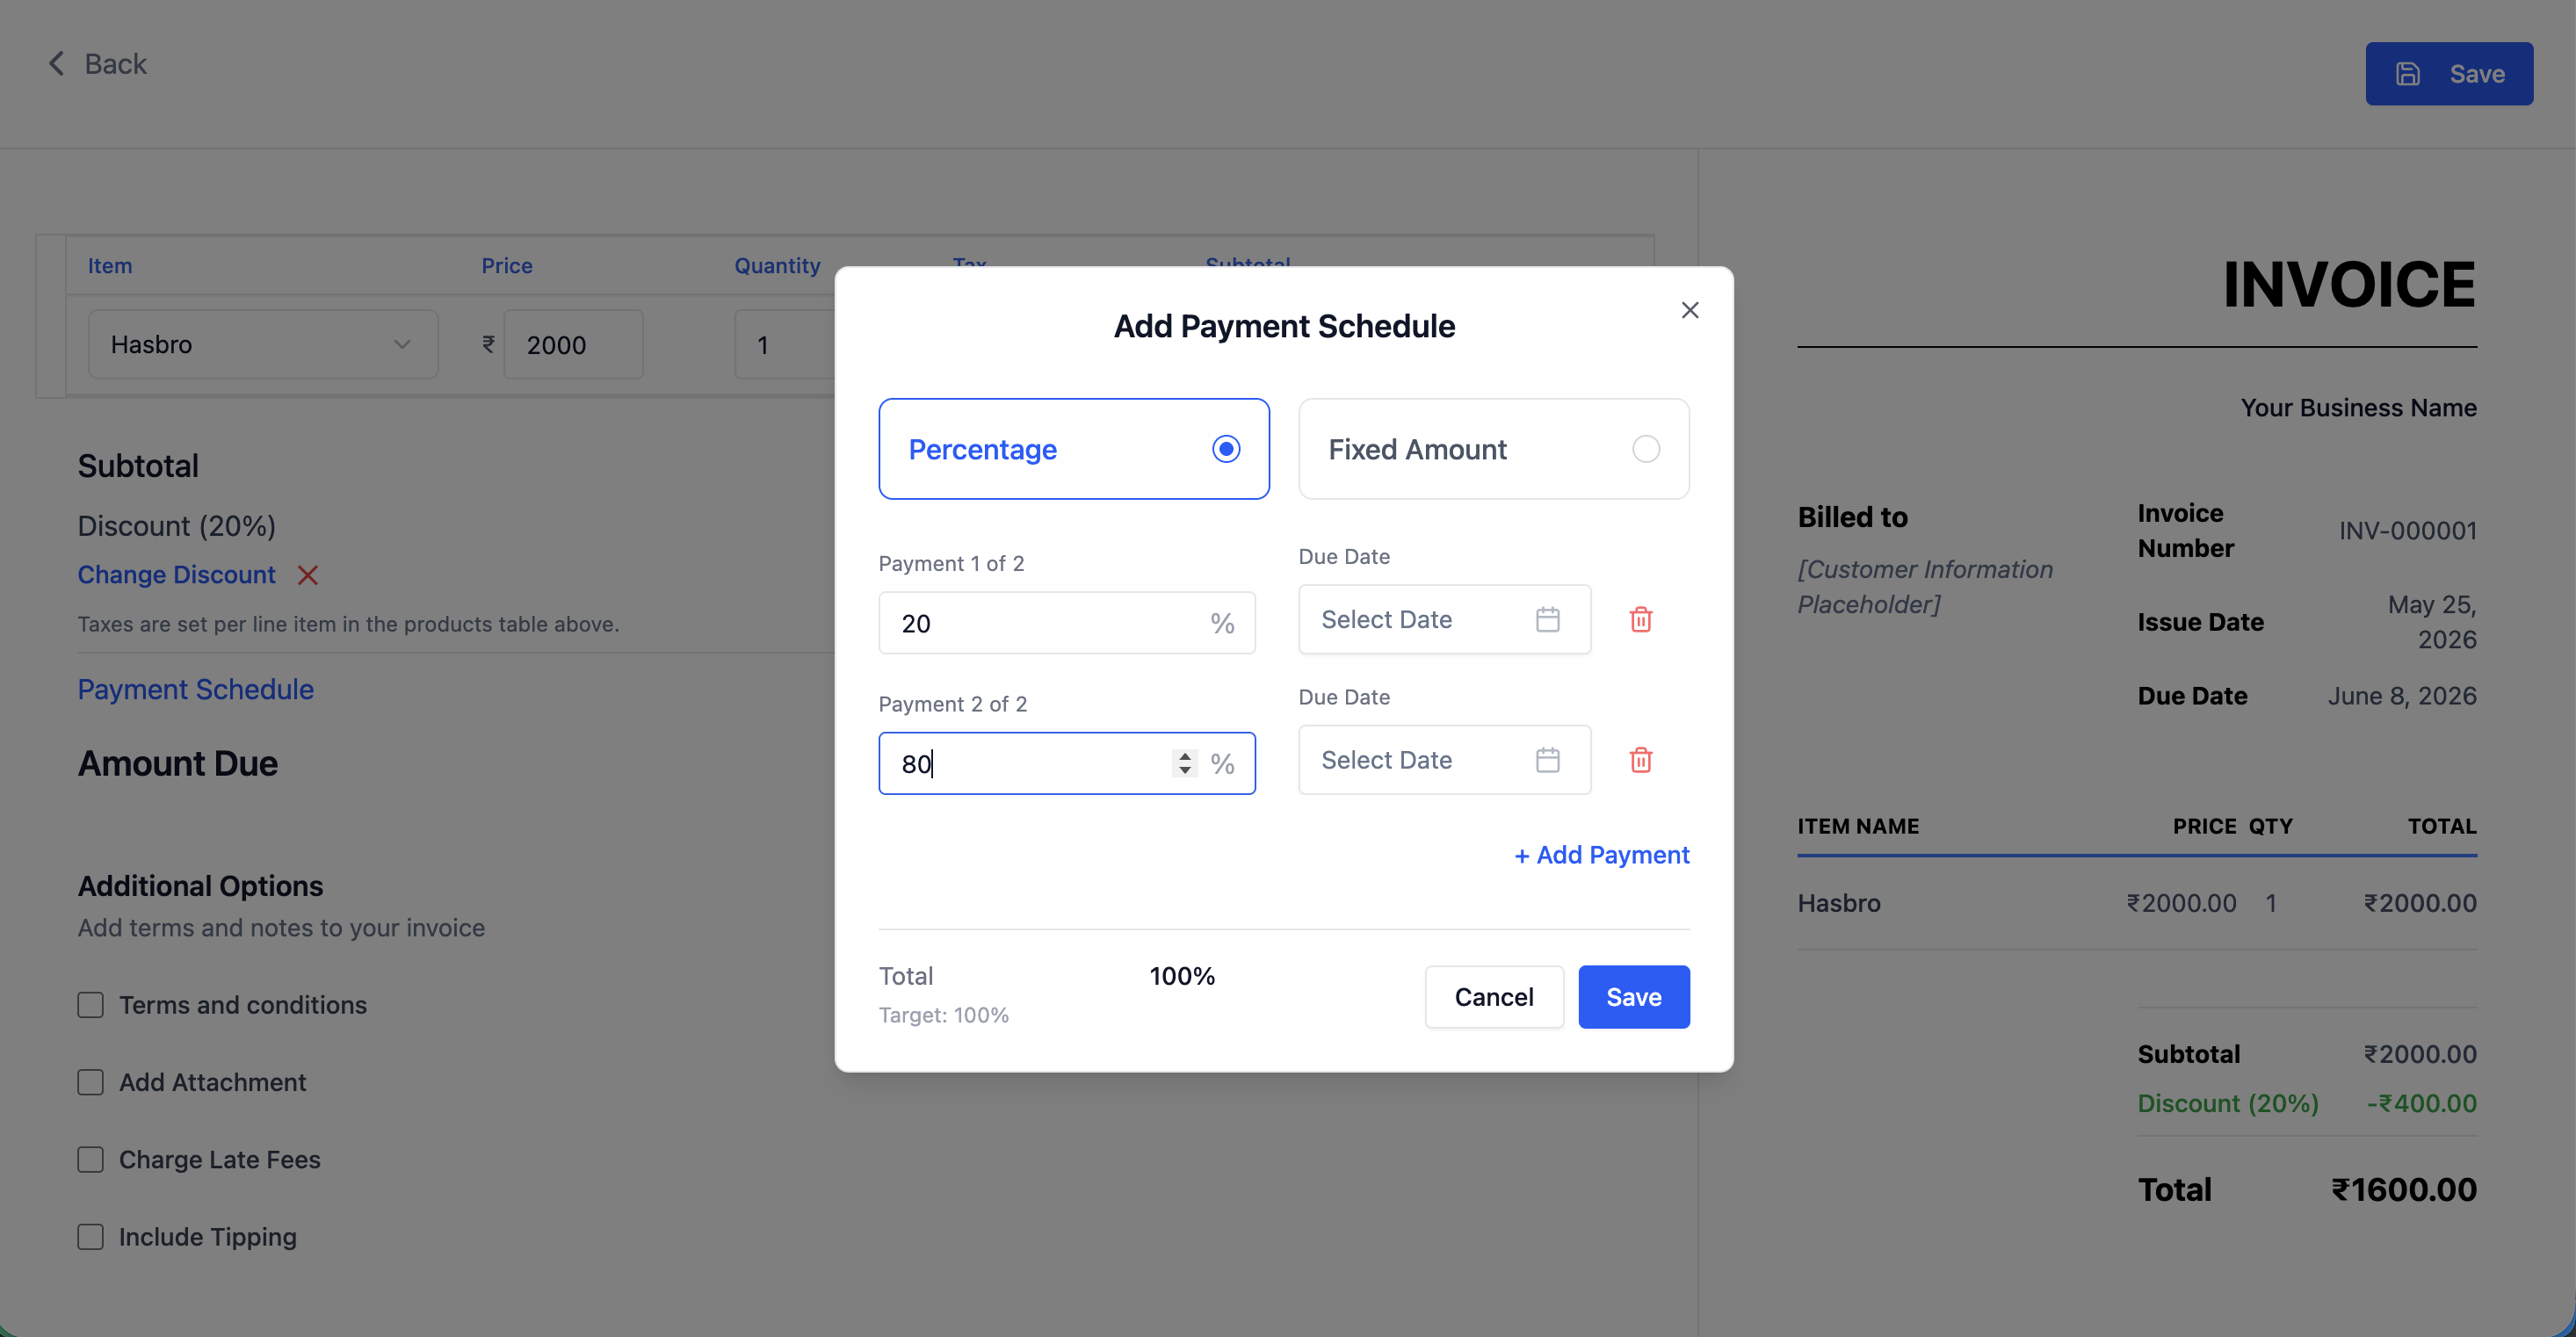 The Payment Schedule section. Click Add Payment to add instalment rows. Each row has a percentage (or fixed amount) and a due date. All instalments must total 100%.
- Click Add Payment to add an instalment.
- Set the percentage or fixed amount for each instalment and its individual due date.
- All instalments must add up to 100% of the total. The form validates this before you can save.
- Each instalment appears as a separate payment row on the invoice PDF, clearly showing what is due and when.
- Example: 50% upfront on signing, 50% on project delivery.
Late Fees
Enable late fees to automatically charge the contact if they don't pay by the due date.
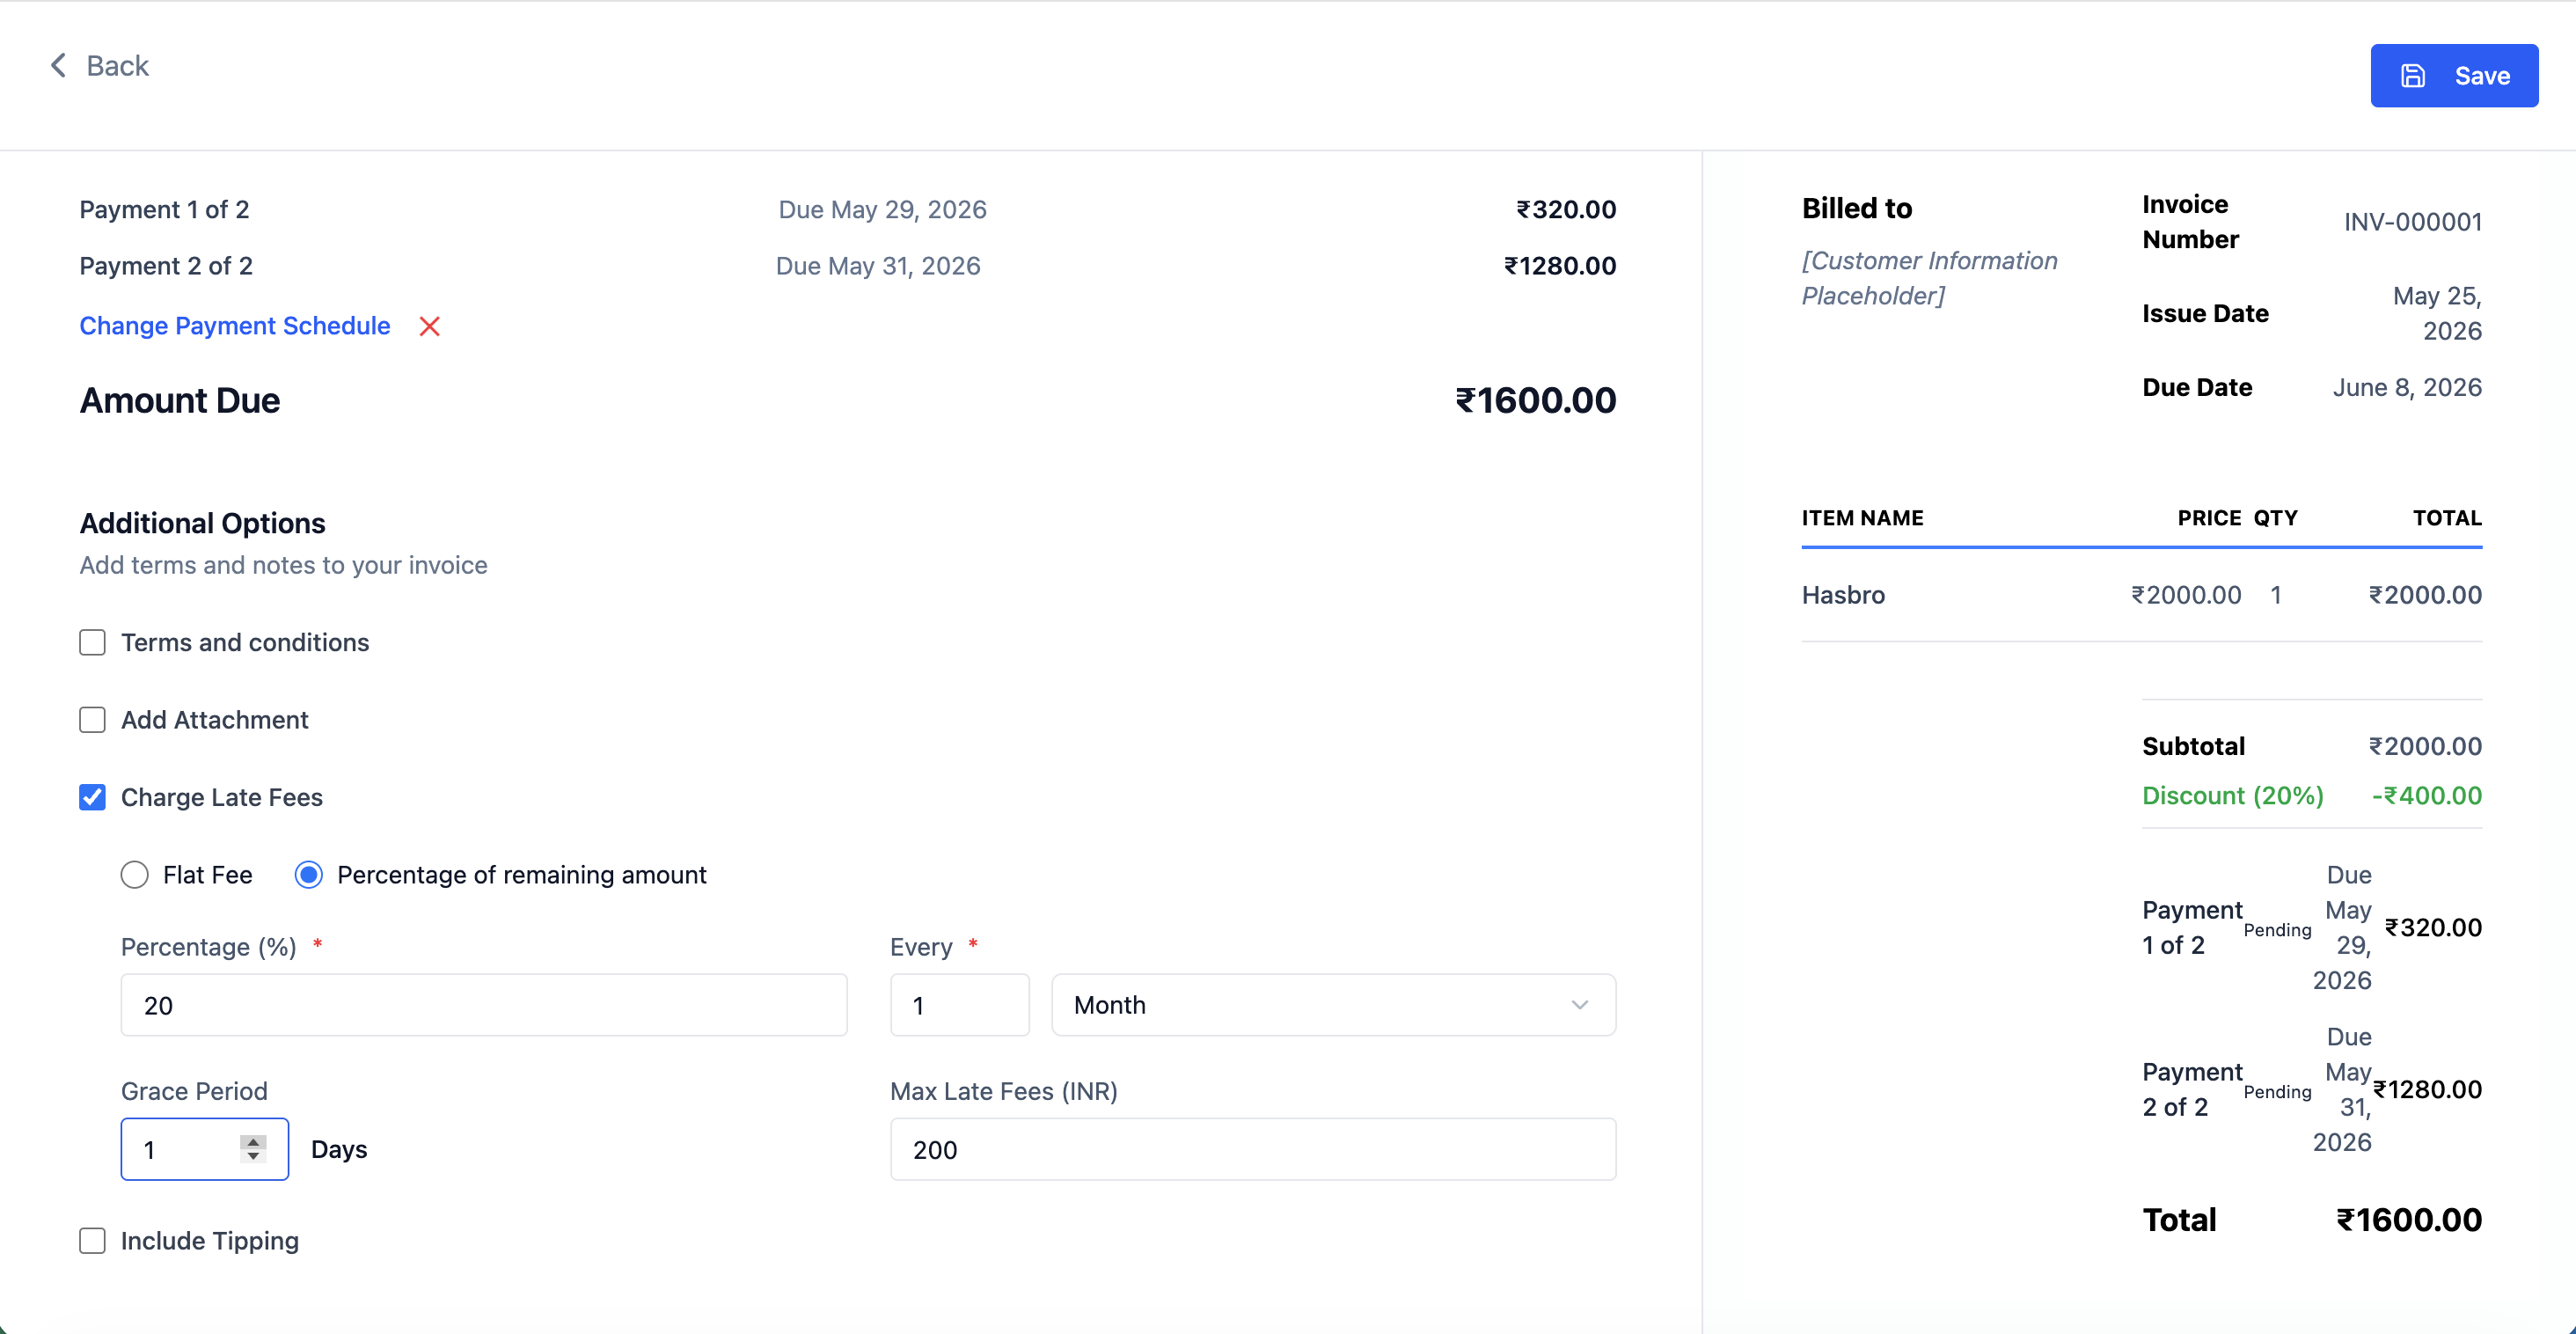 The Late Fees section. Set the grace period in days, choose a fee type (percentage or fixed), and enter the fee value. The fee applies automatically — no manual action needed.
- Set a grace period in days — the number of days after the due date before the late fee kicks in. Setting
0means the fee applies on the day after the due date. - Choose the fee type: a percentage of the outstanding balance, or a fixed amount.
- Enter the fee value.
- The late fee is applied automatically by the system.
Tips
Enable the tips toggle to add a tip field to the contact's payment page. When enabled, the contact sees a tip input before completing payment and can optionally add a gratuity. The tip amount is added to the total and collected through the same payment.
Step 4 — Send or Save
 Three options at the bottom of the invoice form: Send immediately, Schedule for a future date and time, or Save as Draft to send later.
- Send — immediately emails the invoice to the contact with a Pay Now button. The status changes from Draft to Sent.
- Schedule — set a future date and time for the invoice to be automatically sent. The status will be Scheduled until that time.
- Save as Draft — saves the invoice without sending. You can return to edit and send it later.
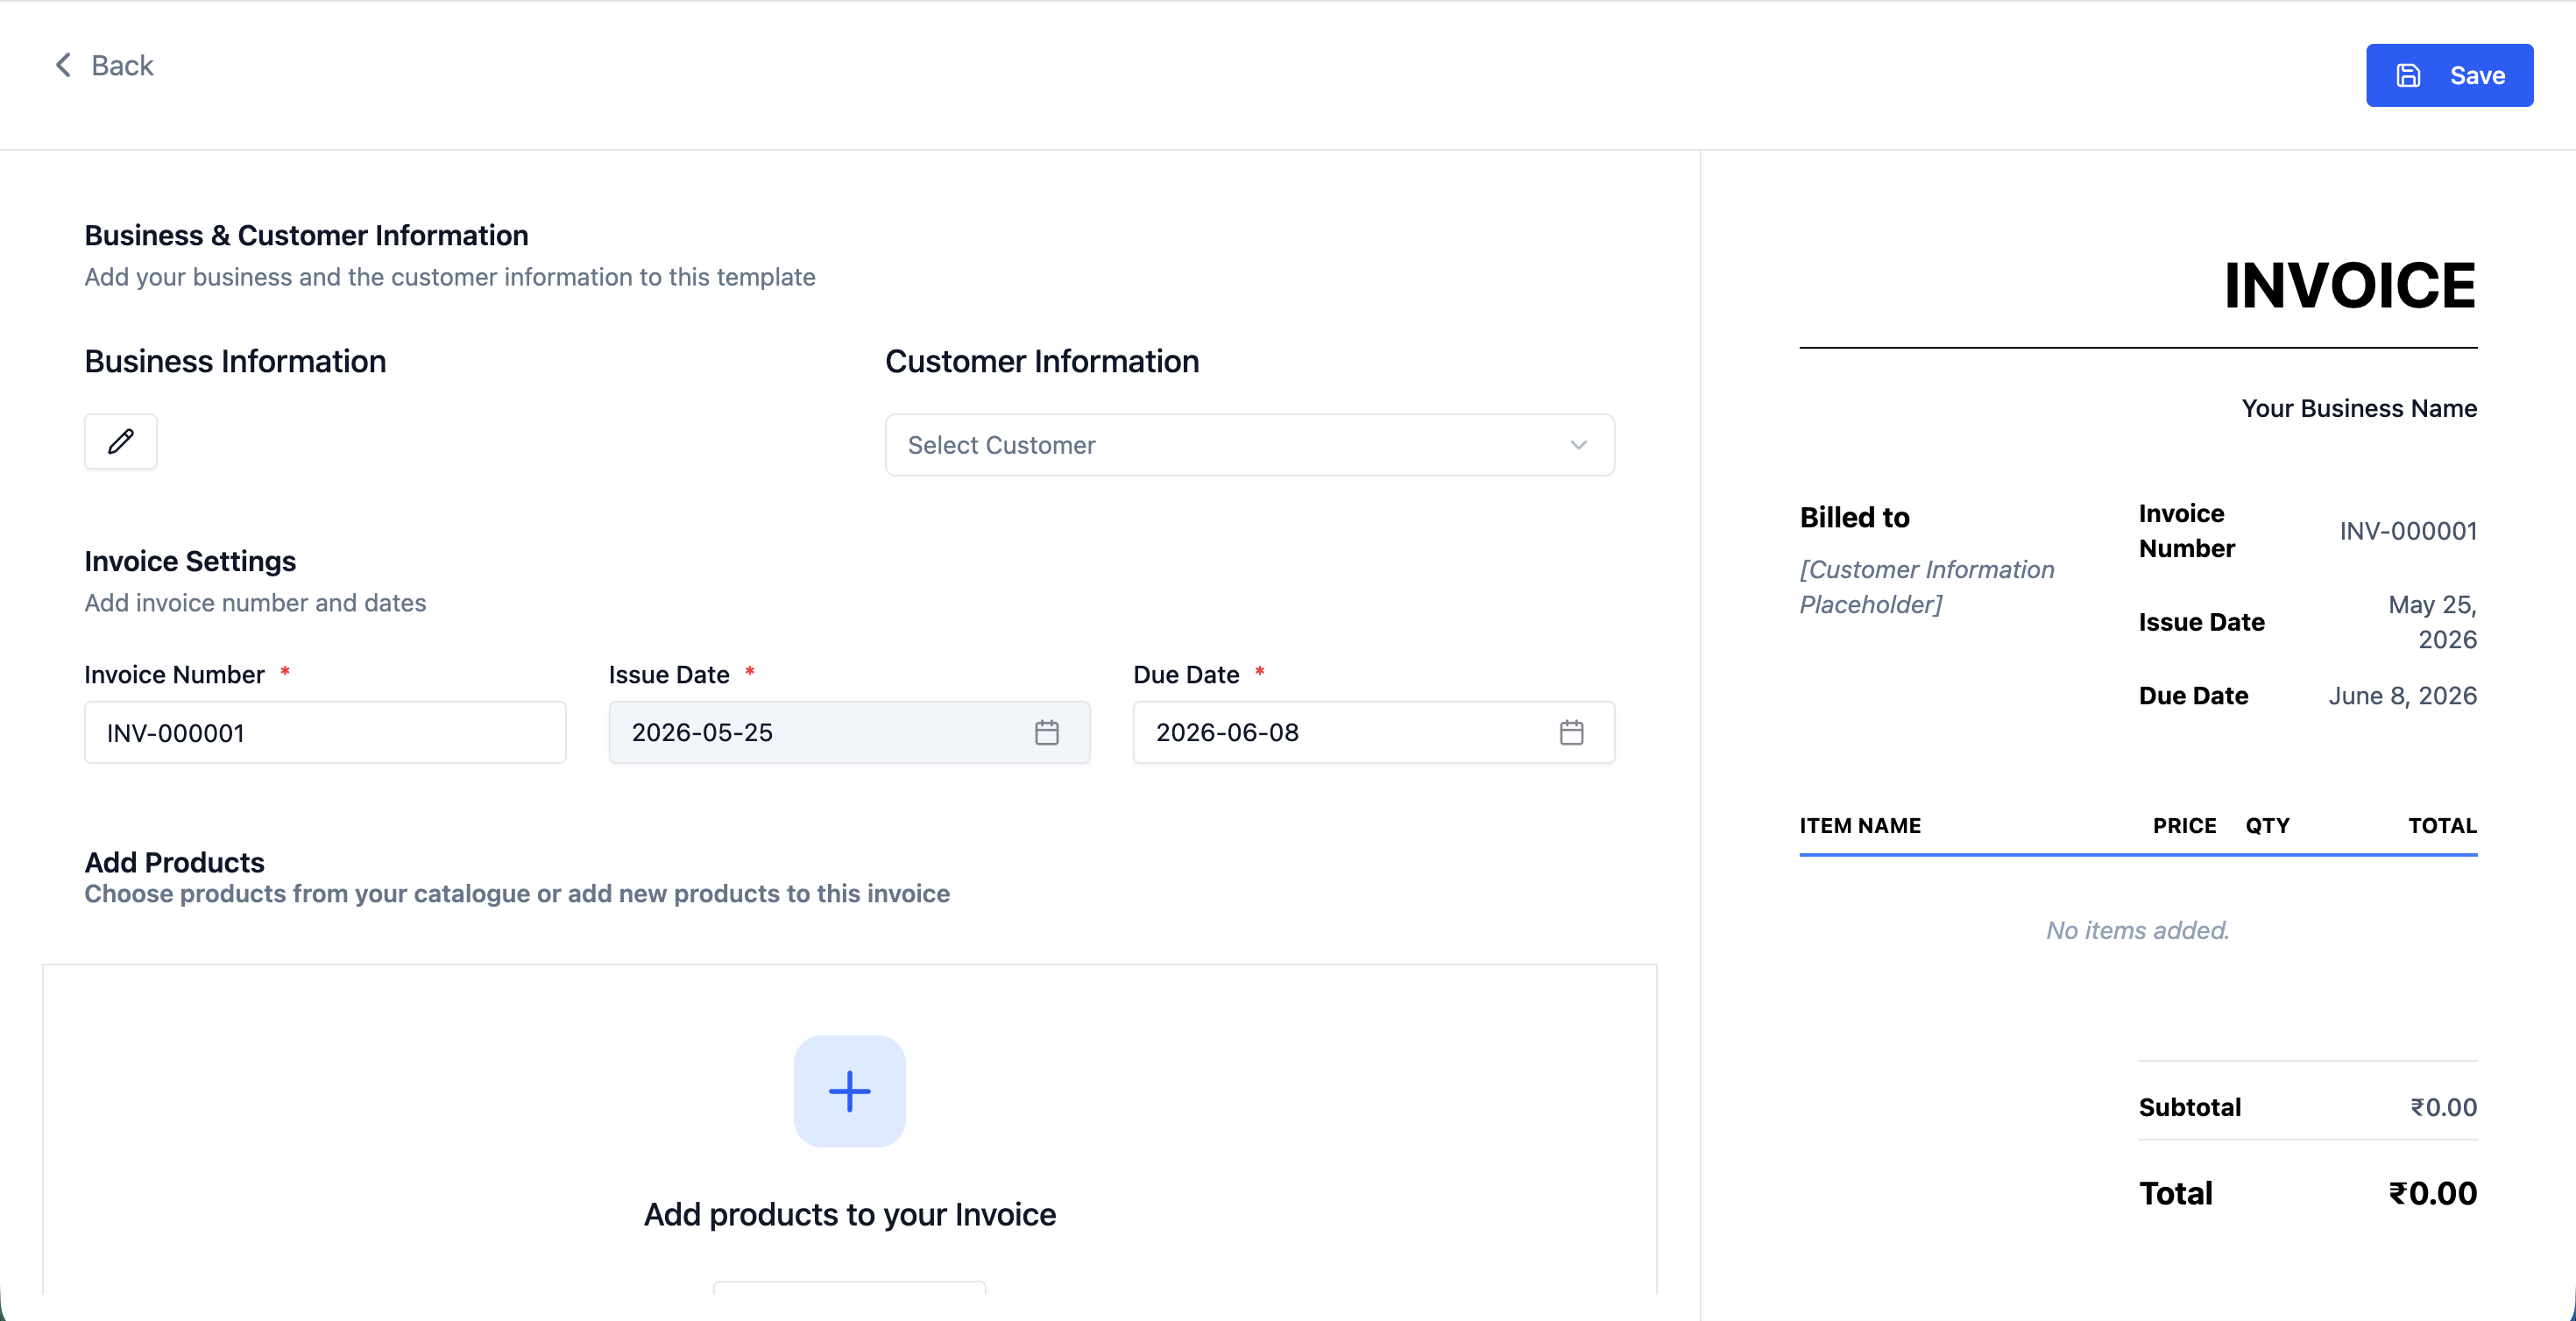 The full invoice creation form showing line items, discount field, and payment terms.
When you send an invoice, the contact gets an email with a Pay Now button. This opens a hosted payment page where they enter their card details and pay. No account or login is required on their end. The payment page supports all payment methods enabled through your connected integration.
If a contact pays outside the system — by bank transfer, cash, or cheque — open the invoice and use the action menu (⋯) → Mark as Paid to manually record the payment. This sets the status to Paid and closes the invoice without going through the payment link. You can optionally enter the payment date and a note.
Importing Invoices
You can bulk-import invoices from a CSV file. Click the New dropdown button (arrow next to + New Invoice) and select Import Invoices.
 The Import Invoices dialog. Download the CSV template, fill in your invoice data, then upload the file. Imported invoices arrive as Drafts.
Download the CSV template, fill in your invoice data, and upload the file. Imported invoices arrive as Drafts so you can review them before sending.
Invoice Actions
From the invoice list, hover any row and click the action menu (⋯):
 The invoice action menu. Available actions change based on the invoice's current status — for example, Mark as Paid only appears on unpaid invoices.
| Action | Description |
|---|---|
| Send | Sends the invoice email to the contact. Available on Draft and Scheduled invoices. |
| Mark as Paid | Manually records a payment and sets the invoice to Paid. Useful for offline payments. |
| Duplicate | Creates an identical copy of the invoice in Draft status. All fields are copied; you can edit before sending. |
| Delete | Permanently removes the invoice. This cannot be undone. |
Filtering and Search
The invoice list supports several ways to narrow results:
- Status tabs — click All, Draft, Sent, Paid, or Overdue to filter by invoice status.
- Search bar — search by contact name, invoice number, or amount.
- Sort — click any column header to sort ascending or descending.
Invoice Settings
Click the Settings button (gear icon) near the top of the Invoices section to configure global invoice defaults.
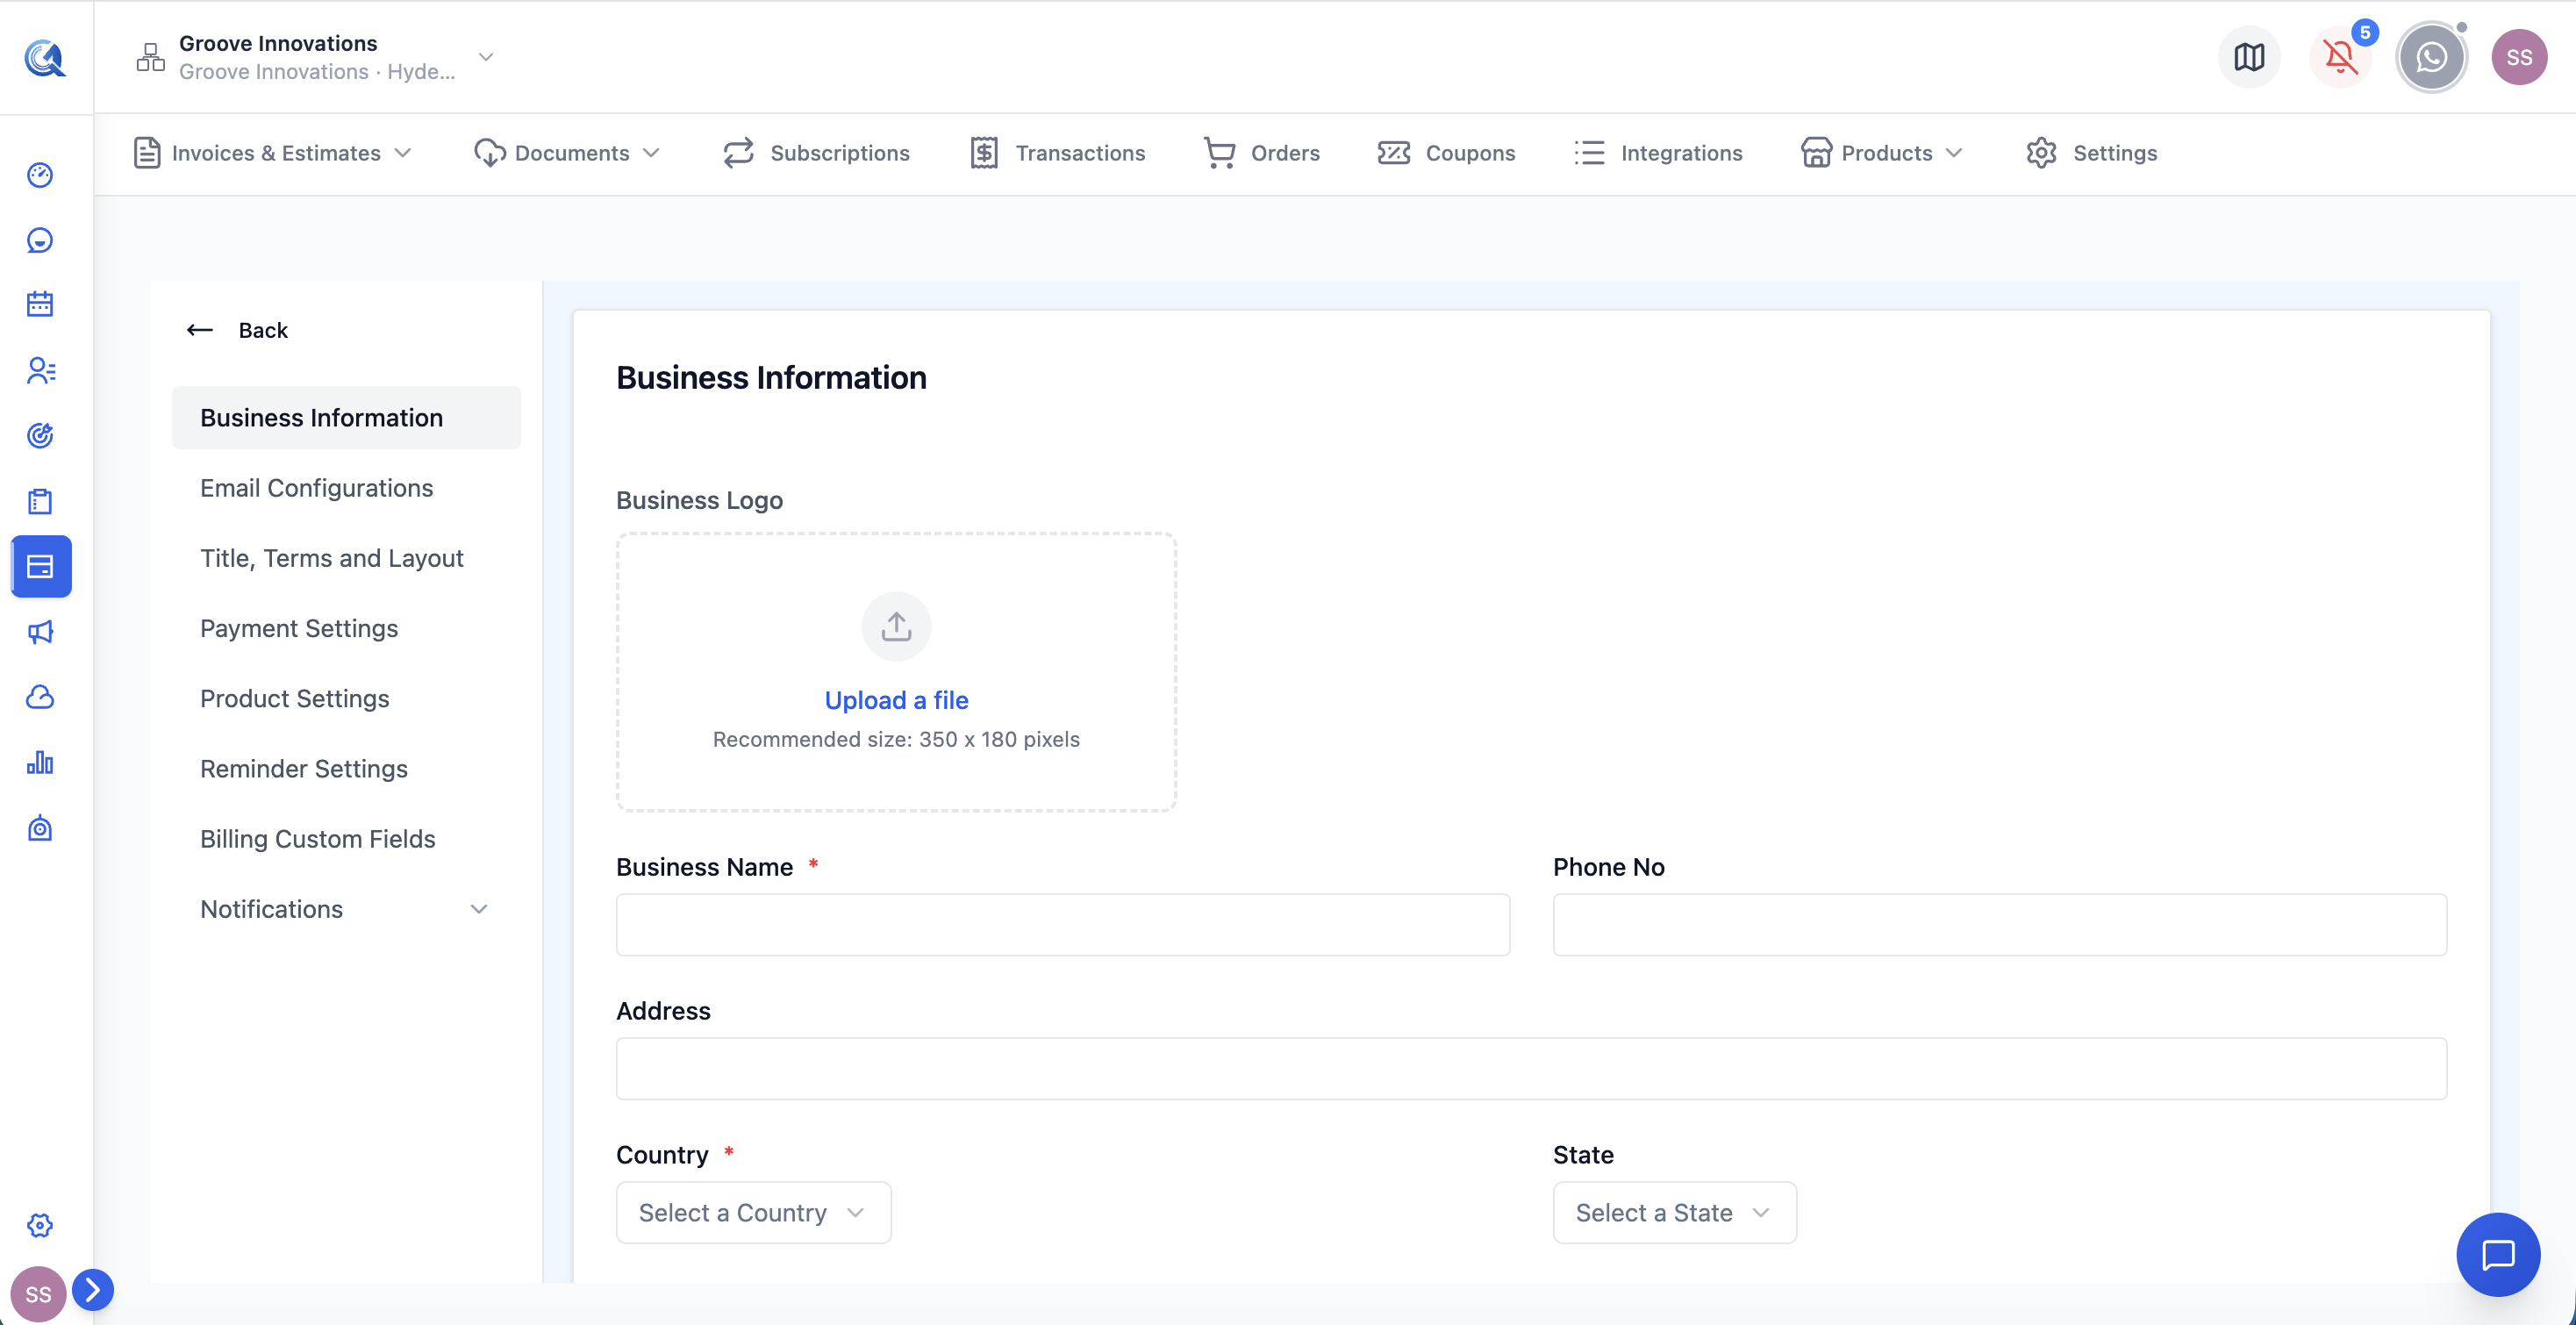 Invoice Settings. Configure invoice numbering, payment terms, business information, email content, and automated payment reminders — all as defaults that apply to every new invoice.
| Setting | What it configures |
|---|---|
| Invoice number | The prefix and starting number for new invoices (e.g. INV-0001) |
| Payment terms | Default payment terms text that appears on every invoice |
| Business information | Your business name, logo, phone, address, and website on invoice PDFs |
| Email configuration | The default subject line and body for invoice delivery emails |
| Payment settings | Which payment methods contacts can use on the payment page |
| Reminder settings | Automated follow-up emails before and after the due date |
These are defaults — you can override any of them on individual invoices.
Video Walkthrough
Watch the complete walkthrough below.