Recurring Invoices
Recurring Invoices let you automate billing for contacts you charge on a regular schedule — monthly retainers, weekly service fees, annual subscriptions, or any repeating charge. You configure the schedule once and Quantixone handles generating and sending each invoice automatically on the correct date.
Navigating to Recurring Invoices
From the main navigation, click Payments → Invoices & Estimates → Recurring Invoices sub-tab.
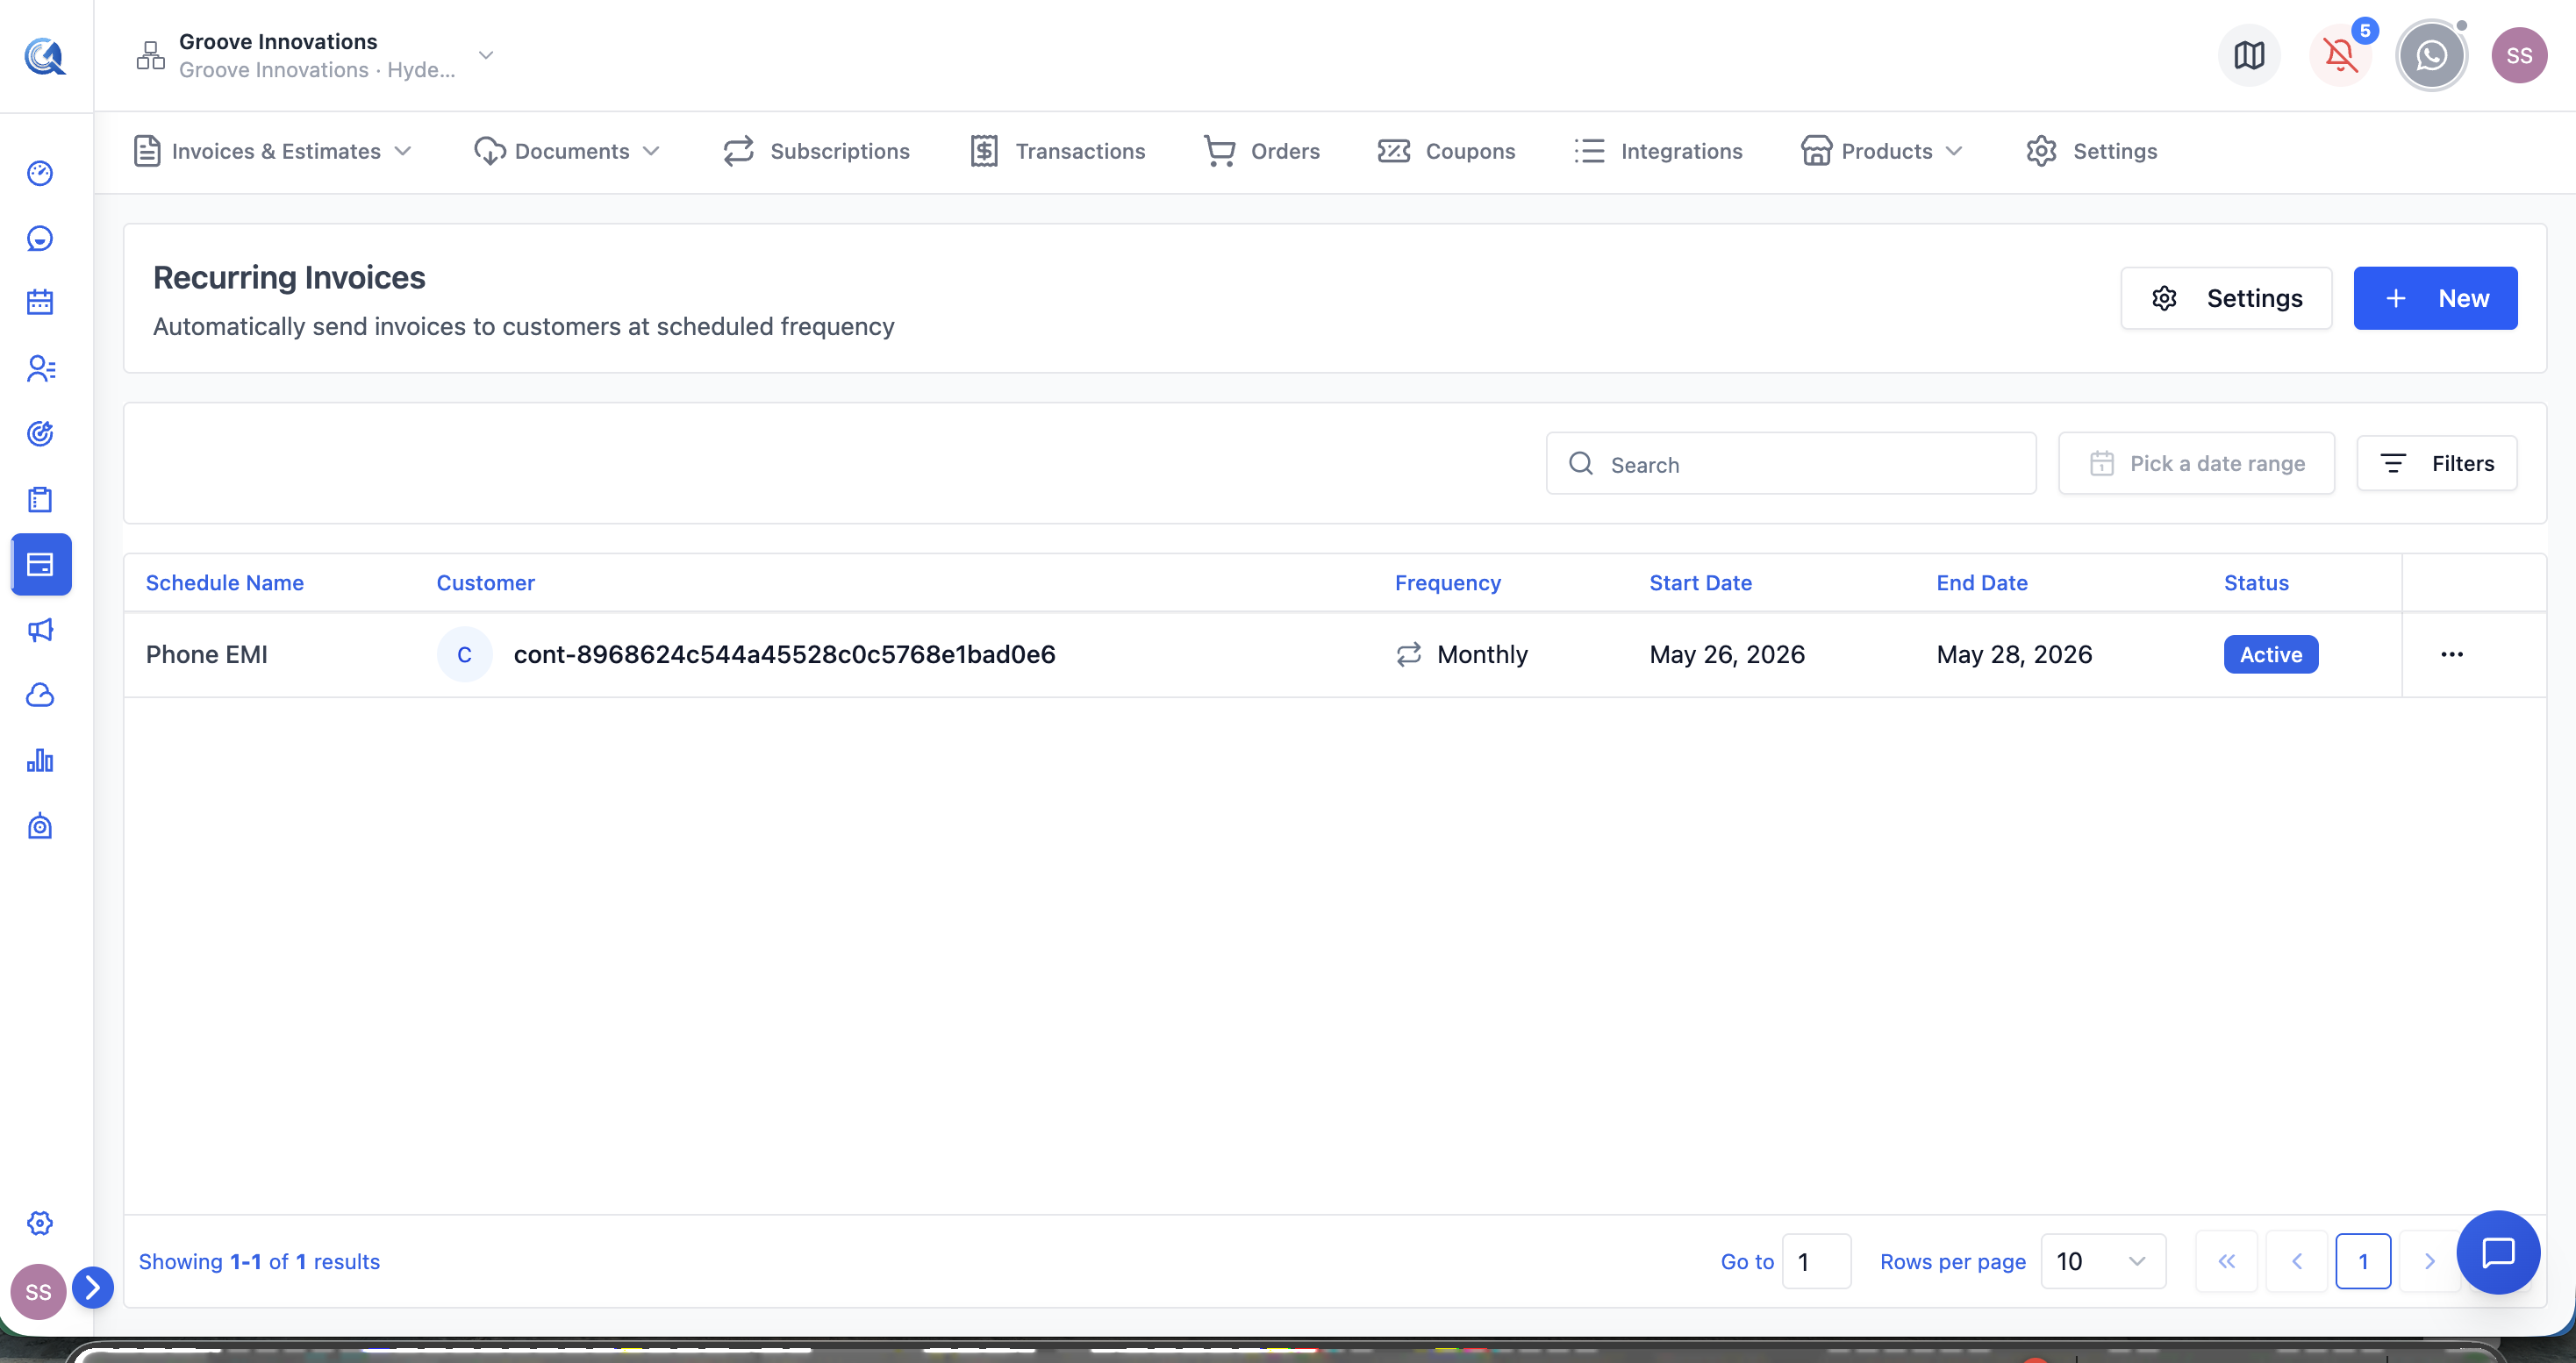 The Recurring Invoices list shows all active, paused, and cancelled schedules.
How It Works
When you save a recurring invoice schedule, Quantixone takes over completely:
- On each billing date, the system automatically generates a new invoice using the line items, pricing, and settings from the schedule.
- That invoice is sent to the contact immediately — they receive the same payment email as any regular invoice, with a Pay Now button.
- The generated invoice appears in the standard Invoices list where you can track whether it has been paid, is overdue, or is still pending.
- On the next billing date, the cycle repeats automatically.
You do not need to do anything between billing cycles. The schedule runs unattended until you pause or cancel it.
Creating a Recurring Invoice
Click + New Recurring Invoice to open the setup form.
Step 1 — Contact
Select the contact you are billing. Their billing details are pre-filled from their contact record, and you can override them as needed.
Step 2 — Line Items
Add line items the same way as a standard invoice — either from your product catalogue or as custom entries with a description and price. Each line item has quantity, unit price, and an optional tax rate.
These line items are used for every generated invoice in the schedule. If your pricing changes in the future, edit the schedule and the new pricing applies from the next billing cycle onwards.
Step 3 — Billing Interval
Set how frequently invoices are generated and sent.
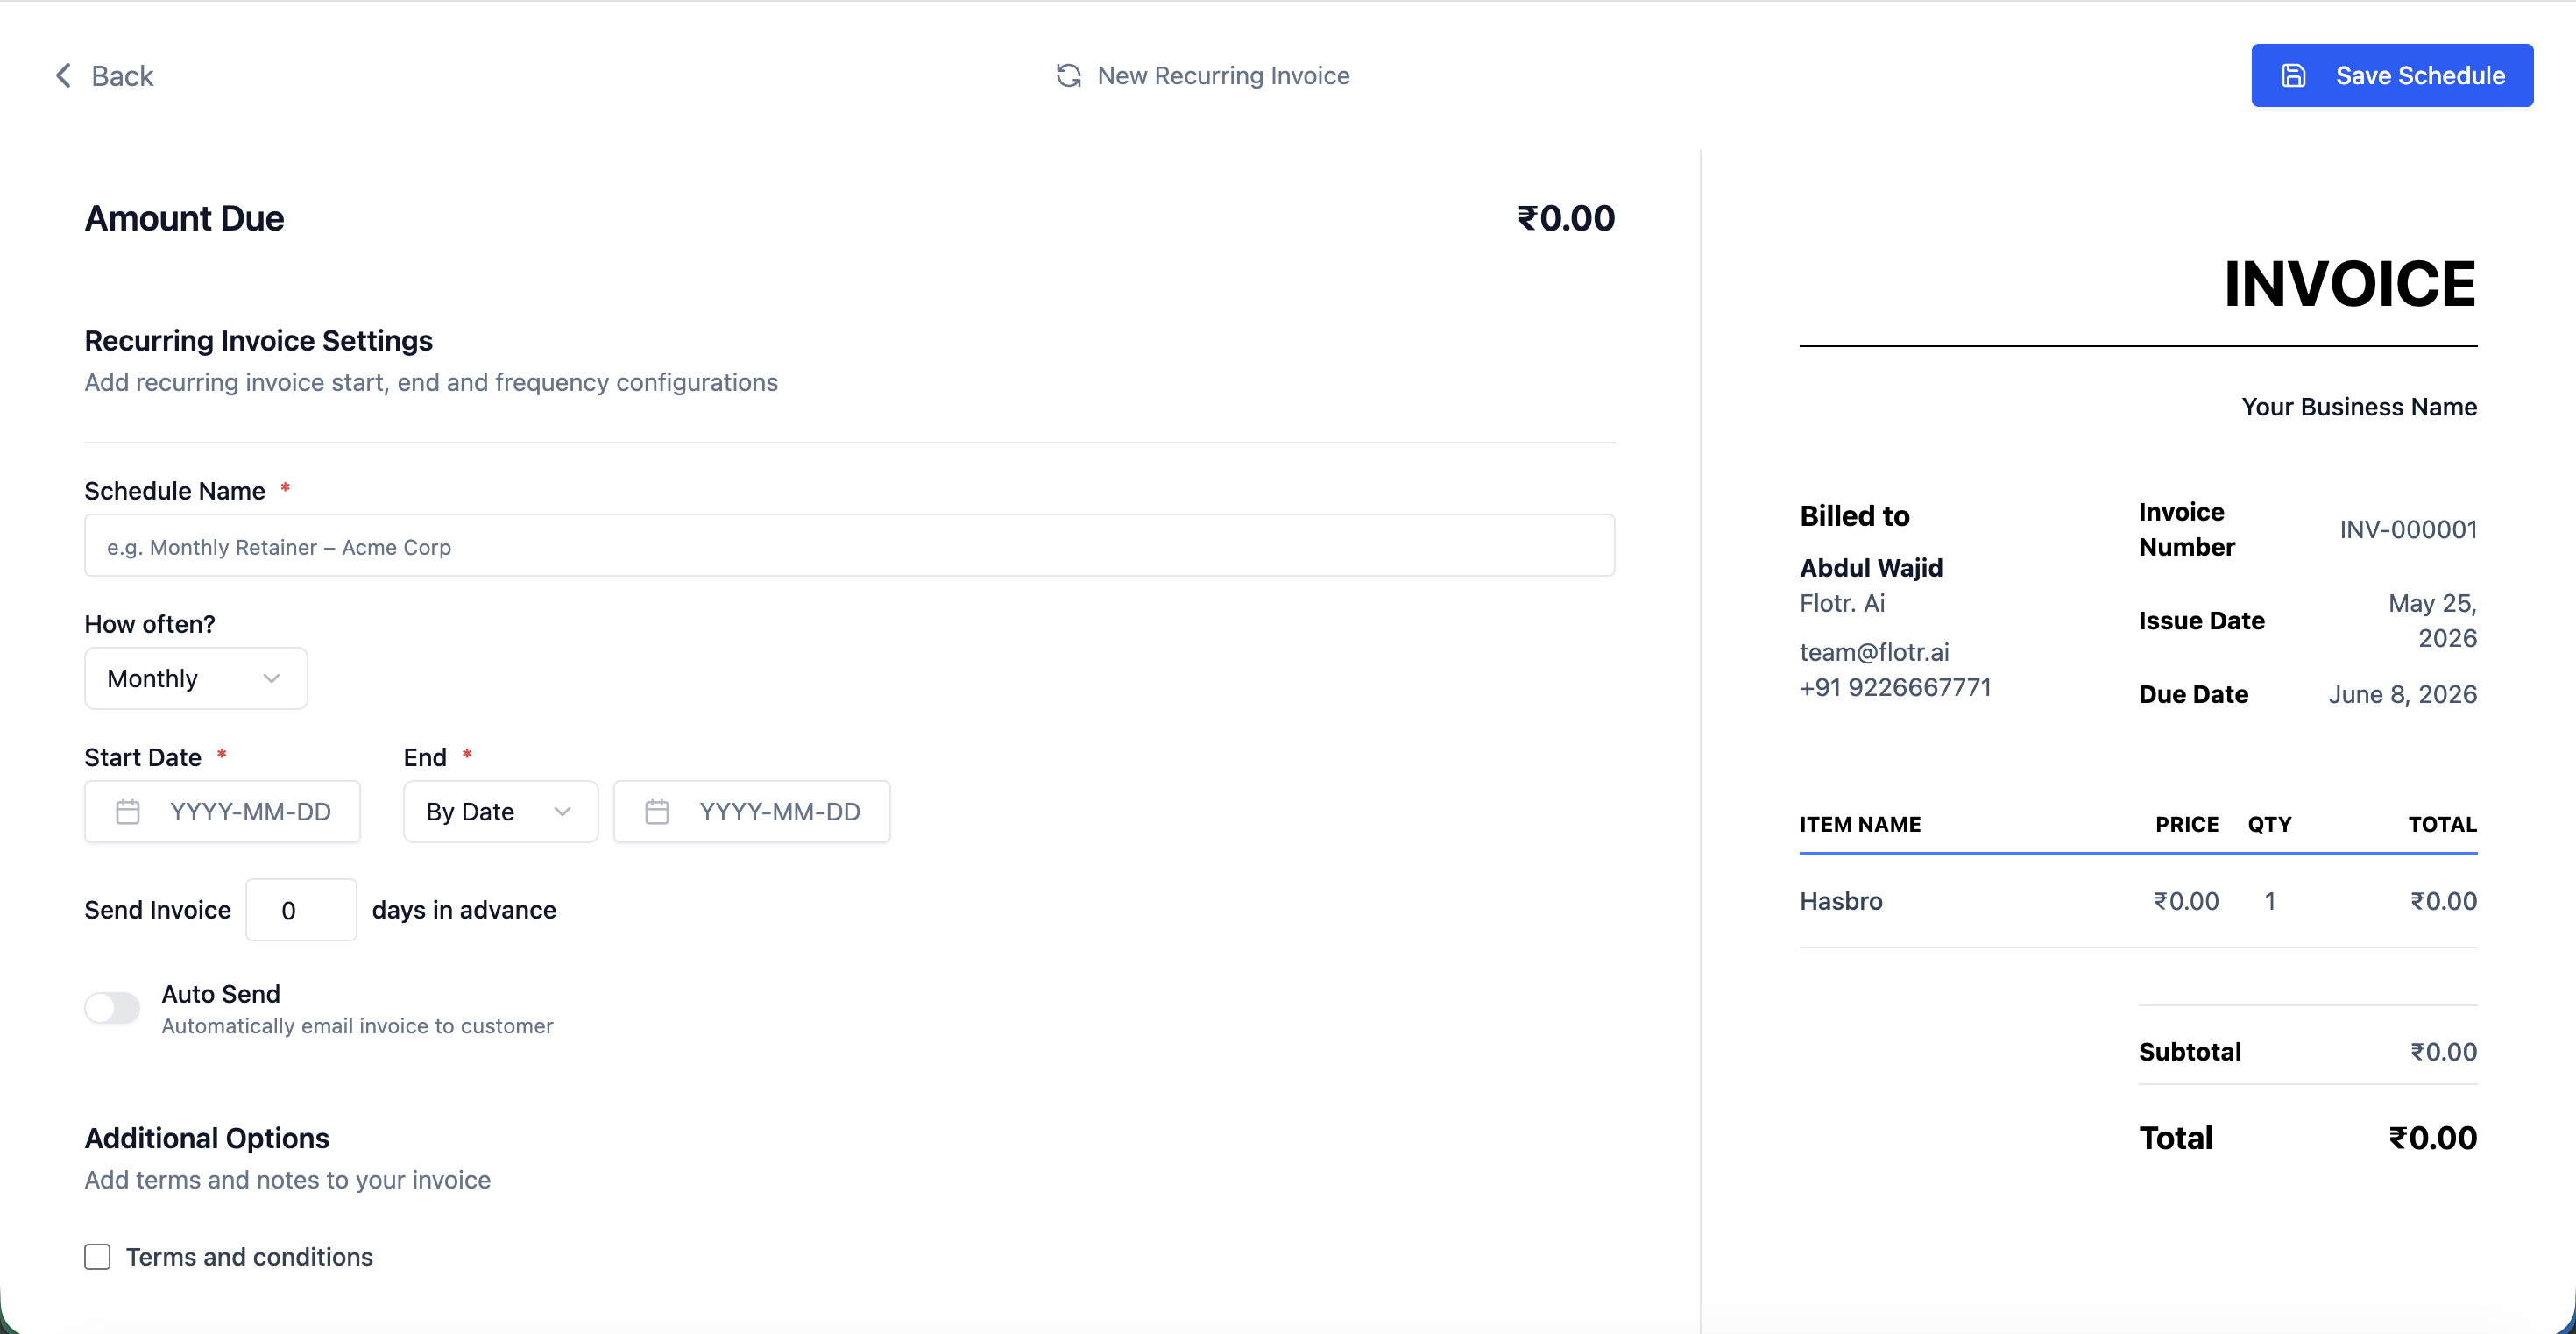 The Billing Interval selector. Choose how frequently the invoice should be automatically generated and sent to the contact.
| Interval | Behaviour |
|---|---|
| Weekly | A new invoice is generated every 7 days from the start date |
| Monthly | A new invoice is generated on the same calendar date each month |
| Quarterly | A new invoice is generated every 3 months |
| Annually | A new invoice is generated once per year on the same date |
Step 4 — Schedule Dates
Start date — the date the first invoice is generated and sent. This is required.
End of schedule — choose one of three options for when the schedule stops:
 The schedule end options. Choose a fixed end date, a total number of invoices, or leave it open-ended for indefinite billing.
| Option | What it means |
|---|---|
| End by date | The schedule stops automatically after the specified end date. No invoice is generated after that date. |
| End after N occurrences | The schedule stops after a set number of invoices have been generated. Setting 12 on a monthly schedule creates a 12-month billing period. |
| No end (open-ended) | Leave both fields blank. The schedule runs indefinitely until you manually cancel it. Use this for ongoing retainer relationships with no defined end. |
Step 5 — Optional Settings
You can configure the same optional settings as a standard invoice:
- Discount — a percentage or fixed discount applied to every generated invoice.
- Late fees — automatic late fee applied if the contact doesn't pay by the due date on each generated invoice.
- Payment terms — the due date rule for each invoice (e.g. due immediately, net 15, net 30).
Step 6 — Save
Click Save to activate the schedule. The first invoice will be generated and sent on the start date.
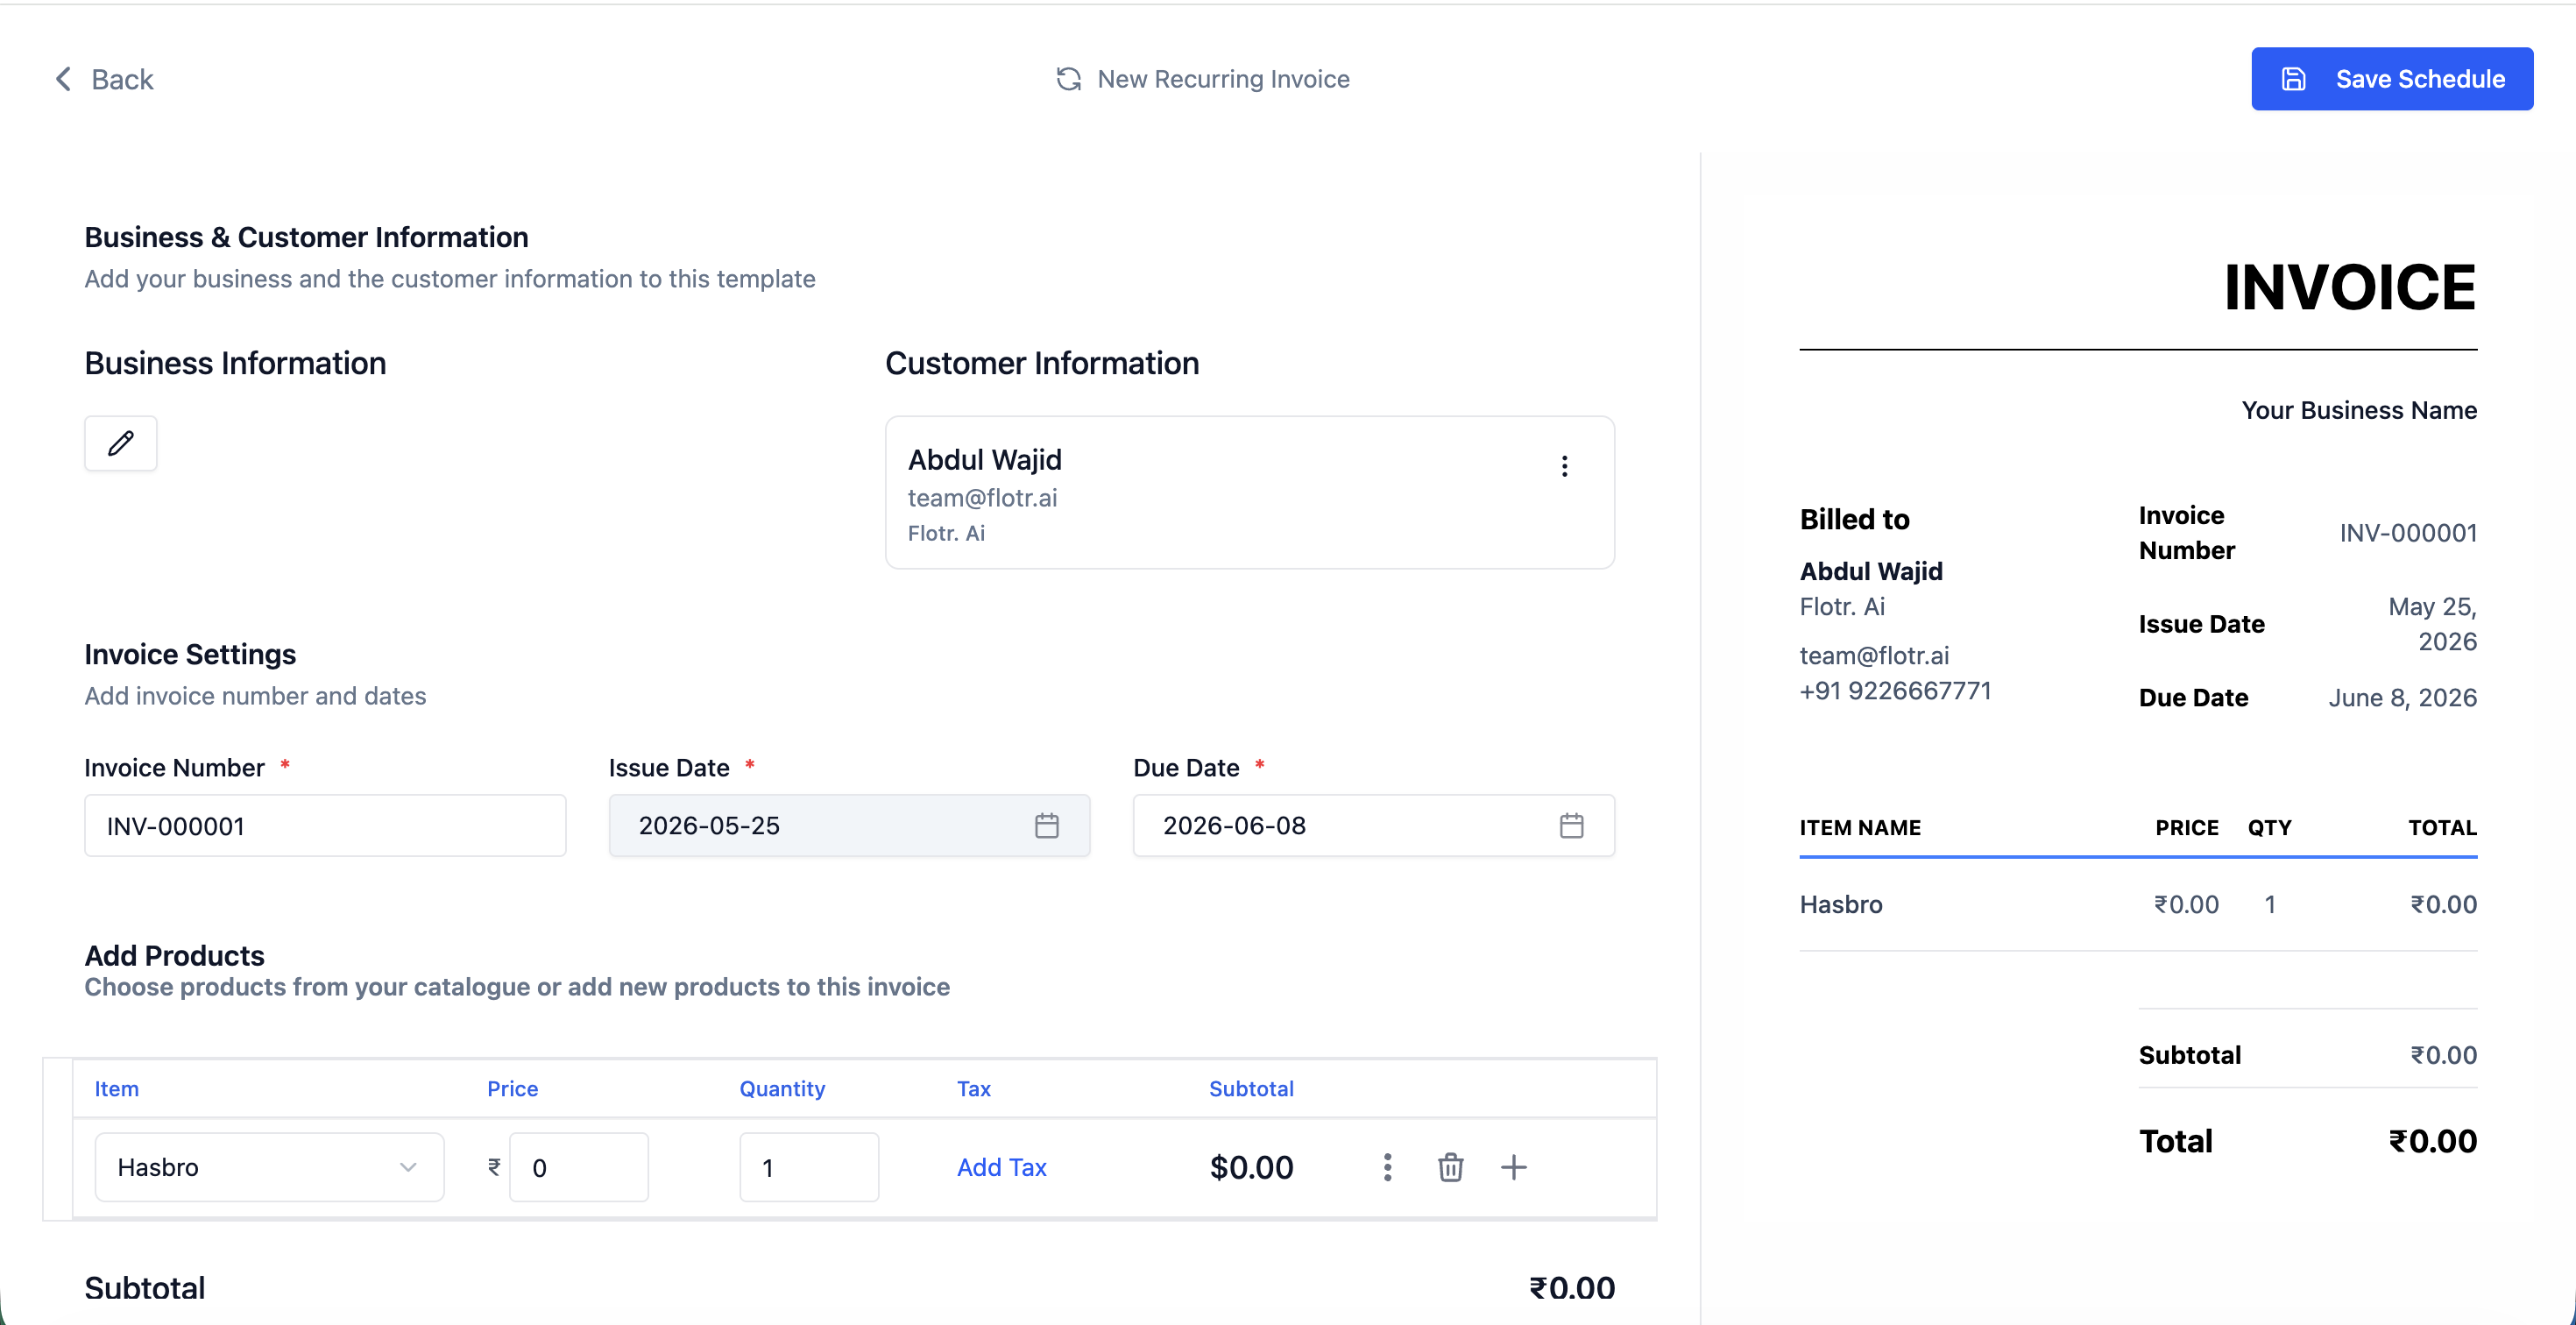 The recurring invoice setup form. Configure the contact, line items, interval, start date, and how the schedule ends.
The Recurring Invoices List
The list shows all your schedules with the following columns:
| Column | What it shows |
|---|---|
| Contact | The contact being billed on this schedule |
| Amount | The invoice total that is generated each cycle |
| Interval | How frequently invoices are sent (Weekly / Monthly / Quarterly / Annually) |
| Next Invoice | The date the next invoice will be generated |
| Status | Whether the schedule is Active, Paused, or Cancelled |
Managing a Schedule
From the recurring invoices list, use the action menu (⋯) on any schedule row.
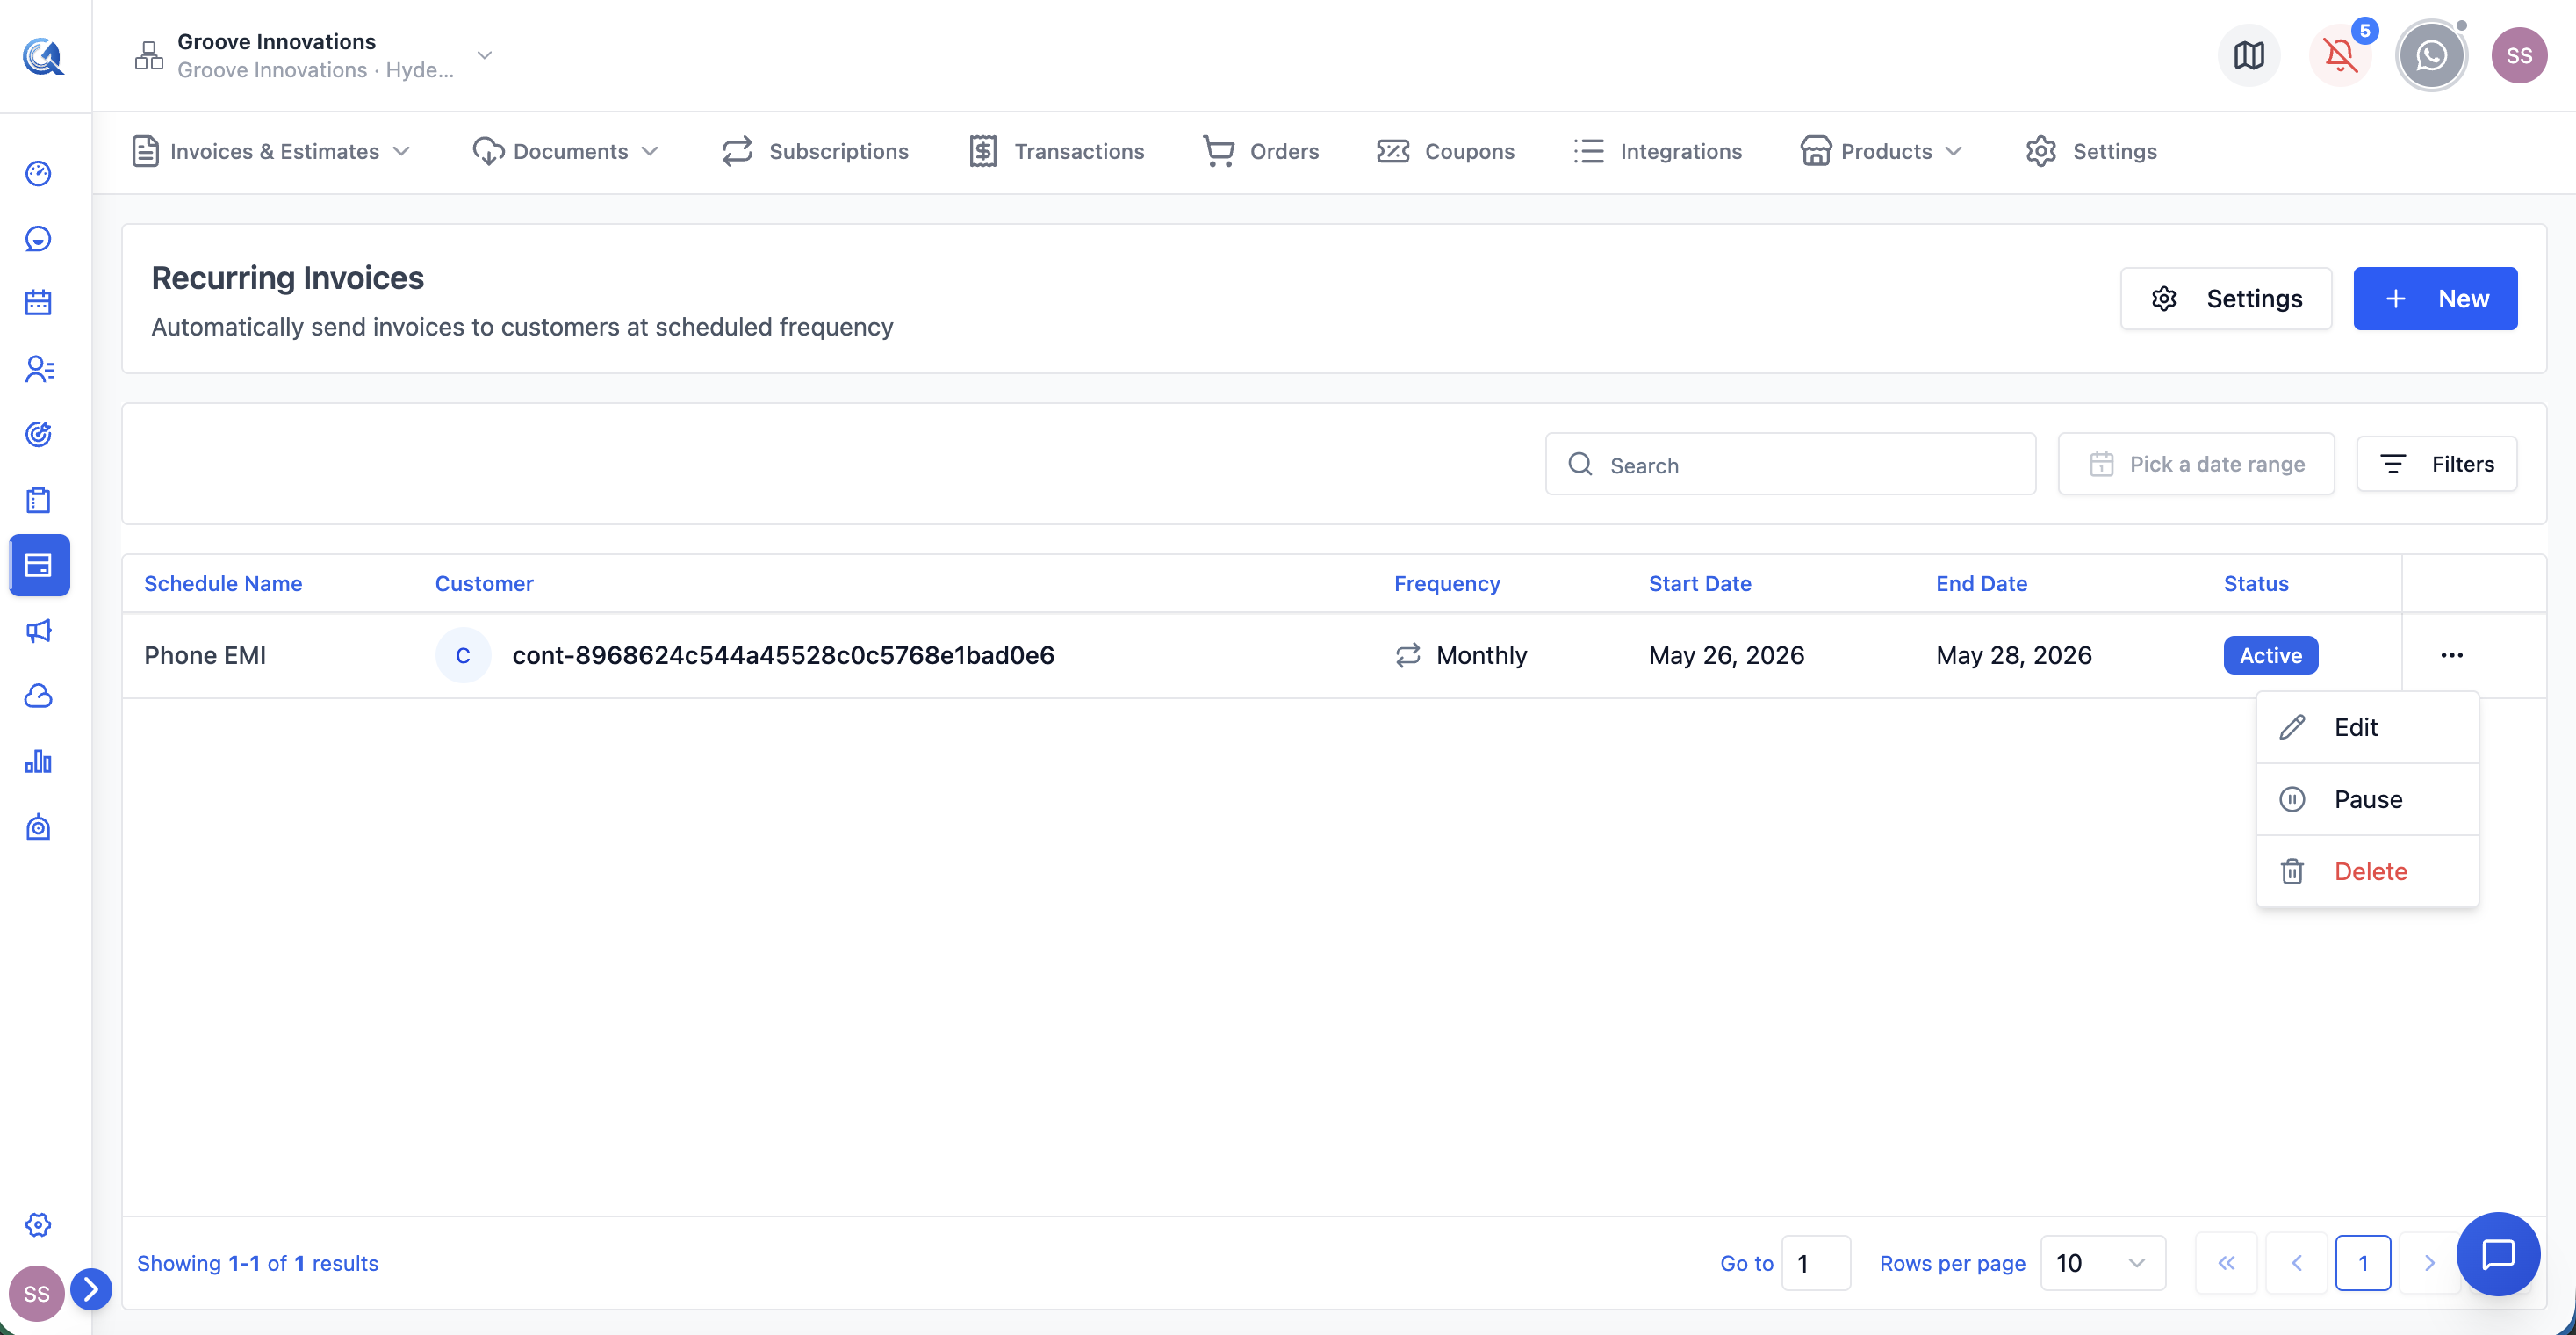 The action menu on a recurring invoice schedule. Use Pause for temporary stops, Edit to change line items or dates, and Cancel only when the billing relationship has permanently ended.
| Action | When to use it | What happens |
|---|---|---|
| Pause | Billing break is temporary (e.g. project on hold, client dispute) | Invoice generation stops. The schedule is preserved exactly as-is. The next billing date is not consumed. |
| Resume | Resuming after a pause | Invoice generation restarts. The next invoice generates on the next scheduled billing date after the resume date. |
| Edit | Changing line items, pricing, interval, or dates | Opens the schedule form. Changes apply from the next billing cycle onwards; previously generated invoices are not affected. |
| Cancel | The recurring billing relationship has permanently ended | Stops all future invoice generation. Cannot be undone. |
Use Pause whenever the break is temporary. The schedule remembers where it was and can be resumed instantly. Use Cancel only when the contract or relationship has genuinely ended — cancelled schedules cannot be restarted and you would need to create a new one.
Once you cancel a recurring invoice schedule, no further invoices will be generated from it. All previously generated invoices remain in the Invoices list and are unaffected — only future generation is stopped.
Viewing Generated Invoices
Every invoice generated by a recurring schedule appears in the standard Invoices section. You can identify recurring-generated invoices by the recurring icon shown alongside them.
 Generated invoices appear in the main Invoices list. The recurring icon identifies them as auto-generated from a schedule. They behave like any other invoice — they can be paid, marked as paid, or sent reminders.
They behave exactly like manually created invoices — they can be paid, marked as paid, sent reminders, or duplicated.
Video Walkthrough
Watch the complete walkthrough below.