Settings
Payments Settings is where you configure the global defaults and rules that govern your entire Payments module — receipts, tax rates, shipping zones and rates, subscription defaults, and miscellaneous charges. These are one-time configurations that apply across all invoices, products, and payments unless overridden at the individual record level.
Navigating to Payments Settings
From the main navigation, click Payments → Settings tab.
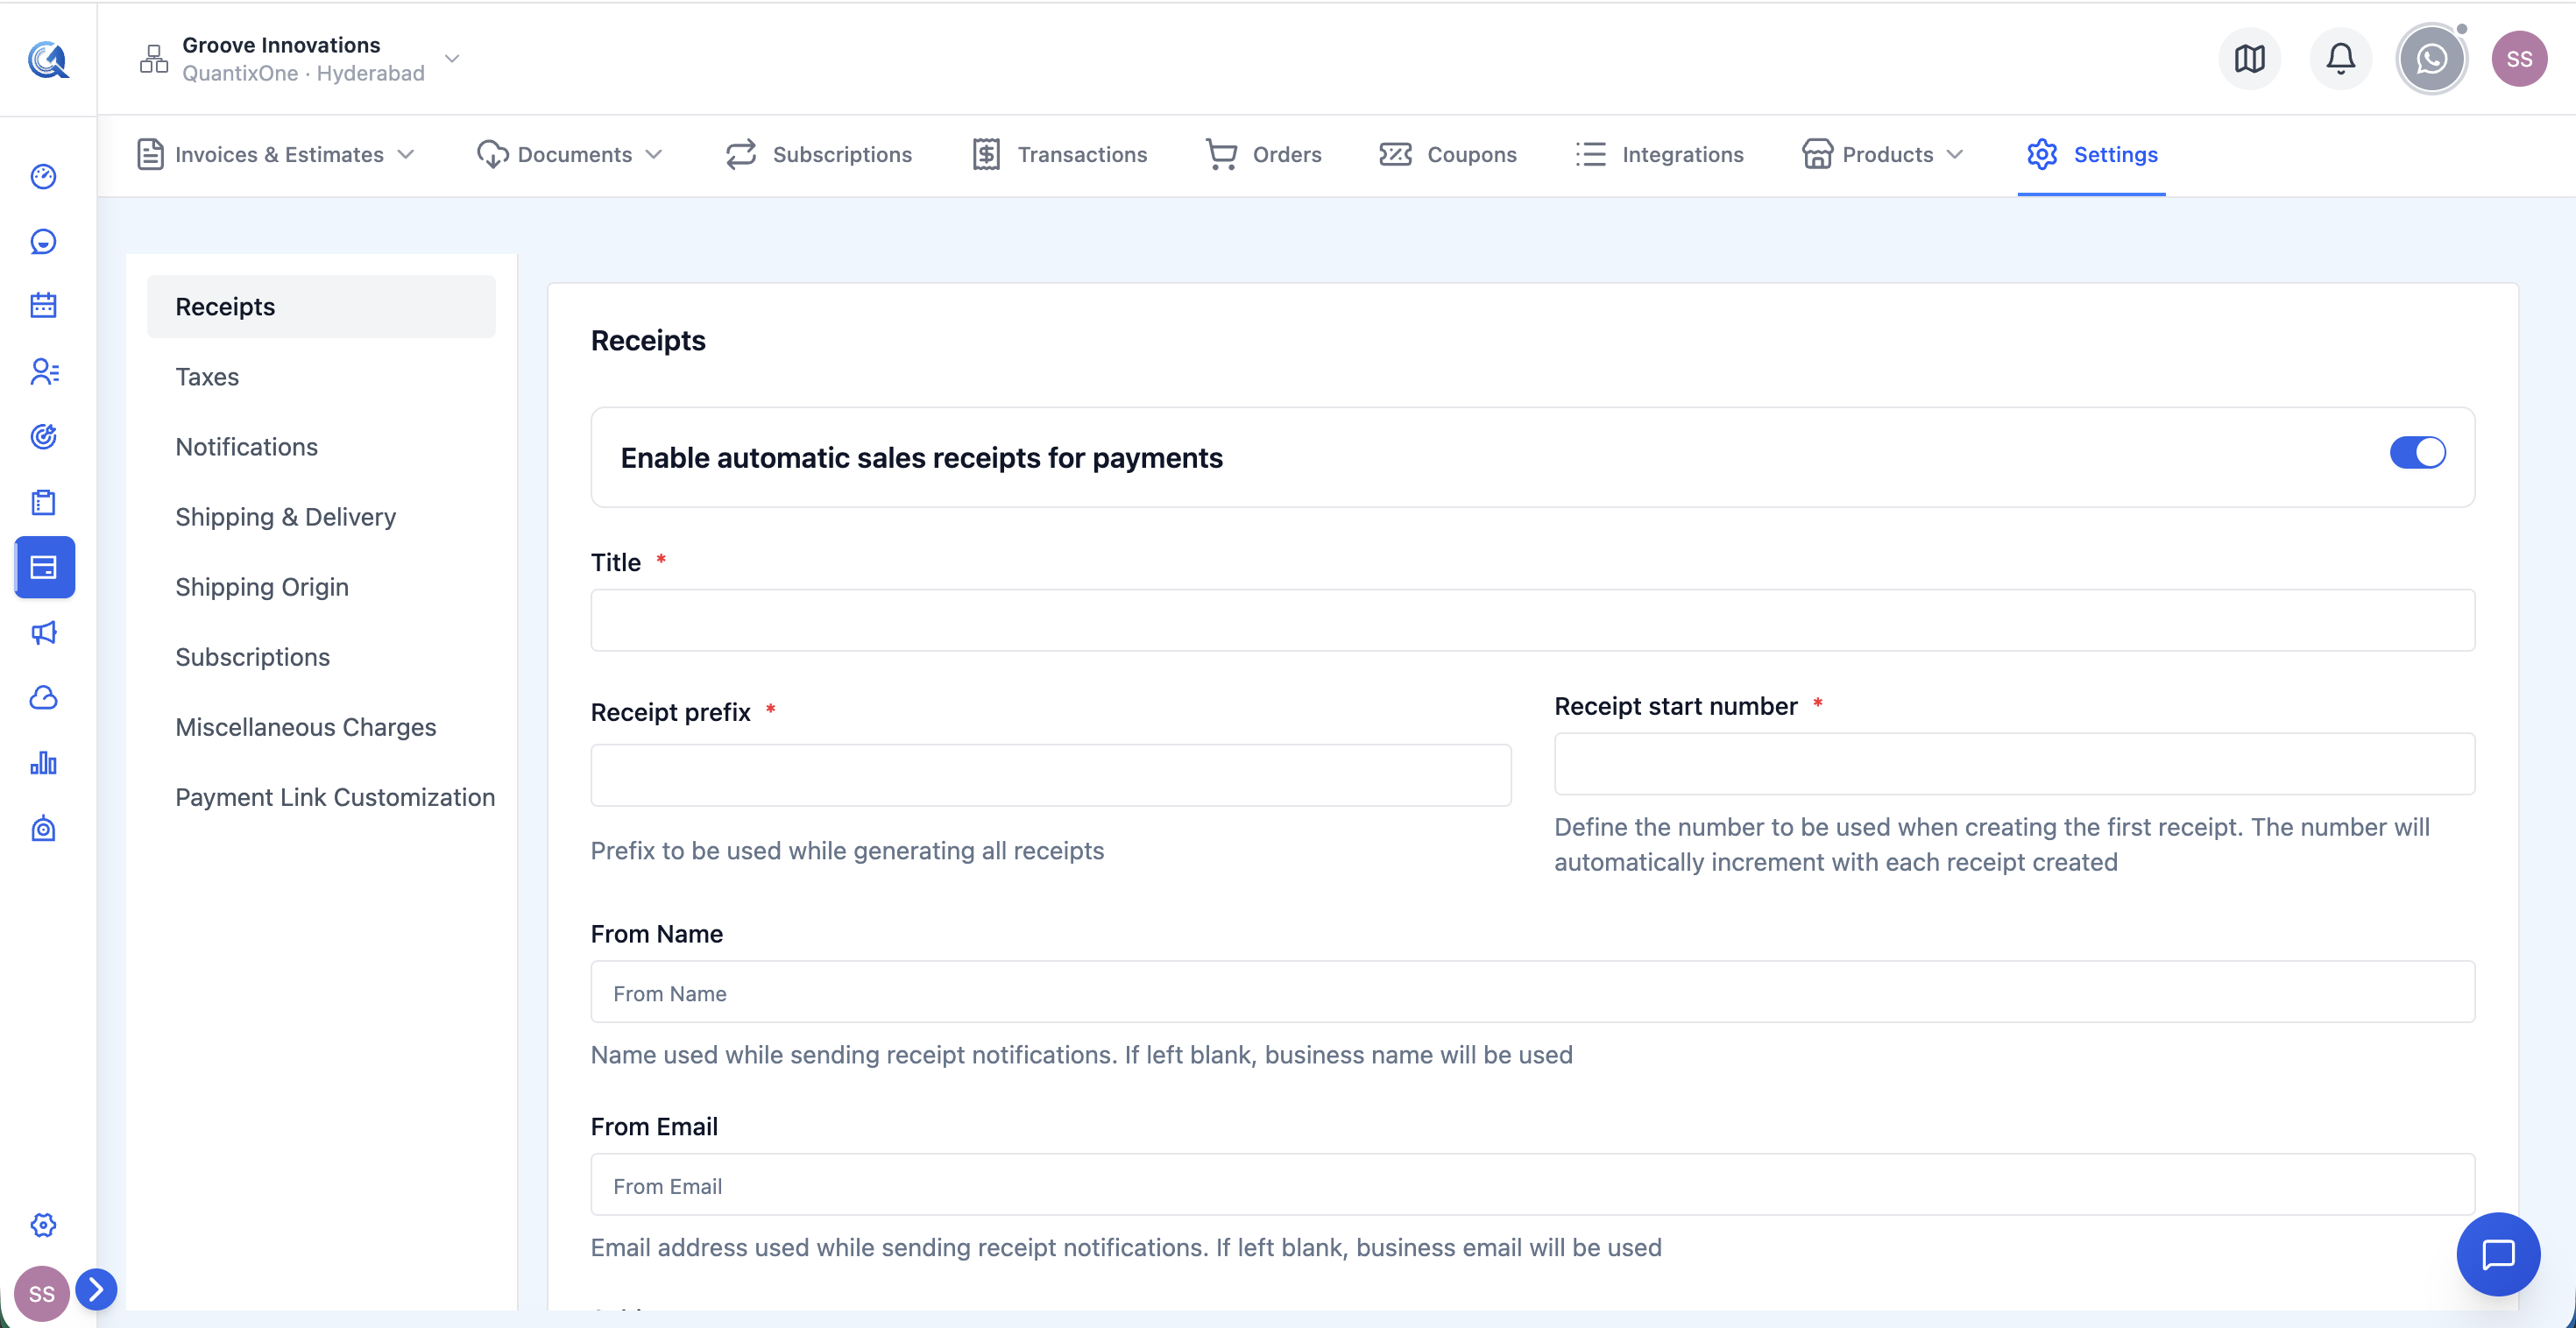 The Settings page. Use the left-side section tabs to switch between Receipts, Taxes, Shipping & Delivery, Subscription Defaults, and Miscellaneous Charges.
Receipts
The Receipts section controls the content and appearance of the payment receipt email sent to contacts after a successful payment.
The receipt email fires automatically after every successful payment — you do not need to trigger it manually. Every receipt automatically includes the business logo, the payment amount and invoice or order reference number, and the transaction date.
 The Receipts section. Upload your logo and customise the heading and footer text that appear on every automated payment receipt email.
Configurable fields:
| Field | What it controls |
|---|---|
| Business Logo | Uploaded image shown at the top of every receipt email. Use a clear, high-resolution PNG or JPG of your logo. |
| Receipt Heading | Customisable greeting text at the top of the receipt body (e.g. "Thank you for your payment, {{contact.first_name}}!") |
| Footer Text | Text at the bottom of the receipt. Use it for a thank-you message, support email, website link, or a reference to your terms and conditions. |
Changes to receipt settings apply to all future receipts immediately. Previously sent receipts are not affected.
Taxes
The Taxes section is where you create the tax rates that can be applied to products and invoice line items.
Tax Inclusion Setting
At the top of the Taxes section is a global setting for how tax is displayed on prices:
| Option | What it means |
|---|---|
| Yes (tax included) | The prices you enter on products and invoices already include tax. The tax amount is shown separately on the receipt but is not added on top of the displayed price. |
| No (tax excluded) | Tax is calculated and added on top of the displayed price at checkout. The customer sees the base price plus the tax as a separate line. |
This setting acts as the default. Individual products can override it using the "Include Tax in Prices" setting in the product form.
Tax Rates Table
The table shows all your existing tax rates.
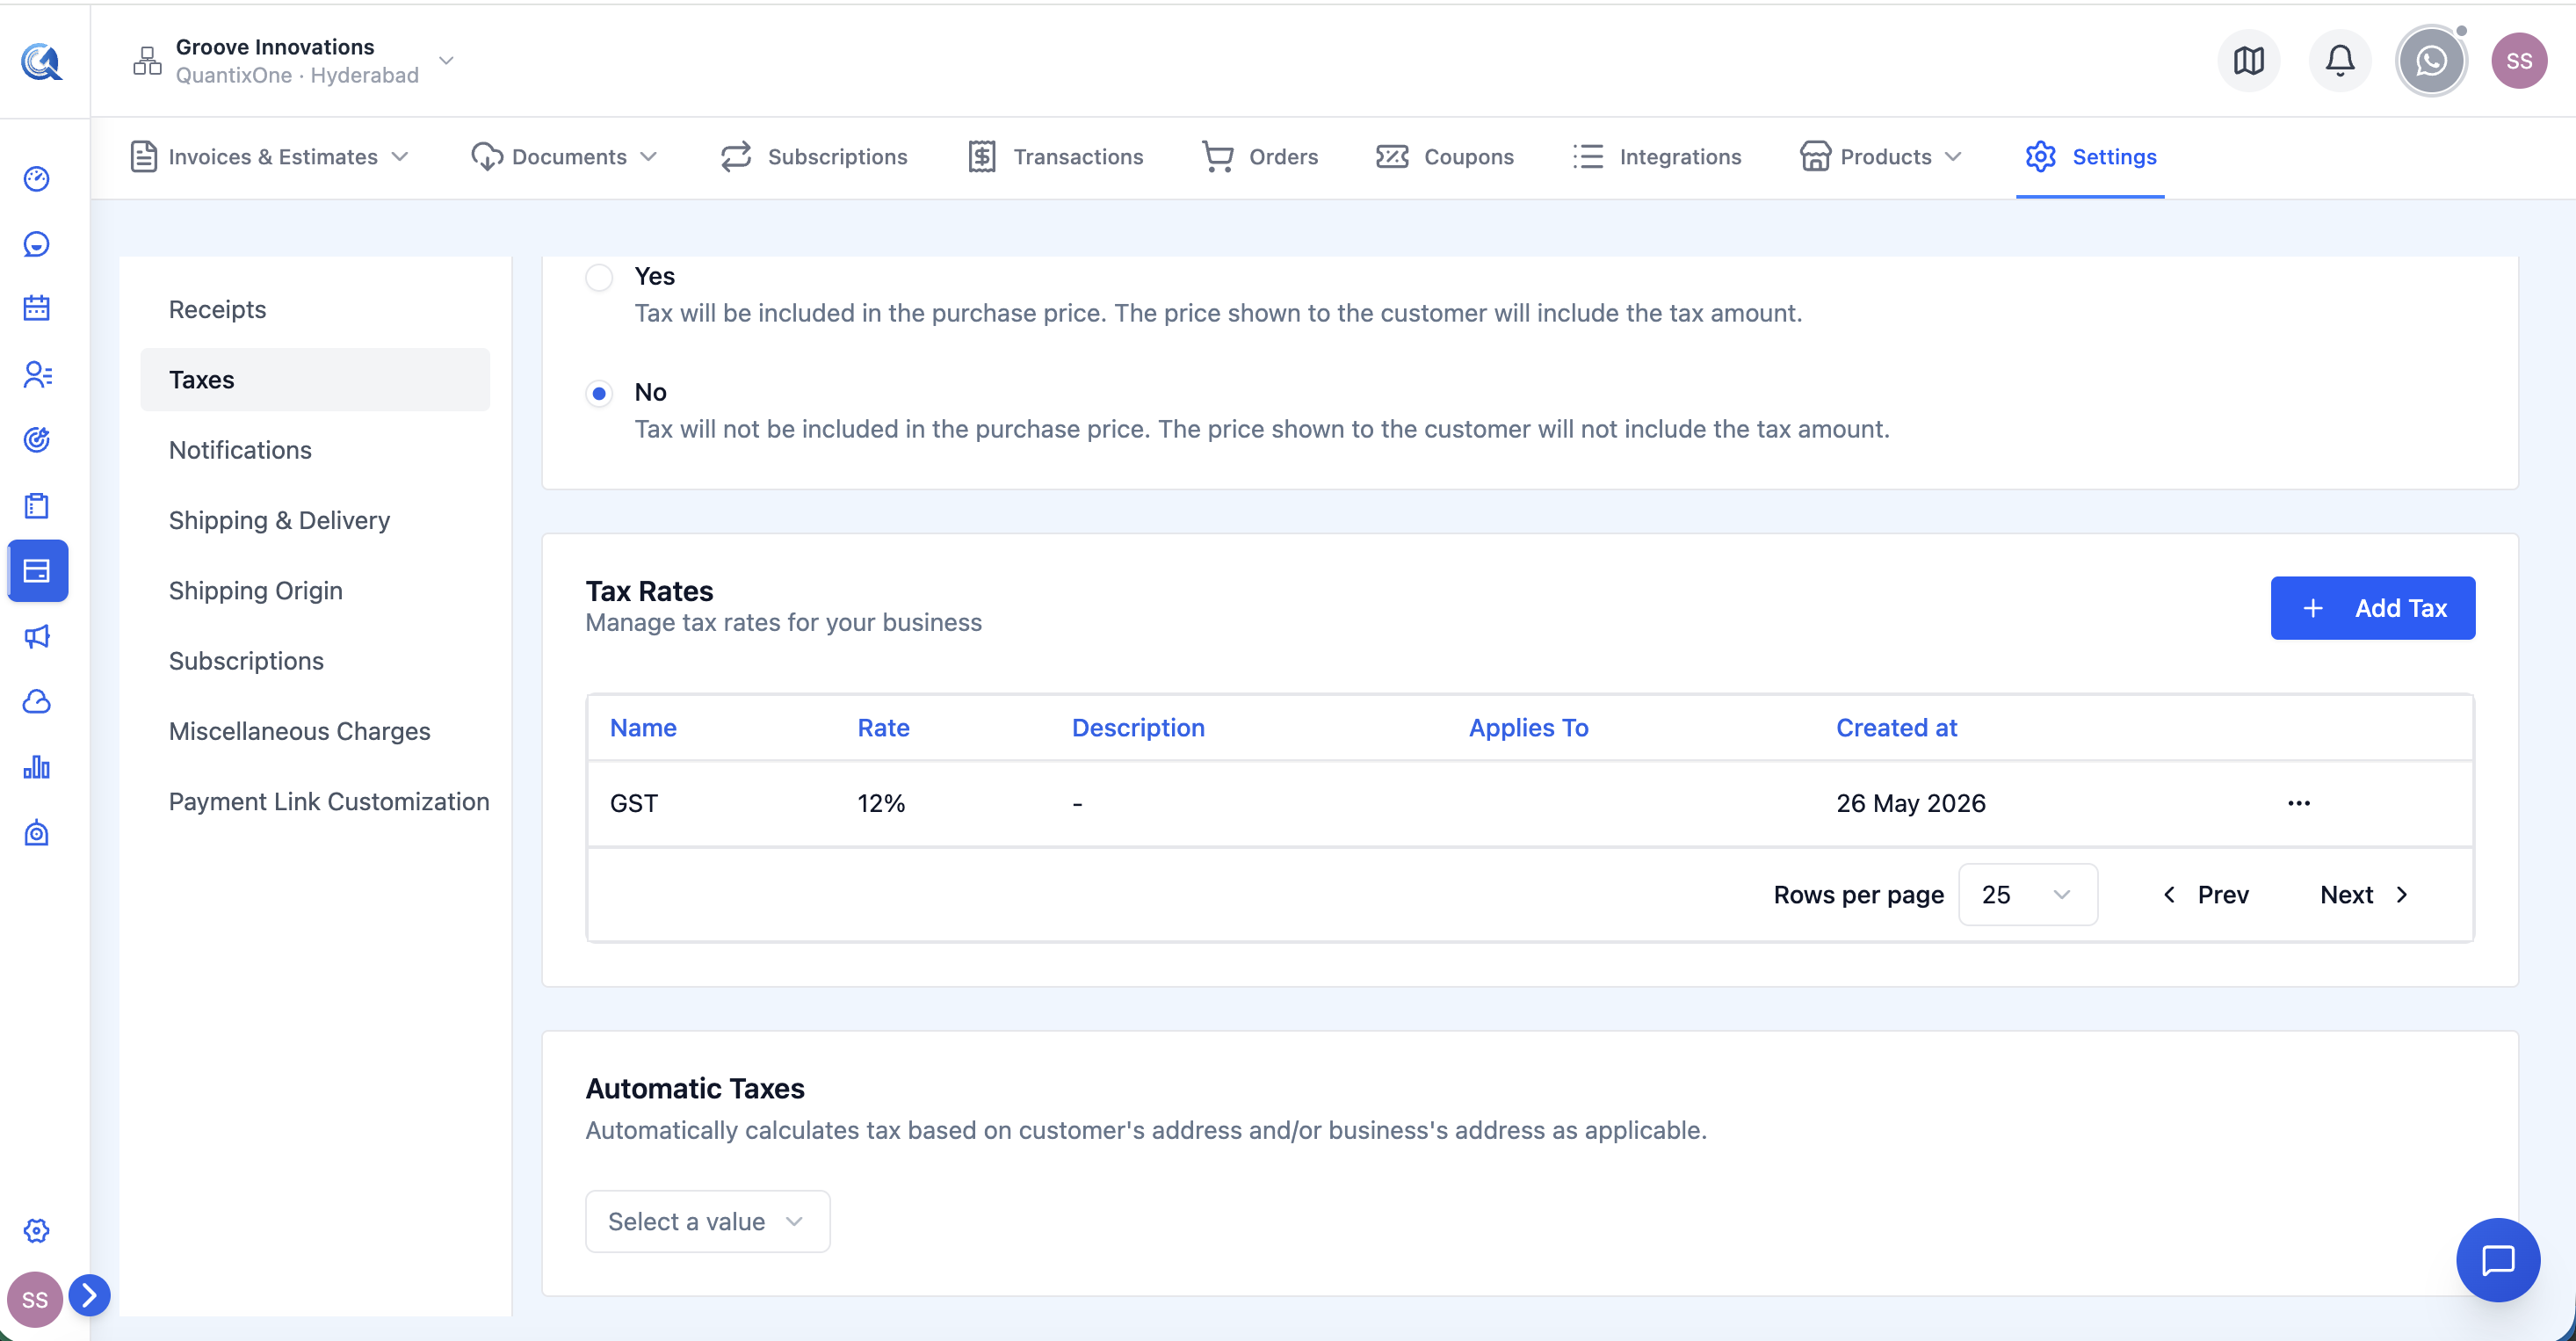 The Tax Rates table. Each row shows the rate name, percentage, optional description, the tax agency it is payable to, and when it was created.
| Column | What it shows |
|---|---|
| Name | The name of the tax rate (e.g. "GST", "VAT 20%", "Sales Tax") |
| Rate | The percentage rate (e.g. "10%") |
| Description | Optional internal notes about this rate |
| Tax Agency | The tax authority or jurisdiction this rate applies to |
| Created At | When this rate was added |
Adding a Tax Rate
Click + Add Tax Rate to open the tax rate dialog.
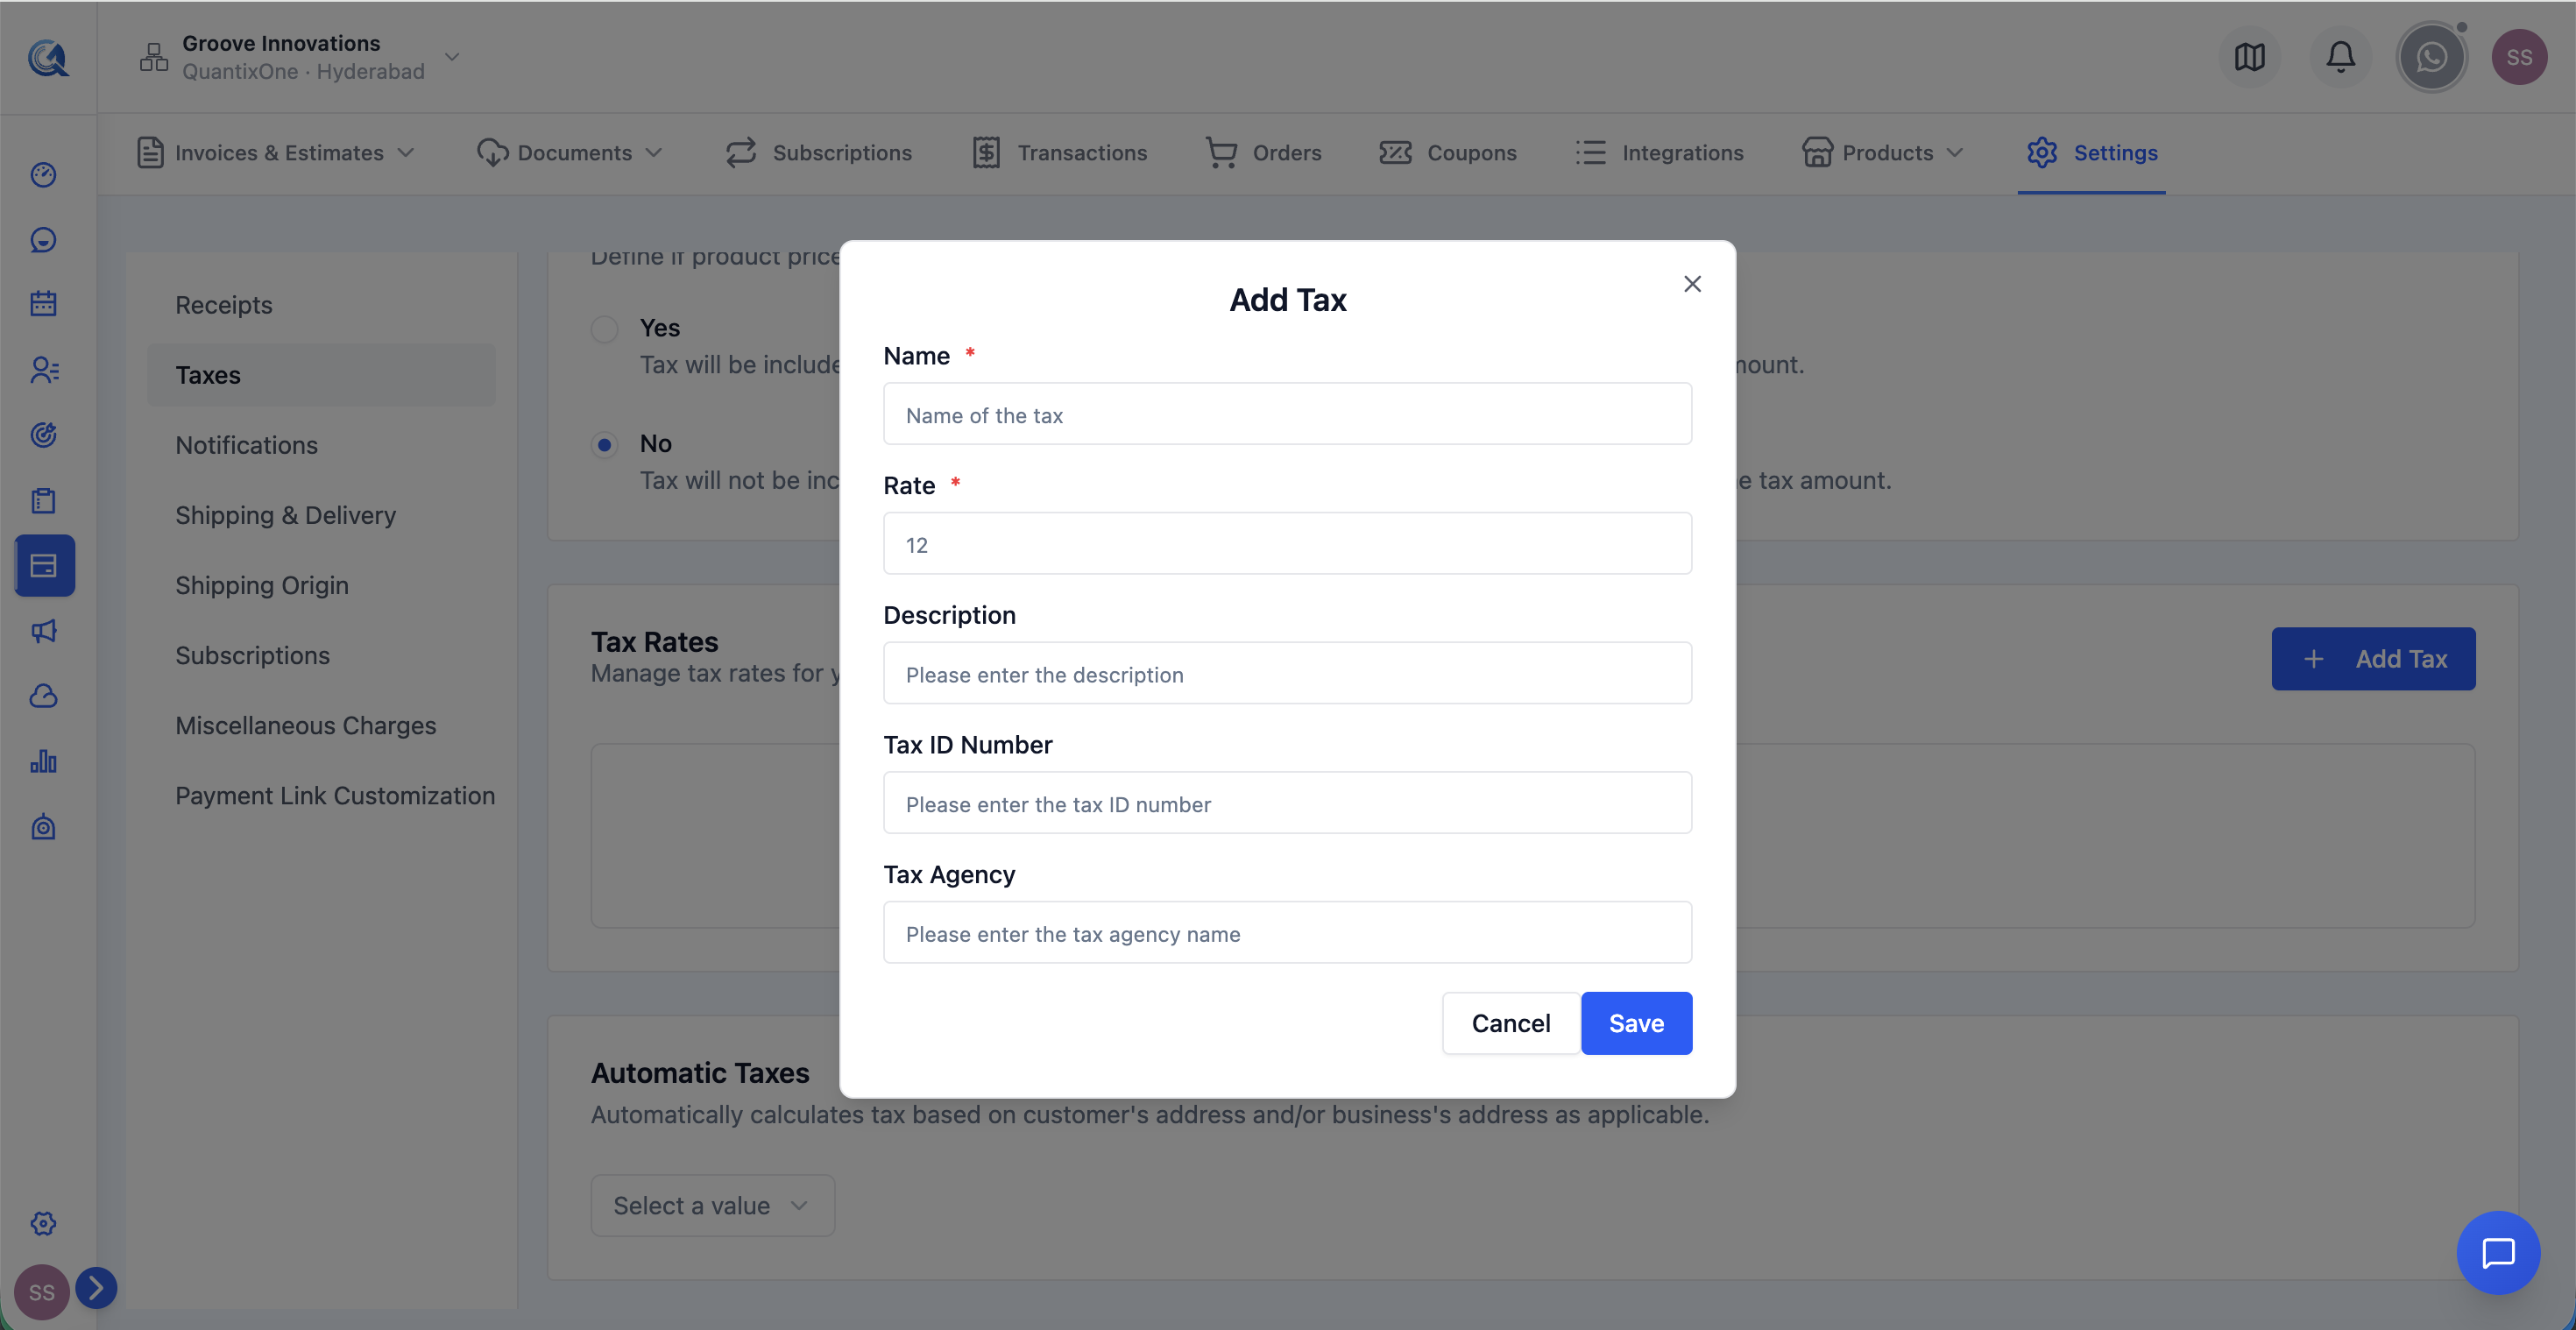 The Add Tax Rate dialog. Name and Rate are required. Description, Tax ID Number, and Tax Agency are optional but useful for compliance.
| Field | Description |
|---|---|
| Name (required) | A recognisable label for this rate. Be specific — e.g. "Australia GST 10%" rather than just "Tax". |
| Rate (required) | The percentage value as a number. Supports decimals — e.g. enter 10 for 10% or 7.5 for 7.5%. |
| Description | Optional internal notes (e.g. "Applies to all services sold to Australian customers"). |
| Tax ID Number | Your registered tax identification number for this rate (e.g. your GST registration number). Optional but useful for compliance documentation. |
| Tax Agency | The name of the tax authority this rate is payable to (e.g. "Australian Taxation Office", "HMRC"). Optional. |
Click Save to create the rate. It immediately becomes available as a selectable option on every product and invoice line item.
How Tax Rates Work on Invoices
- Once a rate is created here, it appears in the Tax Rate dropdown on each invoice line item.
- Tax is calculated per line item, not on the order as a whole.
- You can apply different rates to different line items on the same invoice — for example, applying GST to services and a different rate (or no tax) to physical goods.
- The total tax for all line items is shown as a separate "Tax" line above the invoice grand total.
- The tax rate associated with a line item is also stored on the product, so when you add a product from the catalogue, its configured tax rate pre-fills automatically.
Automatic Taxes
Below the tax rates table is an Automatic Taxes card with three options:
| Option | What it does |
|---|---|
| Enable automatic tax calculation | Quantixone automatically calculates and applies the correct tax rate based on the customer's location and the product type. Requires integration with a supported tax provider. |
| Manual tax entry only | Tax rates are only applied when you or your configured products specify them explicitly. Nothing is applied automatically. |
| Disable automatic taxes | No taxes are calculated or applied anywhere in the Payments module. |
Shipping & Delivery
The Shipping & Delivery section lets you define where you ship to and what rates you charge. It uses a zones-based model — you create geographic zones and add shipping rates within each zone.
Shipping Profiles
A Shipping Profile groups products under a set of shipping rules. The General Profile is the default and applies to all products unless a product is moved to a custom profile.
Shipping Zones
A shipping zone is a geographic area (one or more countries and/or states/regions) with its own set of shipping rates. Contacts in that zone see only the rates defined for it.
To create a zone:
- Click Add Zone (or Manage Zones from the General Profile card).
- Enter a Zone Name — e.g. "Domestic (Australia)", "Europe", "Rest of World".
- Use the country search field to find countries.
- Click a country to expand it and see its states/provinces. Check individual states or check the country header to select all states at once.
- The state counter shows how many states are selected (e.g. "5 / 8 states").
- Click Save Zone.
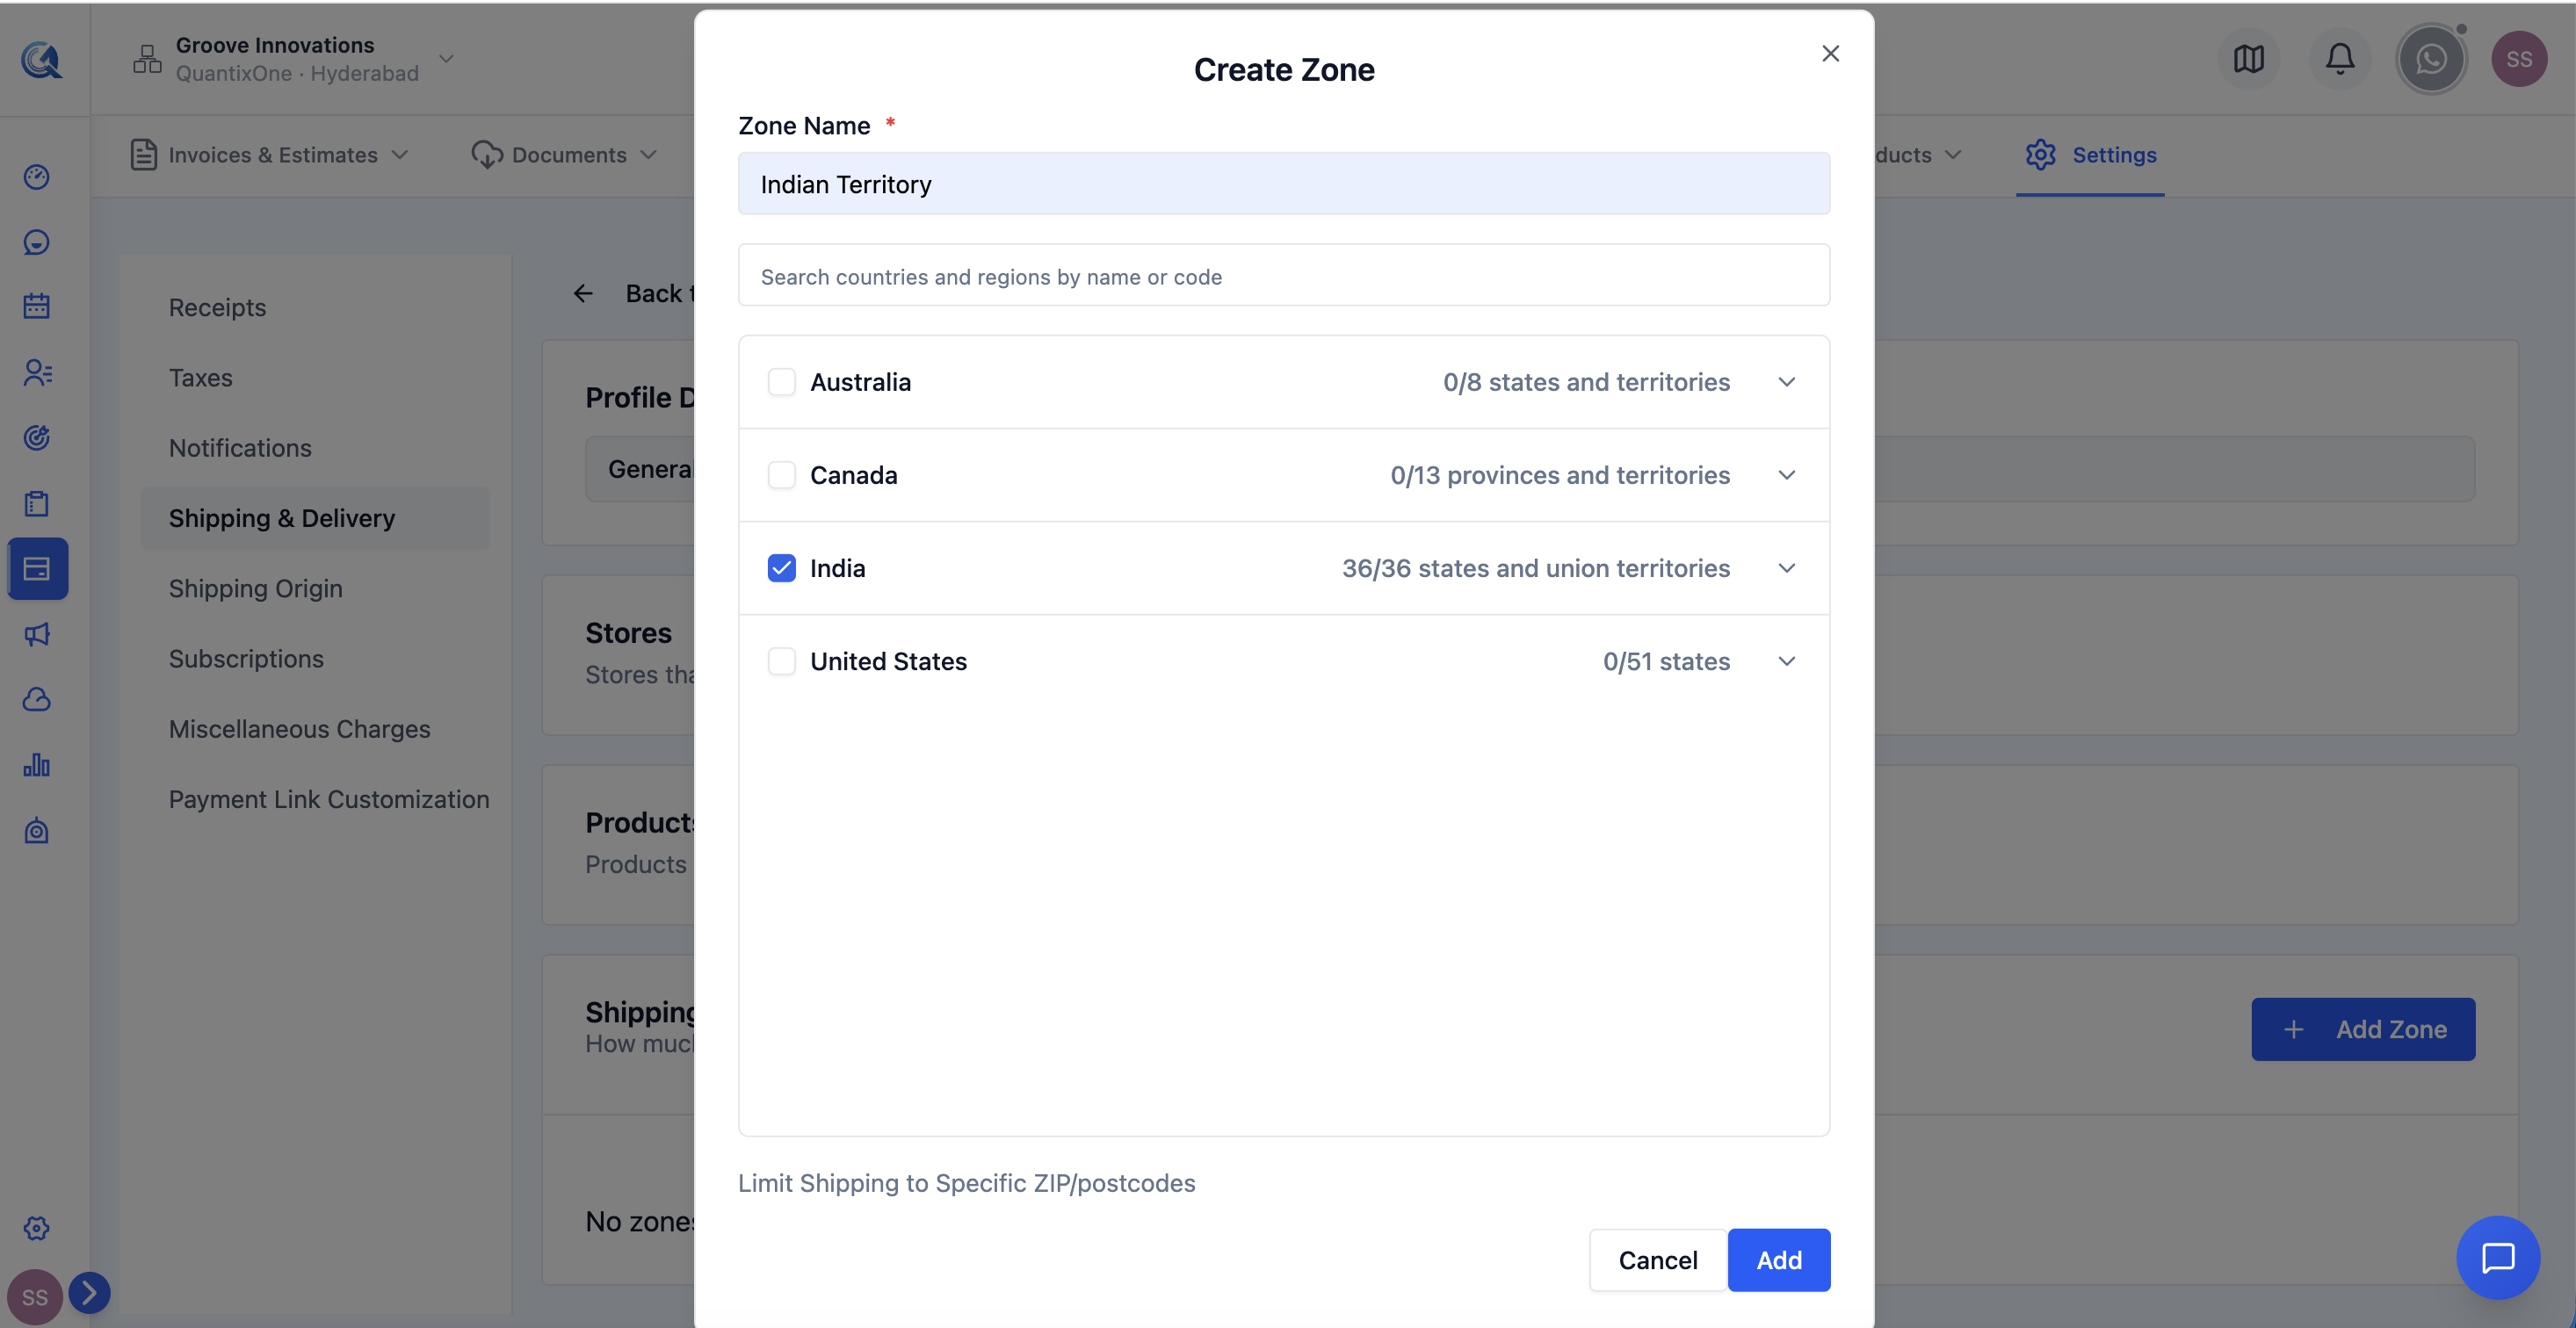 The Add Zone form. Enter a zone name, search for countries, expand each country to select individual states, then save. Contacts in these regions will see the rates you define for this zone.
To edit or delete a zone: use the action menu (⋯) on the zone card — Edit Zone or Delete Zone.
Shipping Rates (within a Zone)
Each zone can have multiple shipping rates — for example, a Standard rate and an Express rate.
To add a shipping rate to a zone:
- Click + Add Rate inside the zone card.
- Fill in the rate fields:
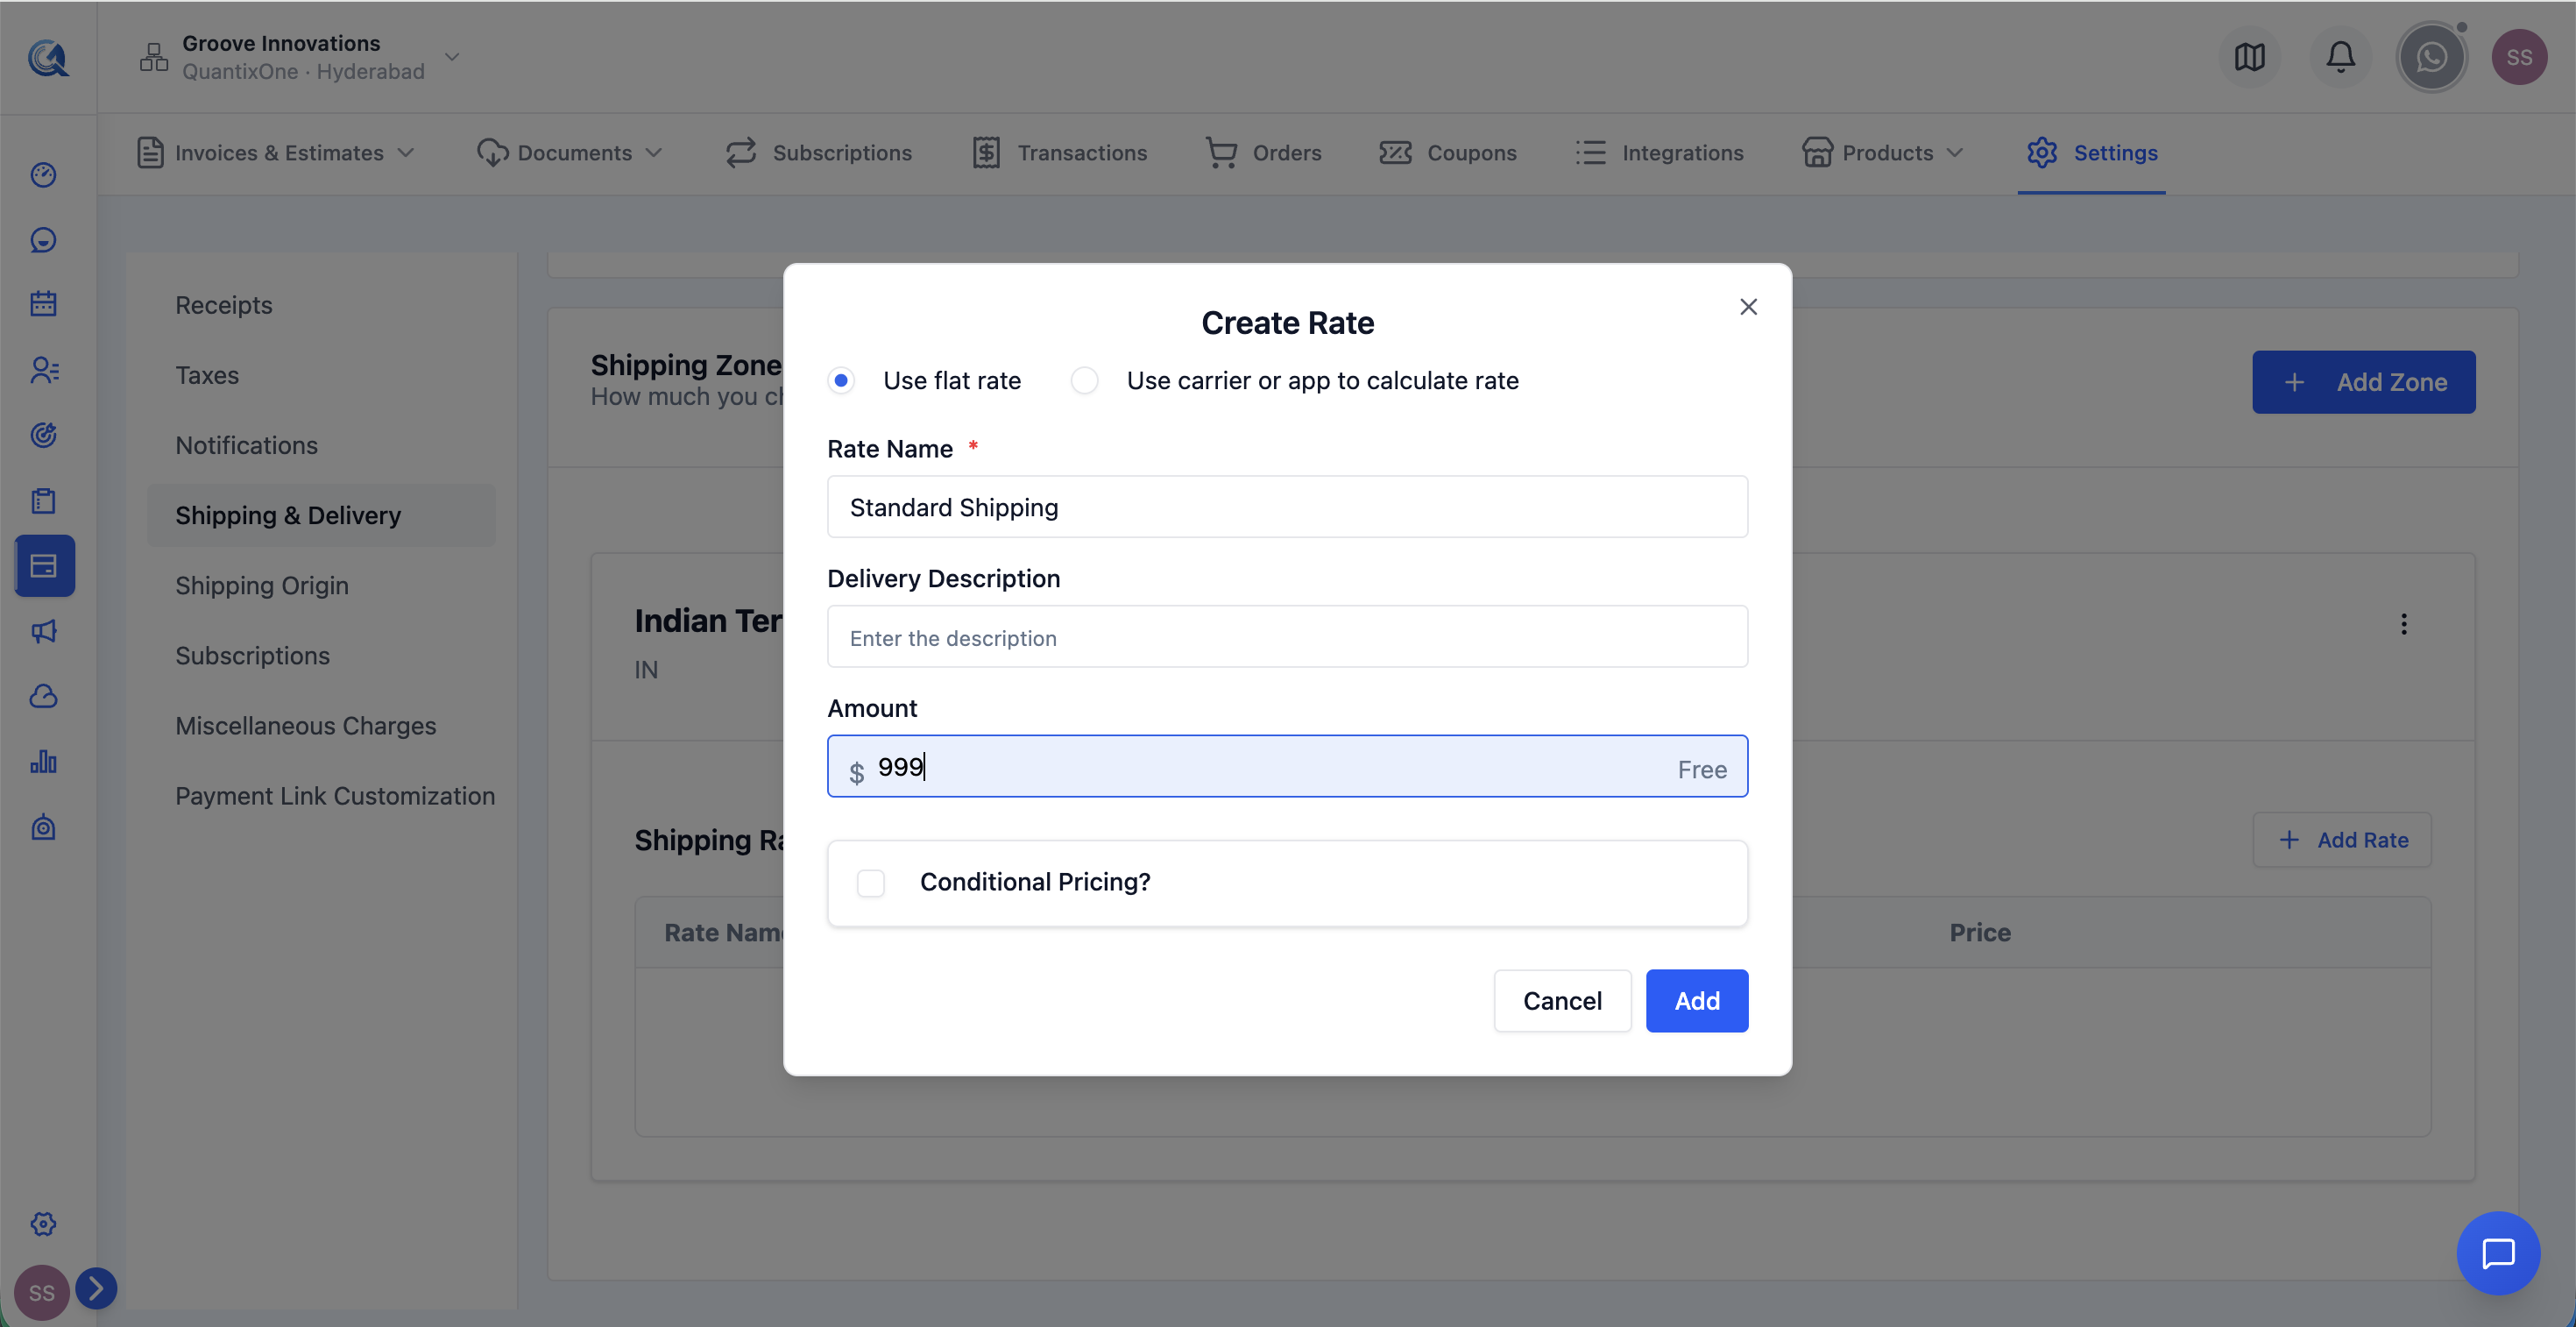 The Add Rate dialog. Choose whether the rate applies based on Order Value or Weight, then set the min/max range and the price. Enter 0 for free shipping.
| Field | Description |
|---|---|
| Rate Name | What the customer sees at checkout — e.g. "Standard Shipping", "Express (2–3 days)", "Free Shipping" |
| Condition Type | Choose Order Value (applies based on the cart total) or Weight (applies based on total item weight) |
| Minimum Value | The minimum order value or weight to qualify for this rate |
| Maximum Value | The maximum order value or weight for this rate to apply. Leave blank for no upper limit. |
| Shipping Price | The amount charged for this rate. Enter 0 to make it free. |
- Click Save Rate.
Example — free shipping above a threshold:
- Rate Name: "Free Shipping"
- Condition Type: Order Value
- Minimum Value: 50
- Maximum Value: (blank)
- Shipping Price: 0
This gives free shipping on all orders over $50.
To edit or delete a rate: use the action menu (⋯) on the rate row — Edit or Delete.
Shipping Origin
Set the Shipping Origin address — the physical address your shipments are sent from. This is used in shipping rate calculations and may appear on packing slips or shipping labels.
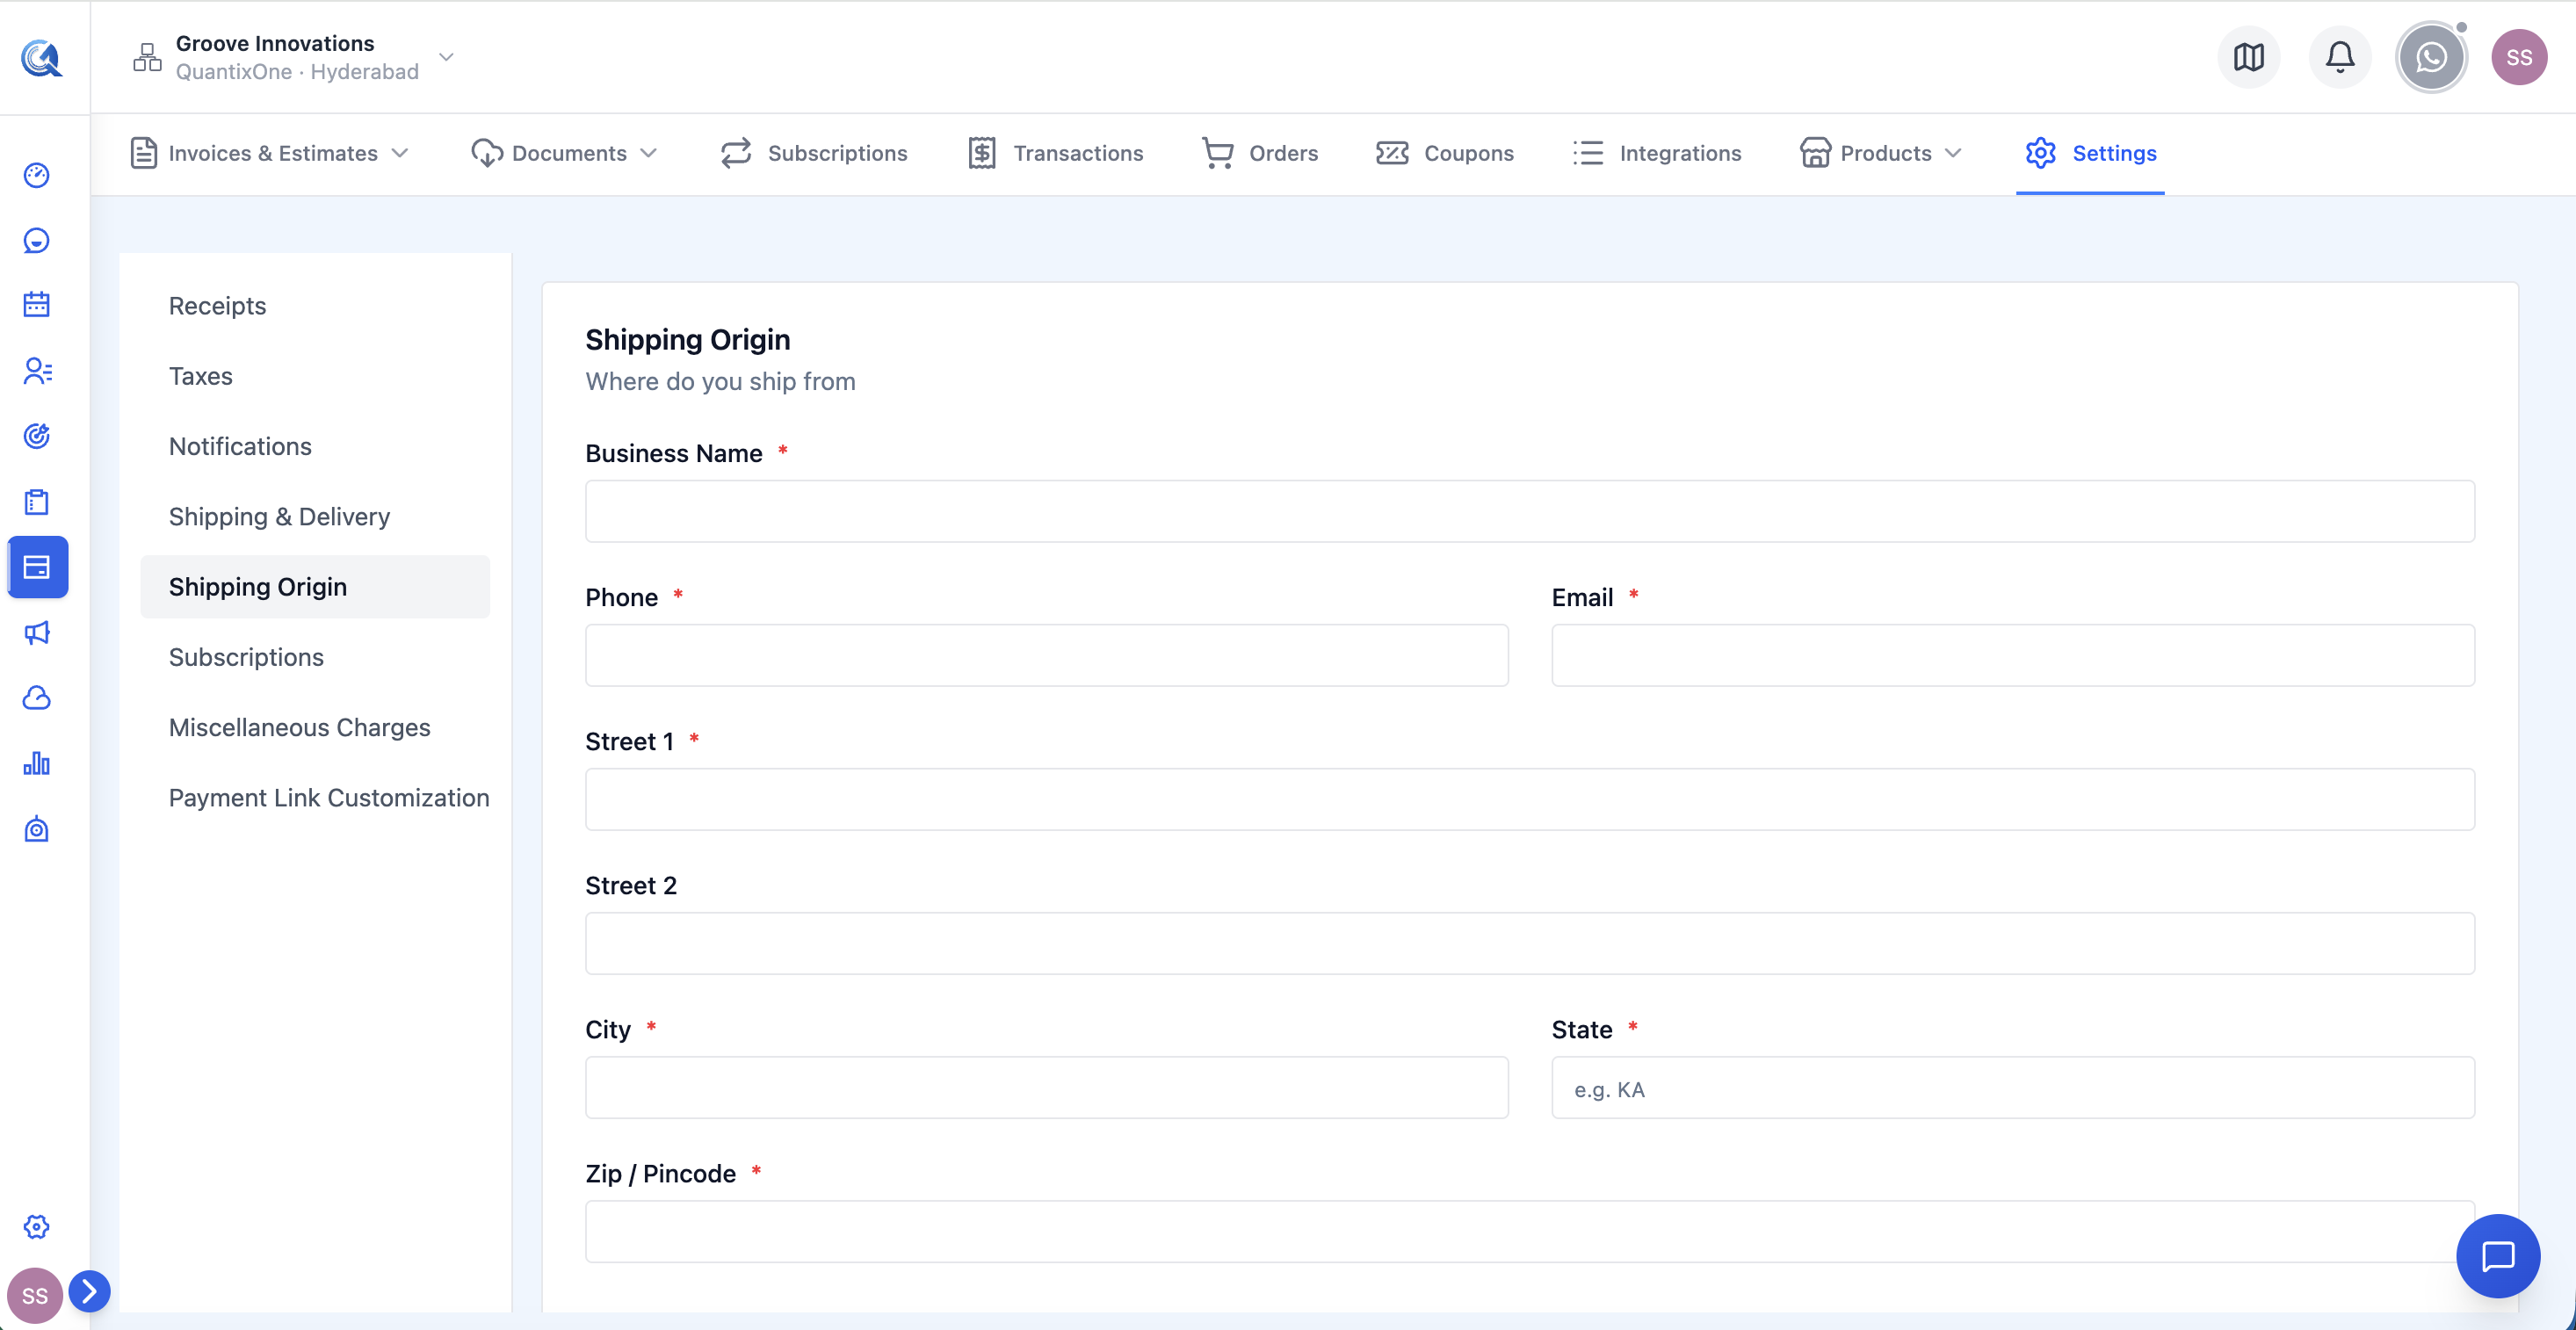 The Shipping Origin card. Enter your dispatch address — street, city, state, postcode, and country.
Click the origin card to enter your street address, city, state, postcode, and country.
Subscription Defaults
The Subscription Defaults section sets the values that pre-fill when creating a new subscription plan, so you don't have to re-enter common settings each time.
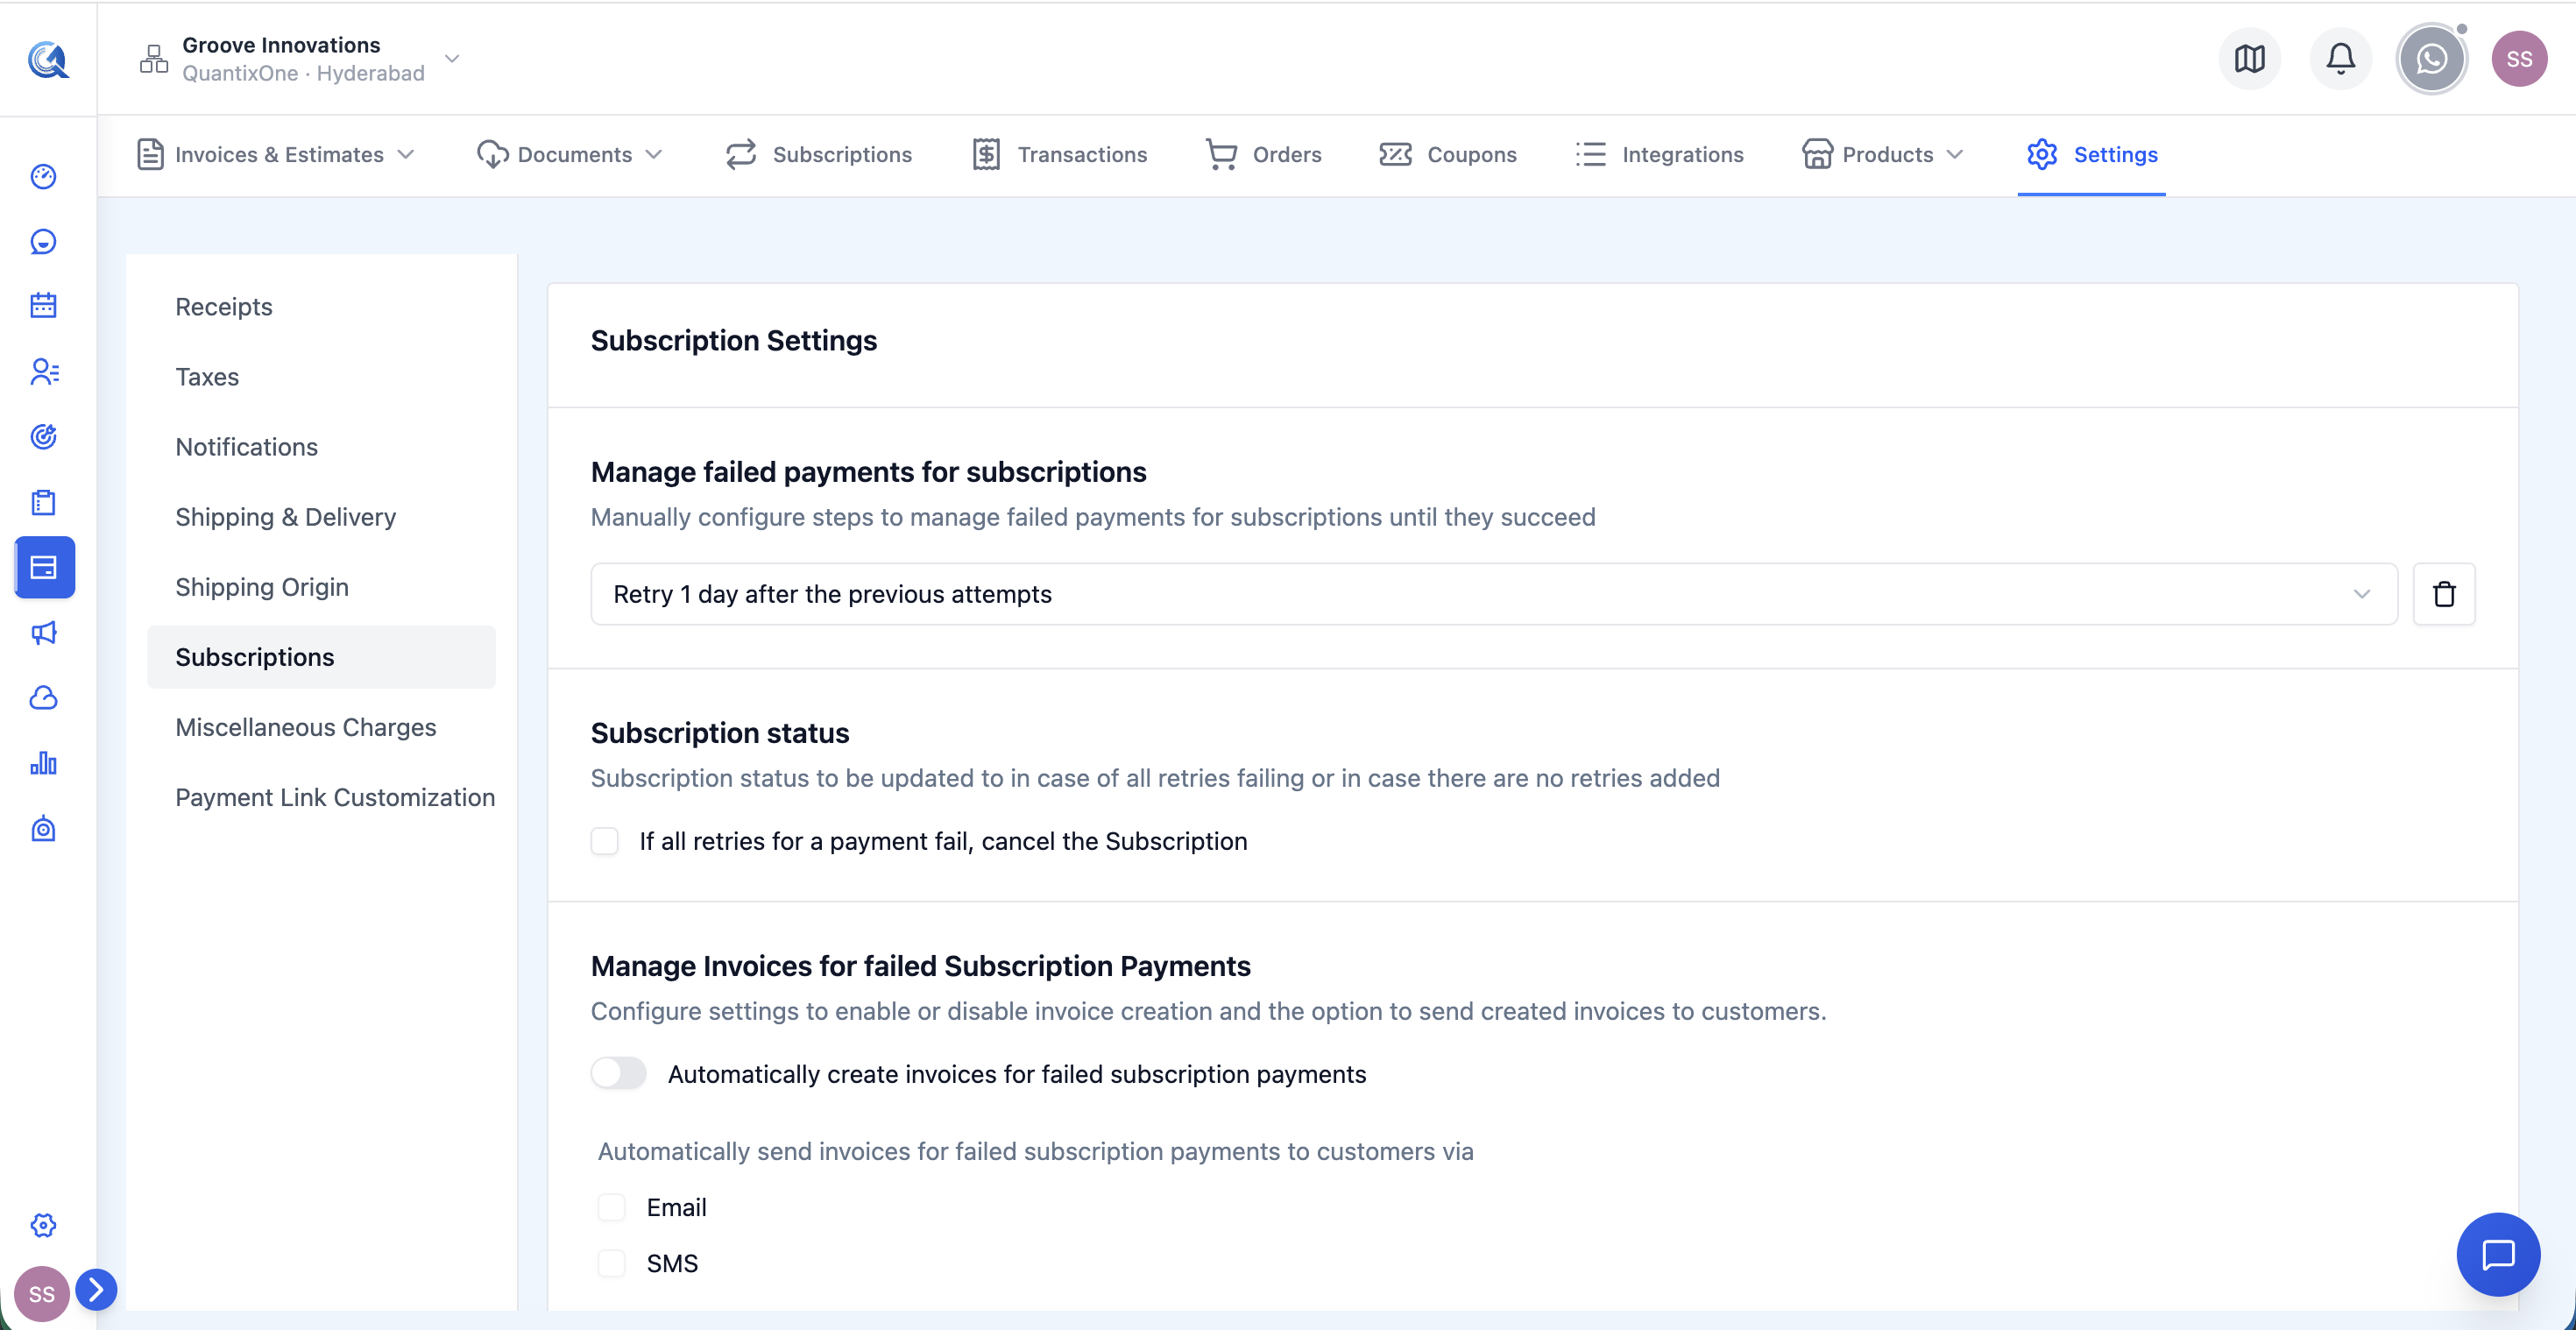 Subscription Defaults. Set the billing interval and trial period that pre-fill when you create a new recurring product — change per-product as needed.
| Field | Description |
|---|---|
| Default Billing Interval | The interval pre-selected when you create a new recurring product or subscription — Monthly, Quarterly, or Annual. You can always change it on the individual product. |
| Default Trial Period | The number of free trial days applied to new subscriptions by default. Set to 0 if you don't offer trials. The trial period means billing starts N days after the subscription begins. |
Miscellaneous Charges
Miscellaneous Charges are reusable add-on fee line items that can be attached to invoices. Instead of typing the same charges from scratch each time, you define them here once and they become selectable from the invoice line item picker.
To add a miscellaneous charge:
- Click + Add Charge.
- Fill in the fields:
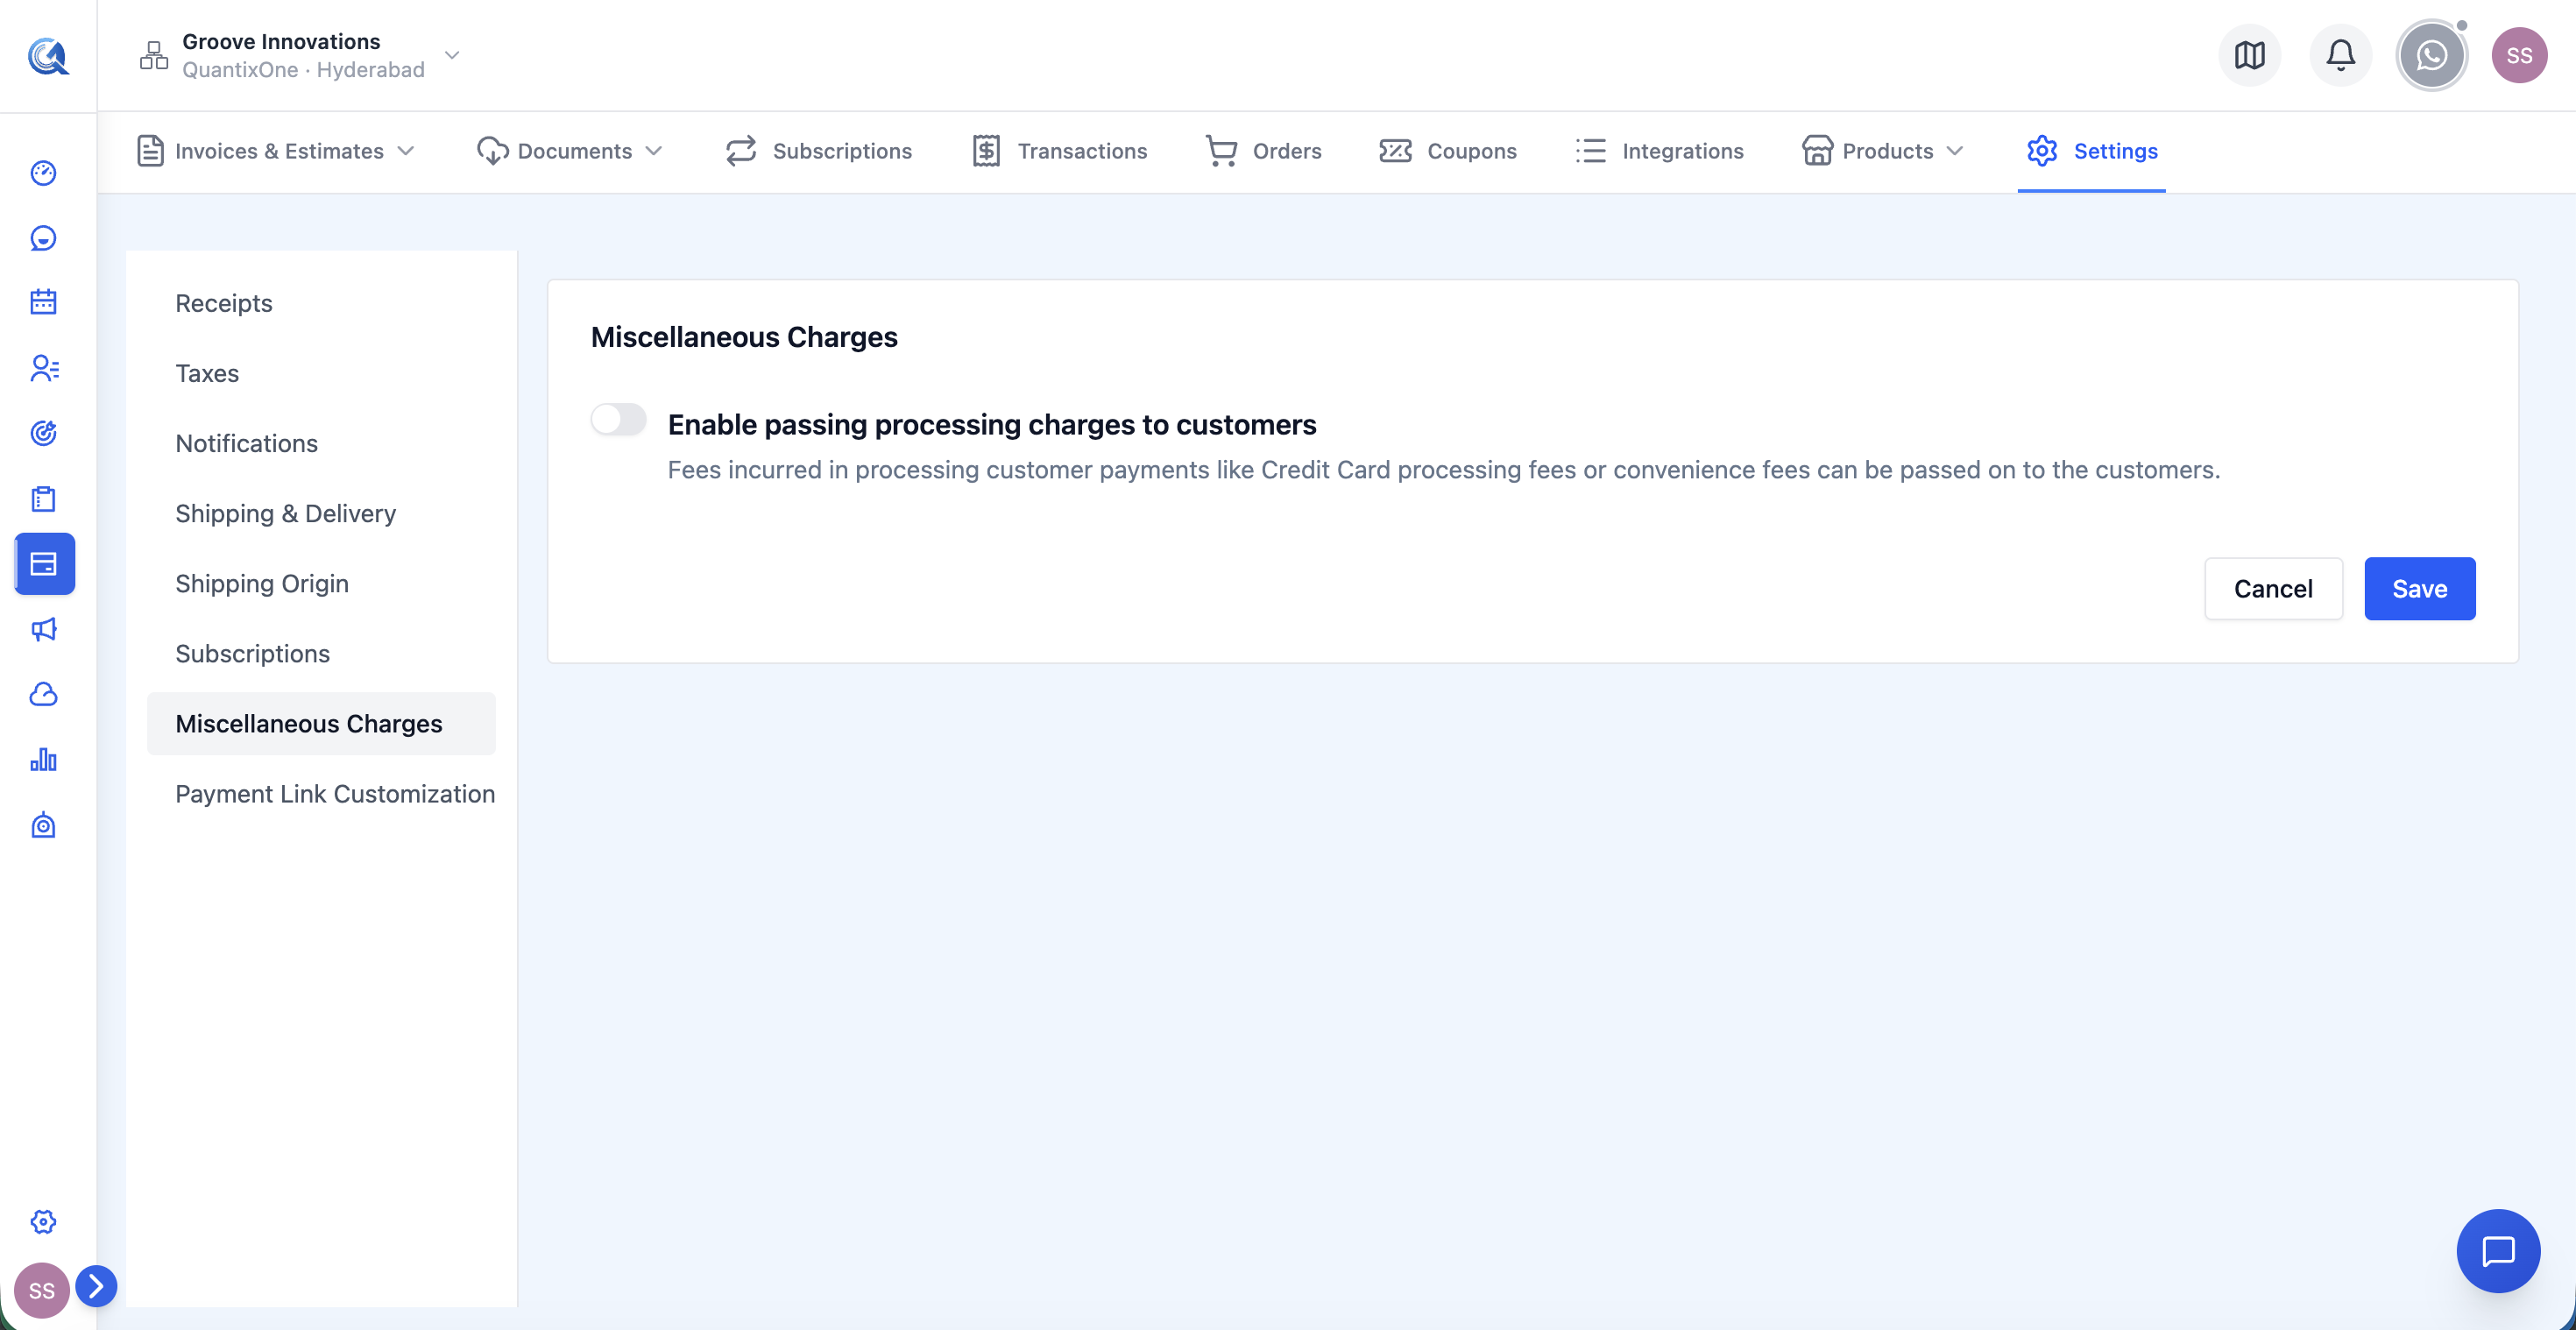 The Add Charge dialog. Set a name, choose Fixed or Percentage, then enter the amount. Once saved, this charge appears in the line item picker on every invoice.
| Field | Description |
|---|---|
| Charge Name | The label that appears on the invoice line item — e.g. "Setup Fee", "Rush Delivery", "Processing Fee", "Equipment Rental" |
| Amount Type | Fixed — a specific dollar amount. Percentage — a percentage of the invoice subtotal. |
| Amount | The value of the charge (number only — the currency or % symbol is applied based on the type you select) |
- Click Save.
Once saved, miscellaneous charges appear in the line item picker when creating or editing an invoice — alongside your products. Add them to any invoice as needed. They are not automatically applied; you explicitly add them each time.
Video Walkthrough
Watch the complete walkthrough below.